How to use VPN Unlimited for Teams
VPN Unlimited for Teams allows you to secure your business information, traffic, and clients’ data by covering all your team with VPN Unlimited protection. It’s easy and convenient for you to manage their subscriptions, and as simple as possible for them to get started with our service. Learn more about this feature here.
How to invite and manage team members? How to ensure security of your team with VPN Unlimited? Find all answers in this step-by-step manual that’ll guide you through possibilities of your team account.
How to get VPN Unlimited Team account
- Log in to your User Office at my.keepsolid.com.
- Navigate to the All Products section where you'll see all available KeepSolid products.
- Locate VPN Unlimited for Teams in the product list.
- Click the Get Now button next to VPN Unlimited for Teams.

5. You'll be redirected to the VPN Unlimited Teams tab, where you can:
- Select the Teams tab if not already selected
- Choose your preferred billing period
- Select from the available team sizes
6. Click Select under your chosen plan.
7. Click Continue to payment button at the bottom of the page.
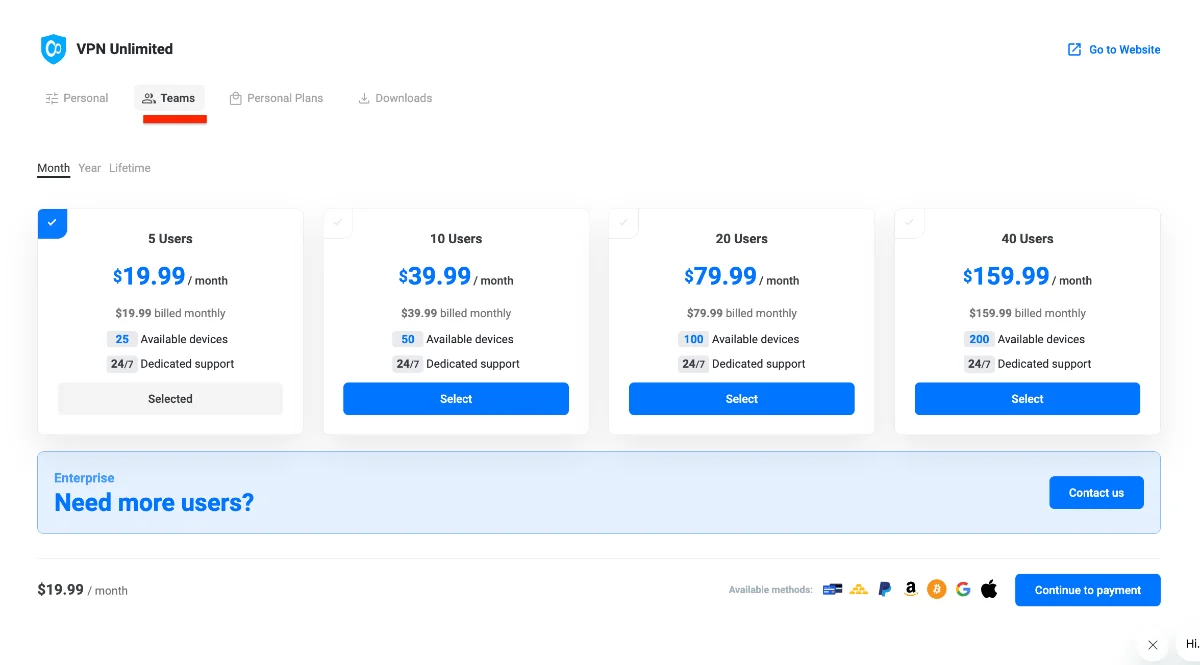
For larger teams: If you need more than 40 users, contact the support team for custom enterprise solutions by clicking Contact us in the Enterprise section.

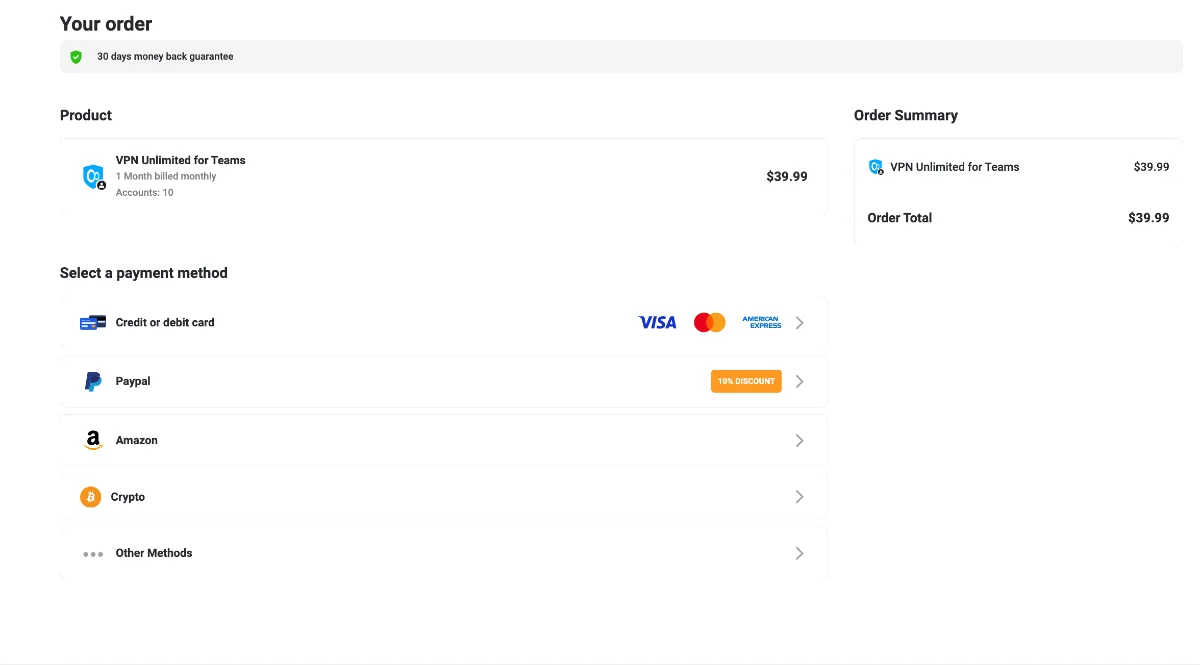
8. On the checkout page, you'll see:
- Product details: VPN Unlimited for Teams with your selected user count
- Order Summary with the total amount
- Payment method selection: Credit or debit card/PayPal/Amazon Pay/Crypto payments/Other available methods
9. Choose your preferred payment method and complete the purchase.
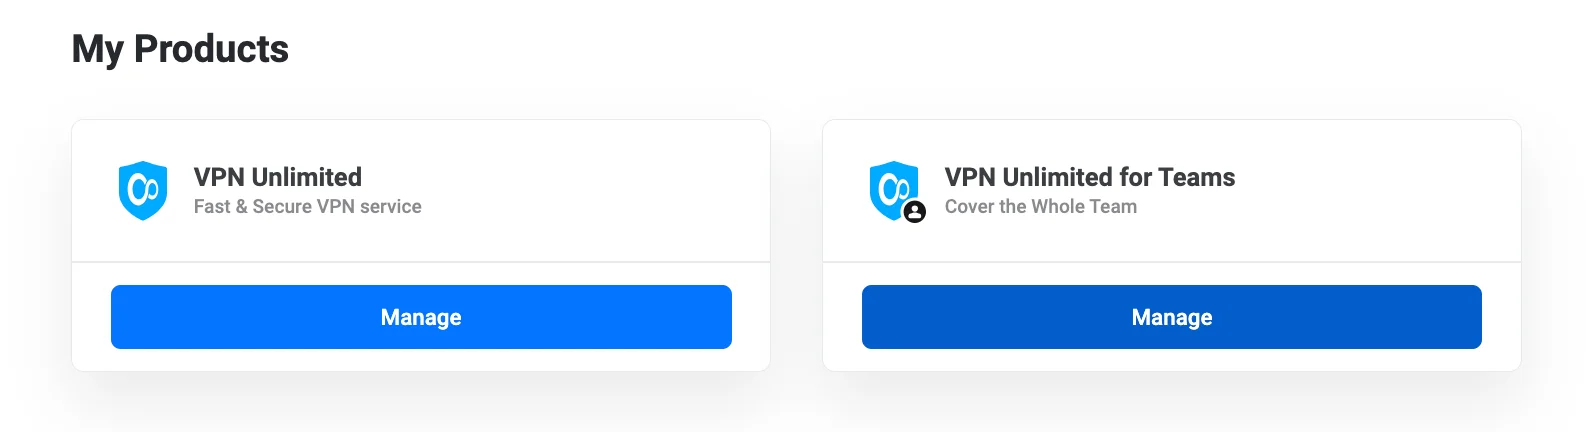
After a successful purchase, you'll find the new VPN Unlimited Team section in your My Products area, where you can Manage your team subscription.
Note: One VPN Unlimited account can be an Admin of one team only. Though the number of teams you can get invited as a member is unlimited. No matter how many teams you belong to, you can view them all on the VPN Unlimited Team screen.
How to change your VPN team name
As the team Admin, you can edit the default name assigned to your team. To rename your team:
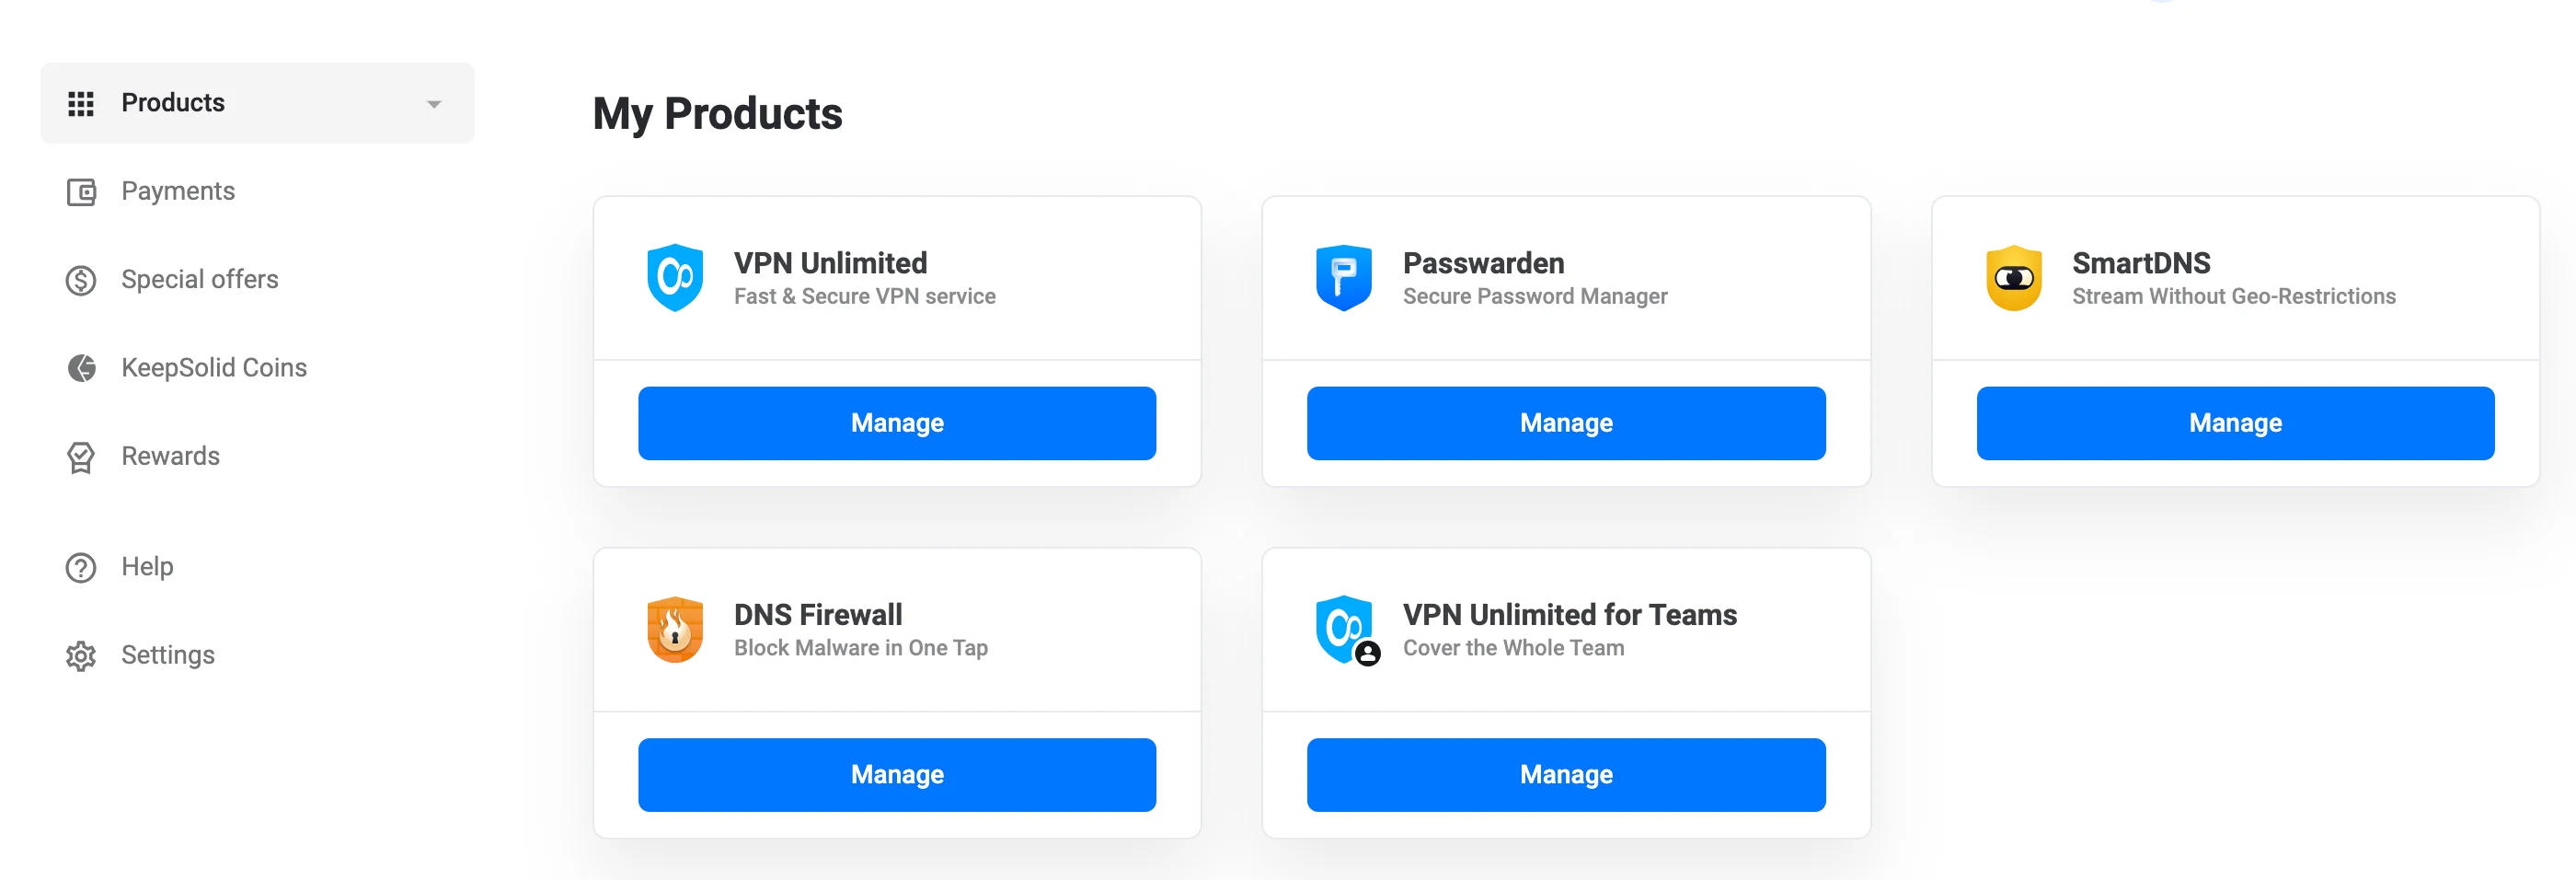
1. Navigate to your My Products section and locate your VPN Unlimited for Teams subscription.
2. Click the Rename team button
![]()
3. In the Rename team popup window that appears:
- Enter your preferred team name in the Team name field
- Click Confirm Changes to save the new name
- Or click Cancel if you want to keep the current name
The team name will be updated immediately and will be visible to all team members.


How to manage your team
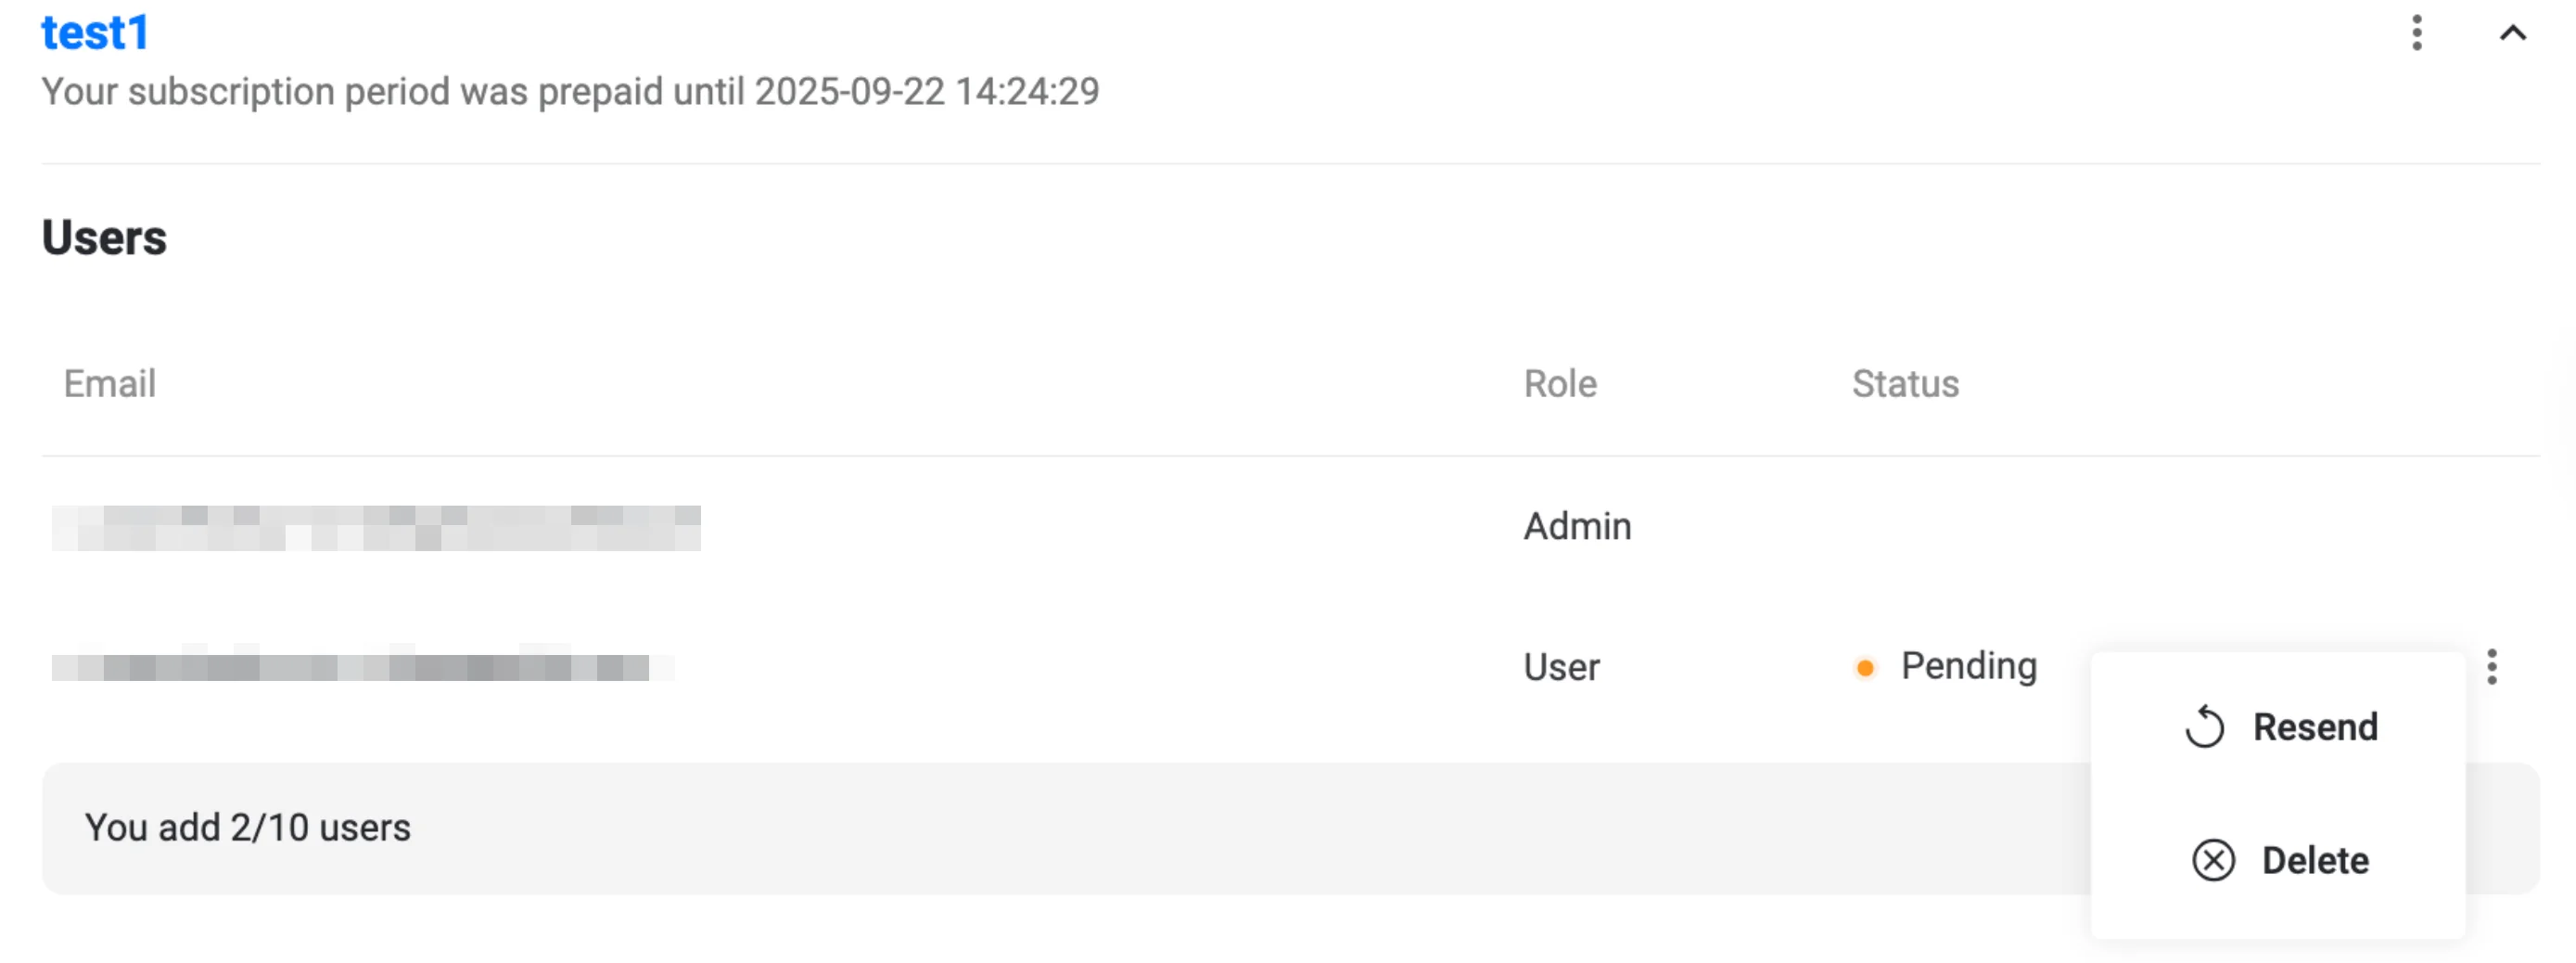
Invite users to your VPN Unlimited team
-
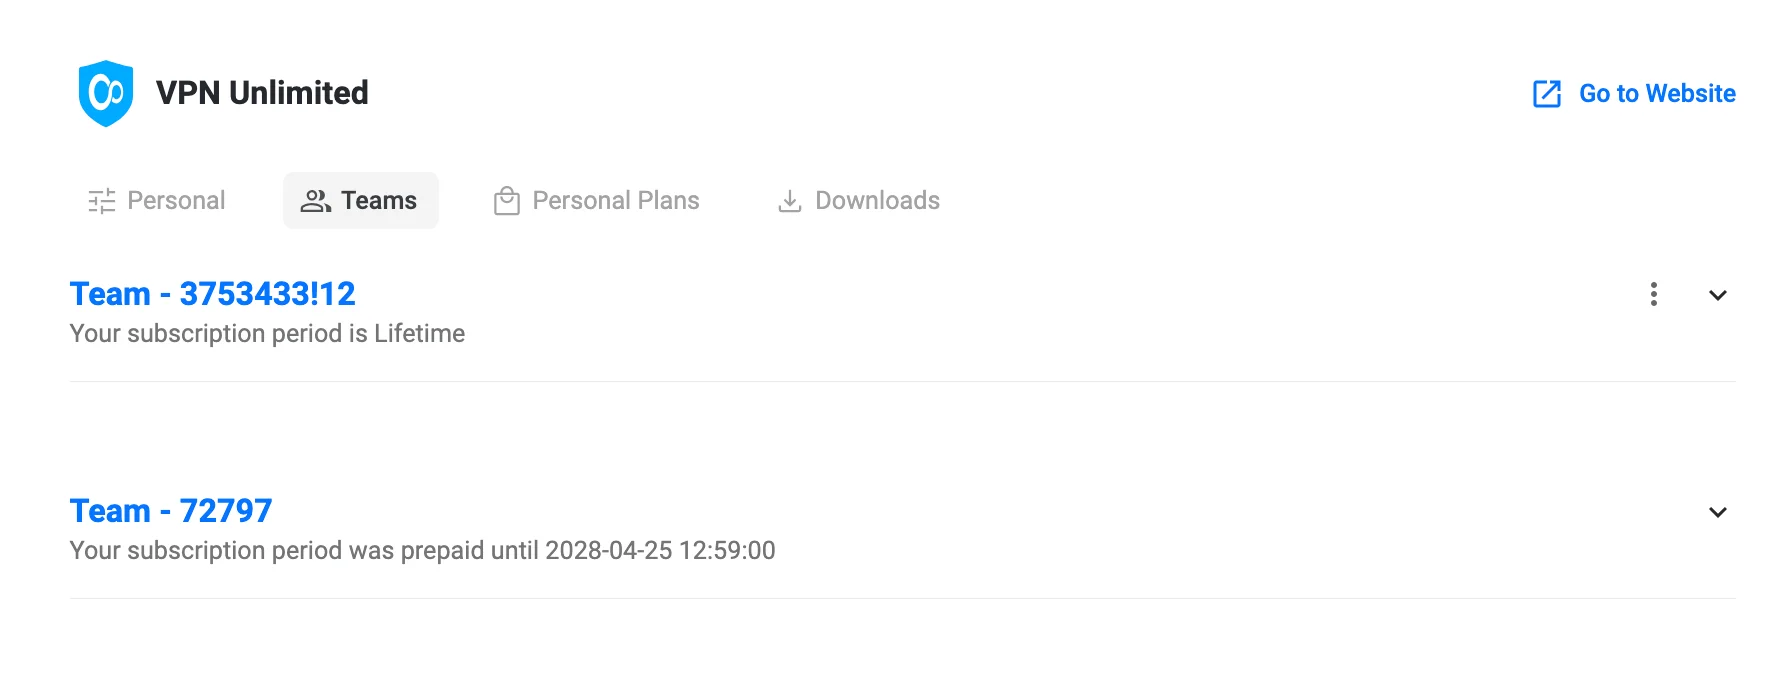
In your User Office go to All Products → VPN Unlimited → Teams, then expand your team by clicking the down arrow.
-
Click + Add user, enter the member’s email in the Invite user popup, and click Send Invite.
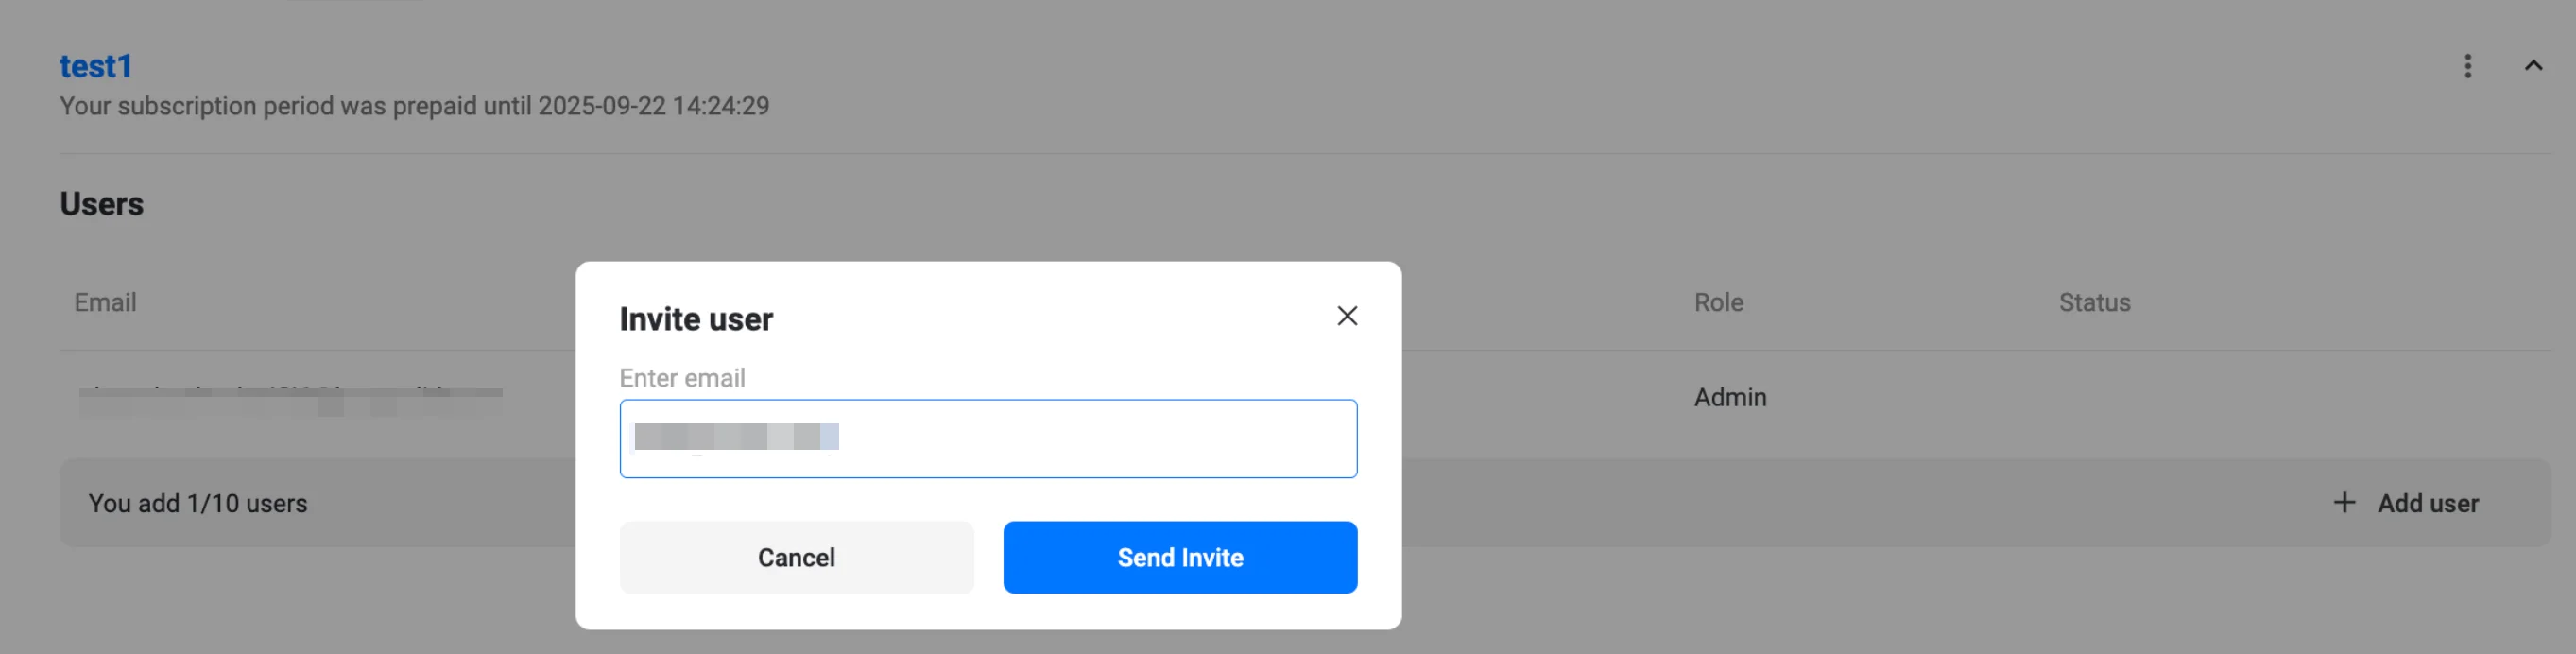
- The new user appears in the list with a Pending status (orange dot).
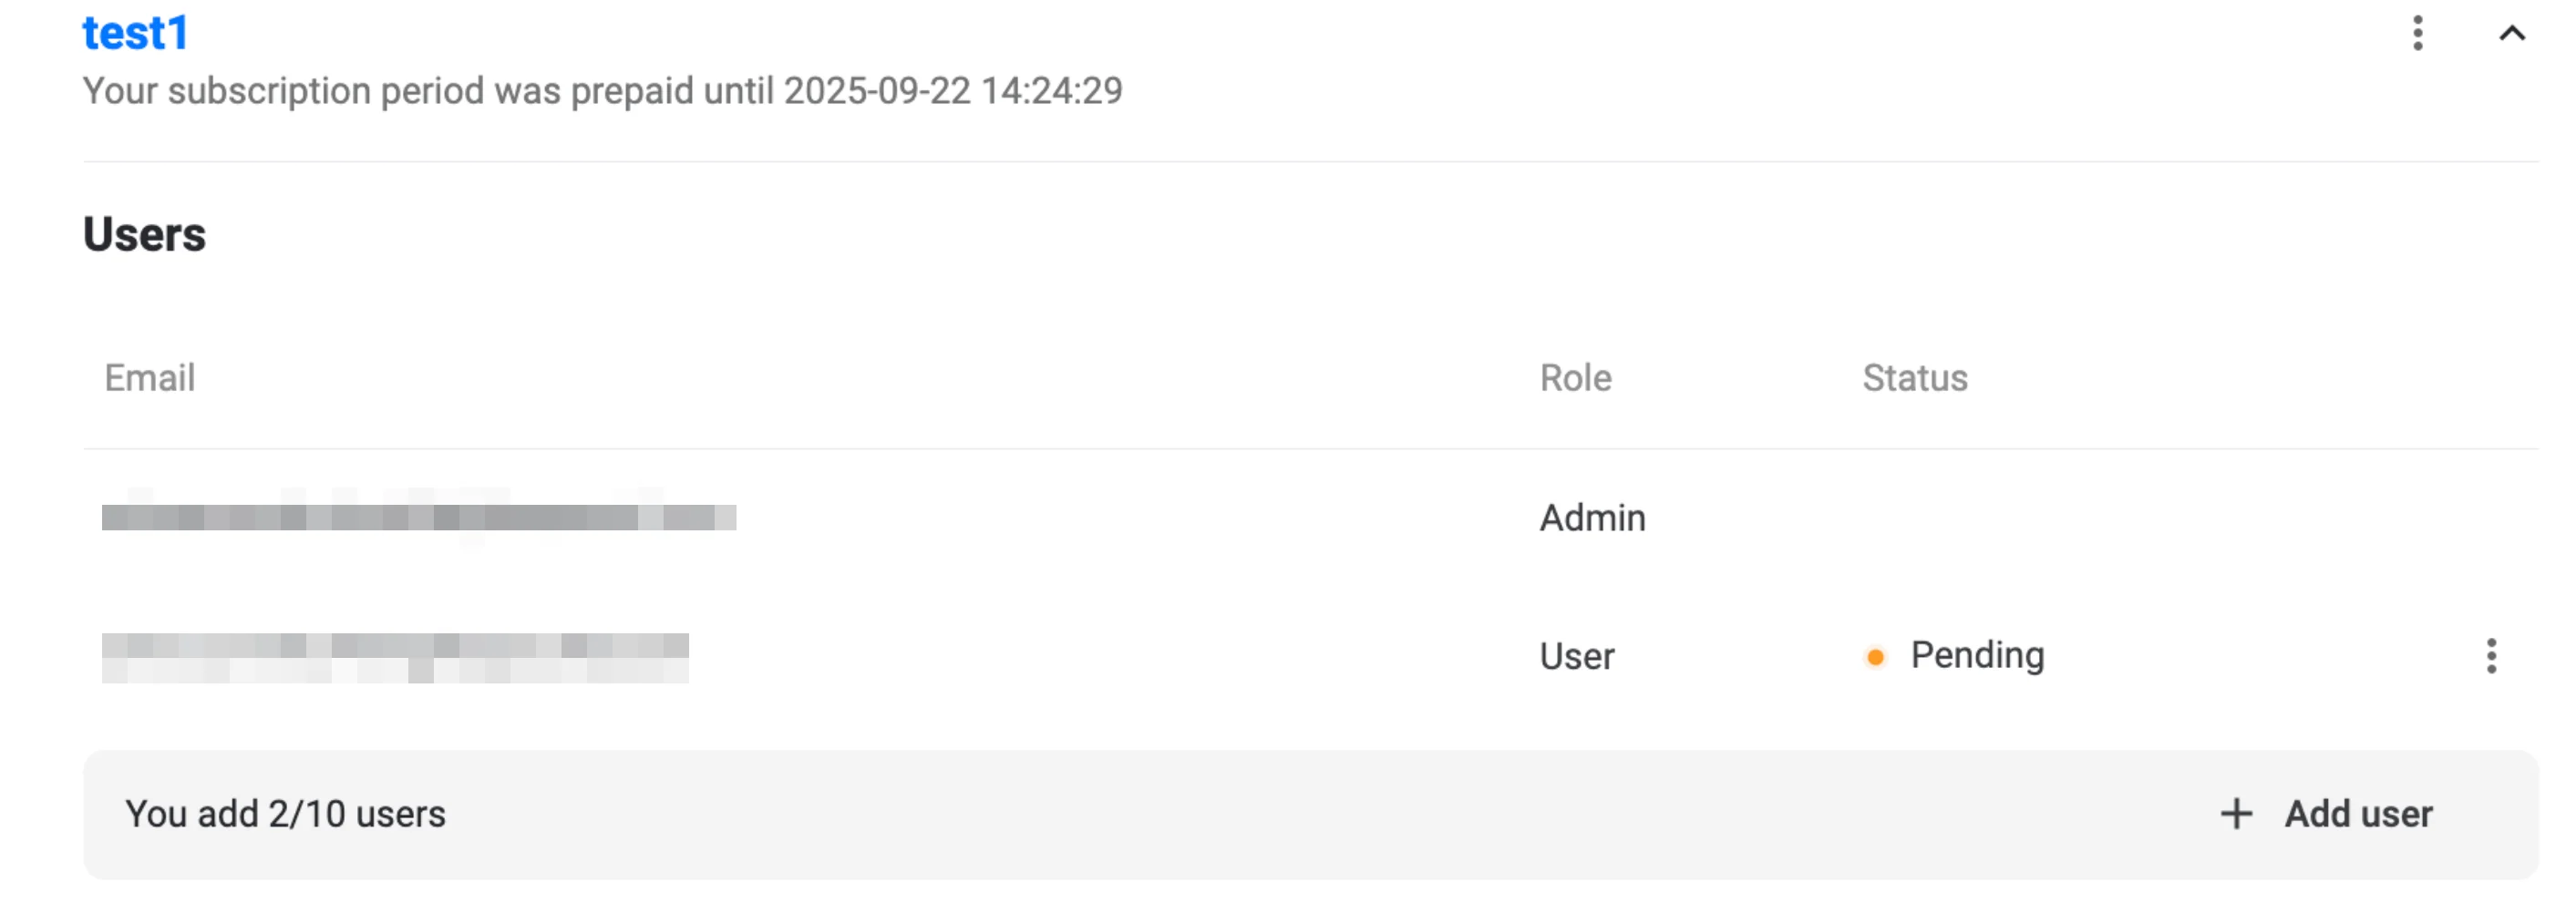
An informational email is sent to the invited address - no actions are required within the email itself.
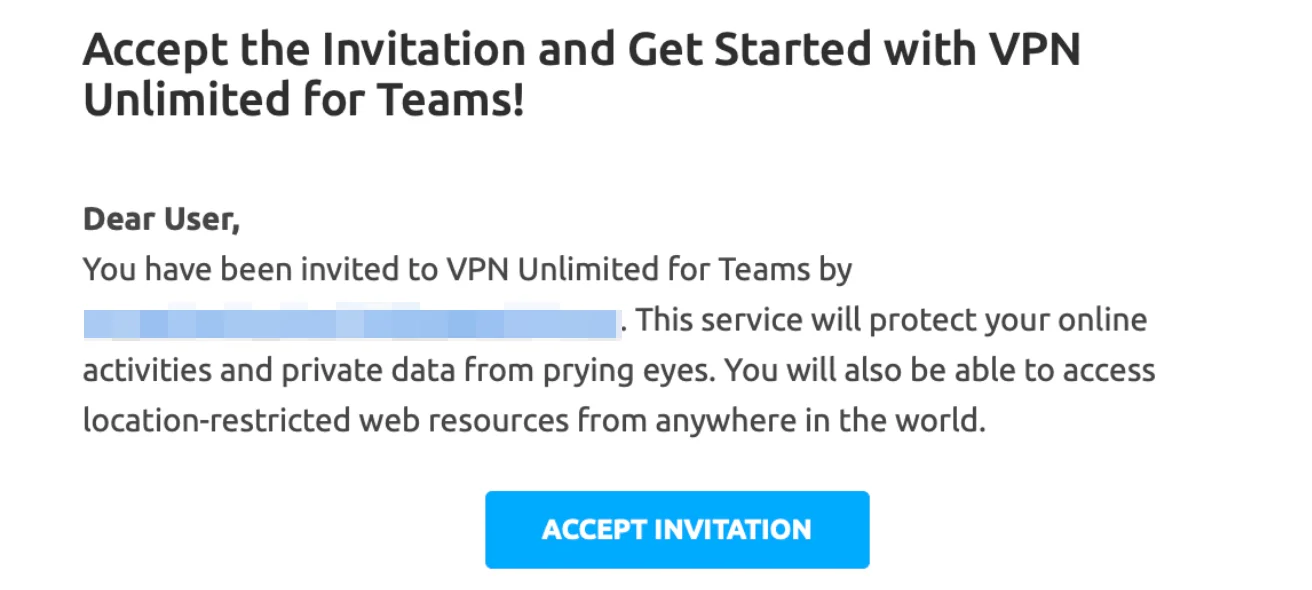
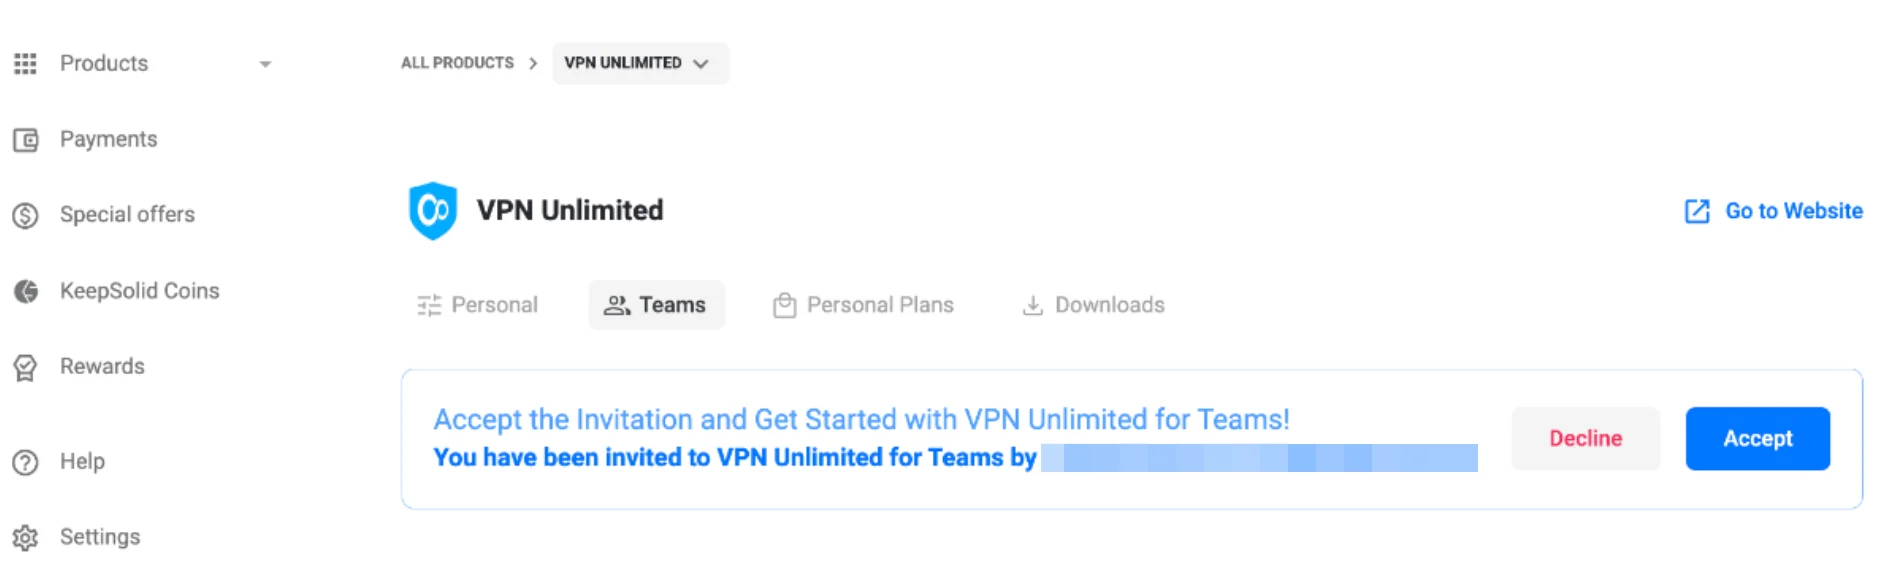
3. User accepts the invitation
- The invited user logs in (or registers) in the User Office using the invited email.
- In All Products → VPN Unlimited → Teams, they click Accept on the invitation banner to join the team.
Remove a team member
To remove a user, just press
![]()
How to extend your VPN Unlimited team
To be able to invite more users, you need to upgrade your team account.
- Go to the User Office and navigate to My Products → VPN Unlimited for Teams → Manage.
- Select the new plan that matches your desired user count (e.g., upgrade from 10 to 20 users) by clicking Select under the appropriate card.
- Click Continue to payment at the bottom of the page.
- Complete the purchase by choosing your payment method and confirming the transaction.
If you need more than the listed options (up to 40 users), click Contact us in the Enterprise banner to discuss custom plans.
How to level up your team protection
To enjoy the highest level of protection, as well as the best possible connection speed and performance, you can get a Personal VPN Server or a Personal IP which will be automatically shared with all your team members. To get a Personal VPN server for your team, follow a few simple steps below:
- Go to the User Office and scroll down to the Extras section.
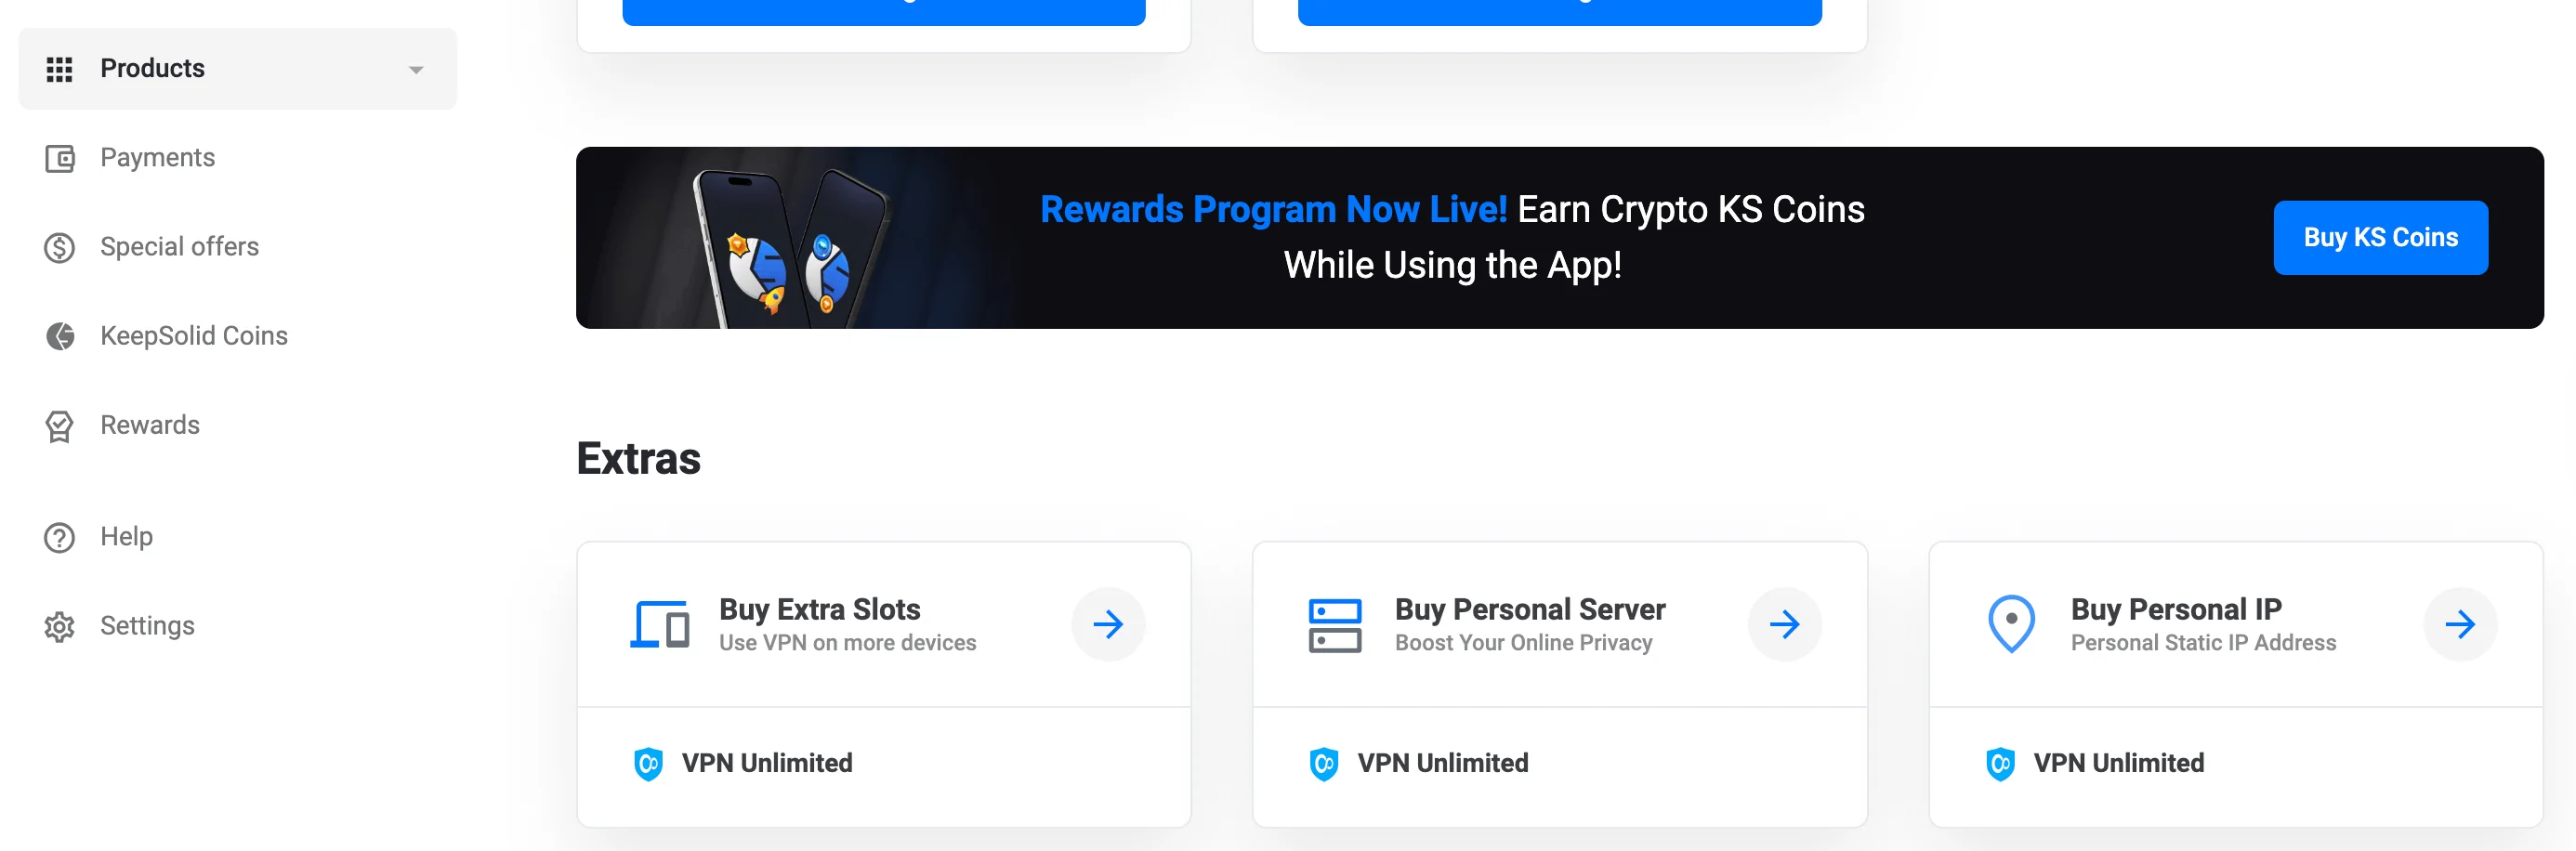
2. Buy a Personal VPN Server
- In Extras, click Buy Personal Server.
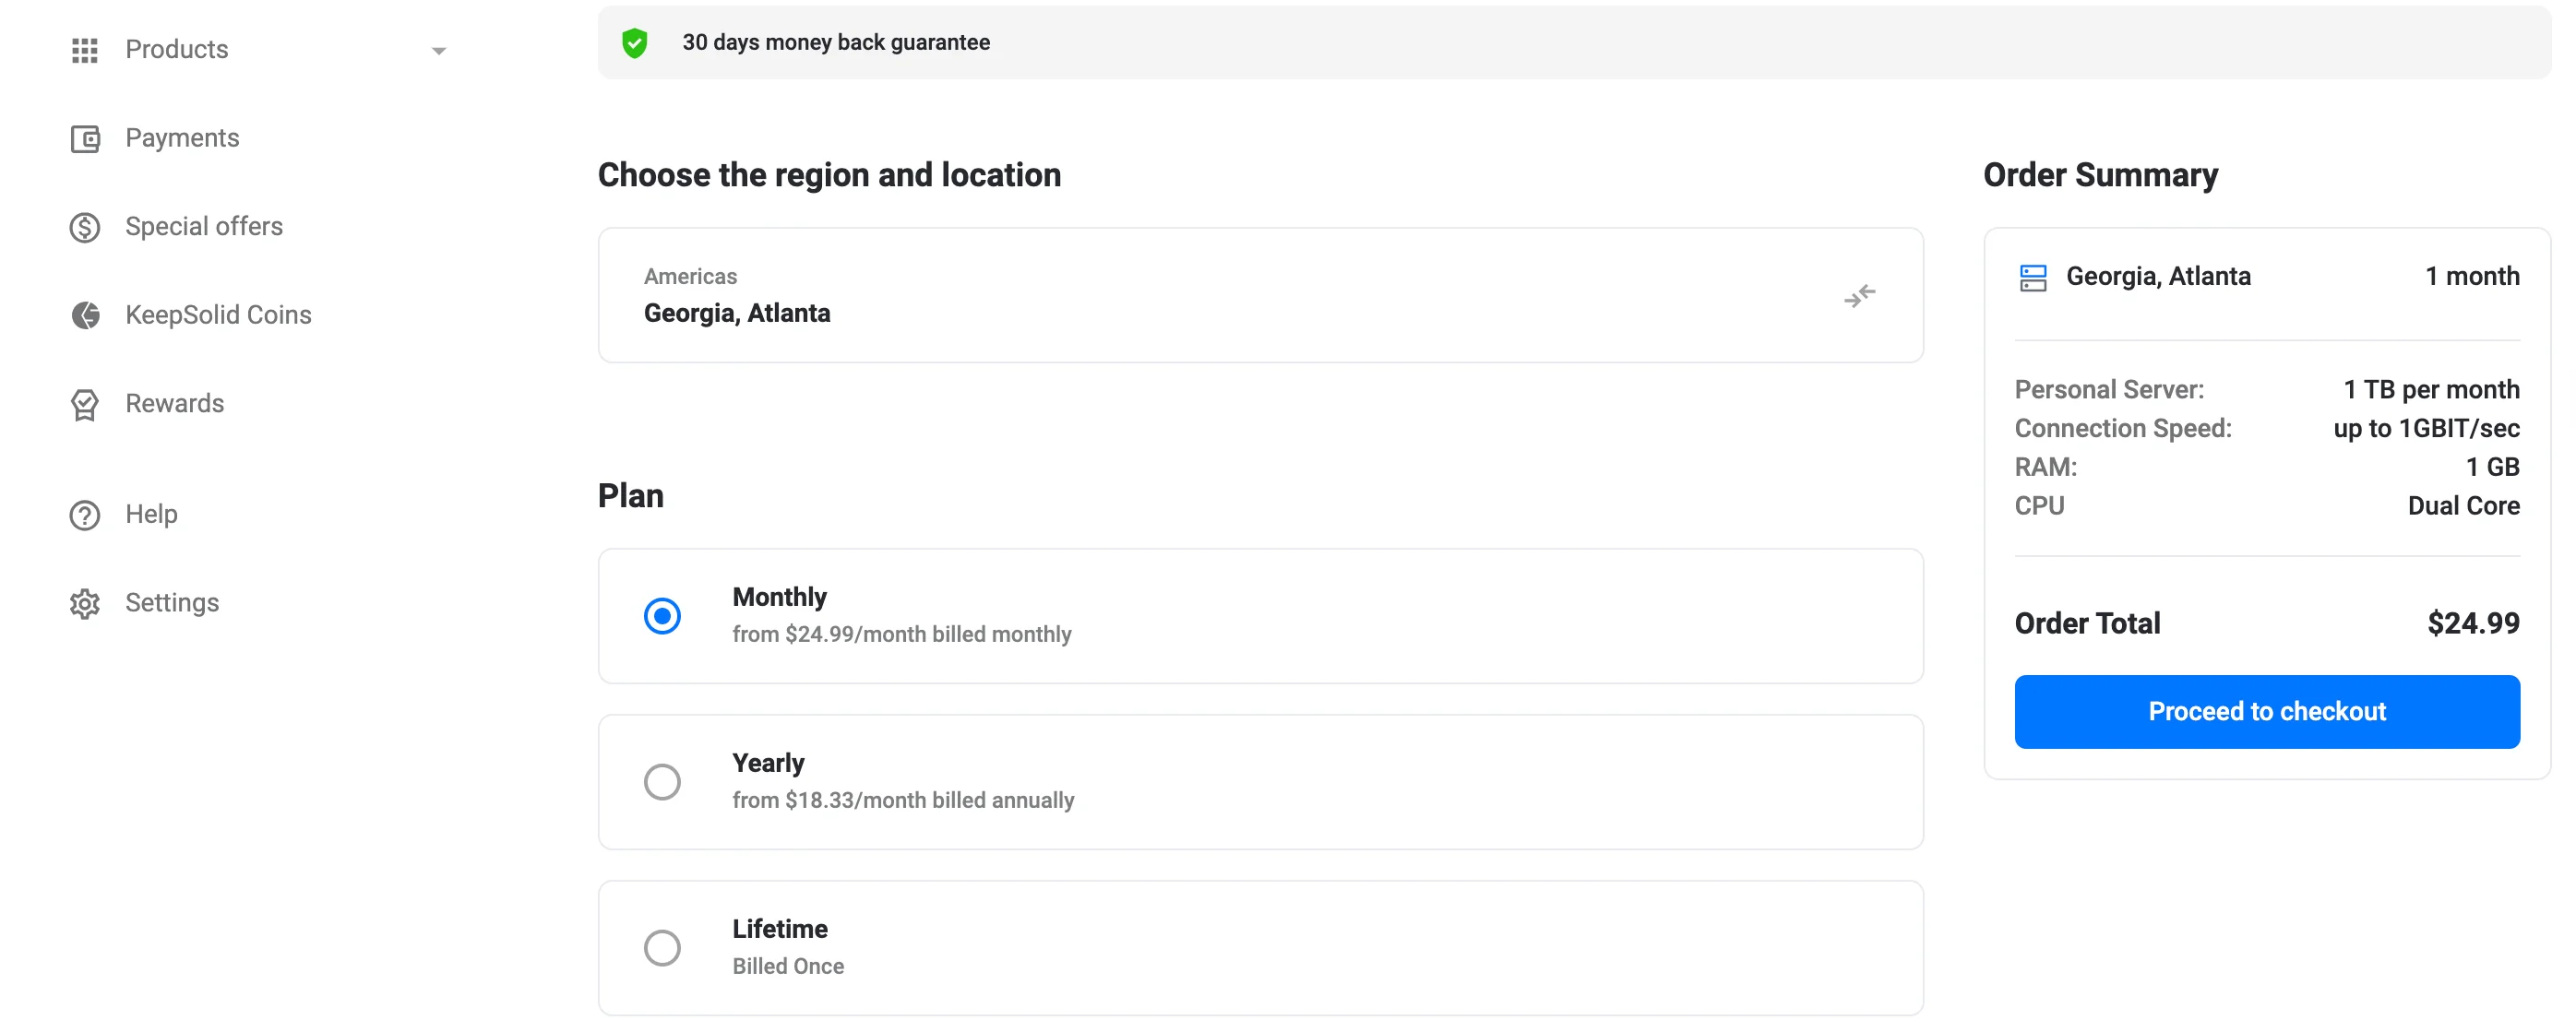
- In the purchase screen, choose your server location.
- Select a billing plan (Monthly, Yearly, or Lifetime).
- Click Proceed to checkout and complete your payment.
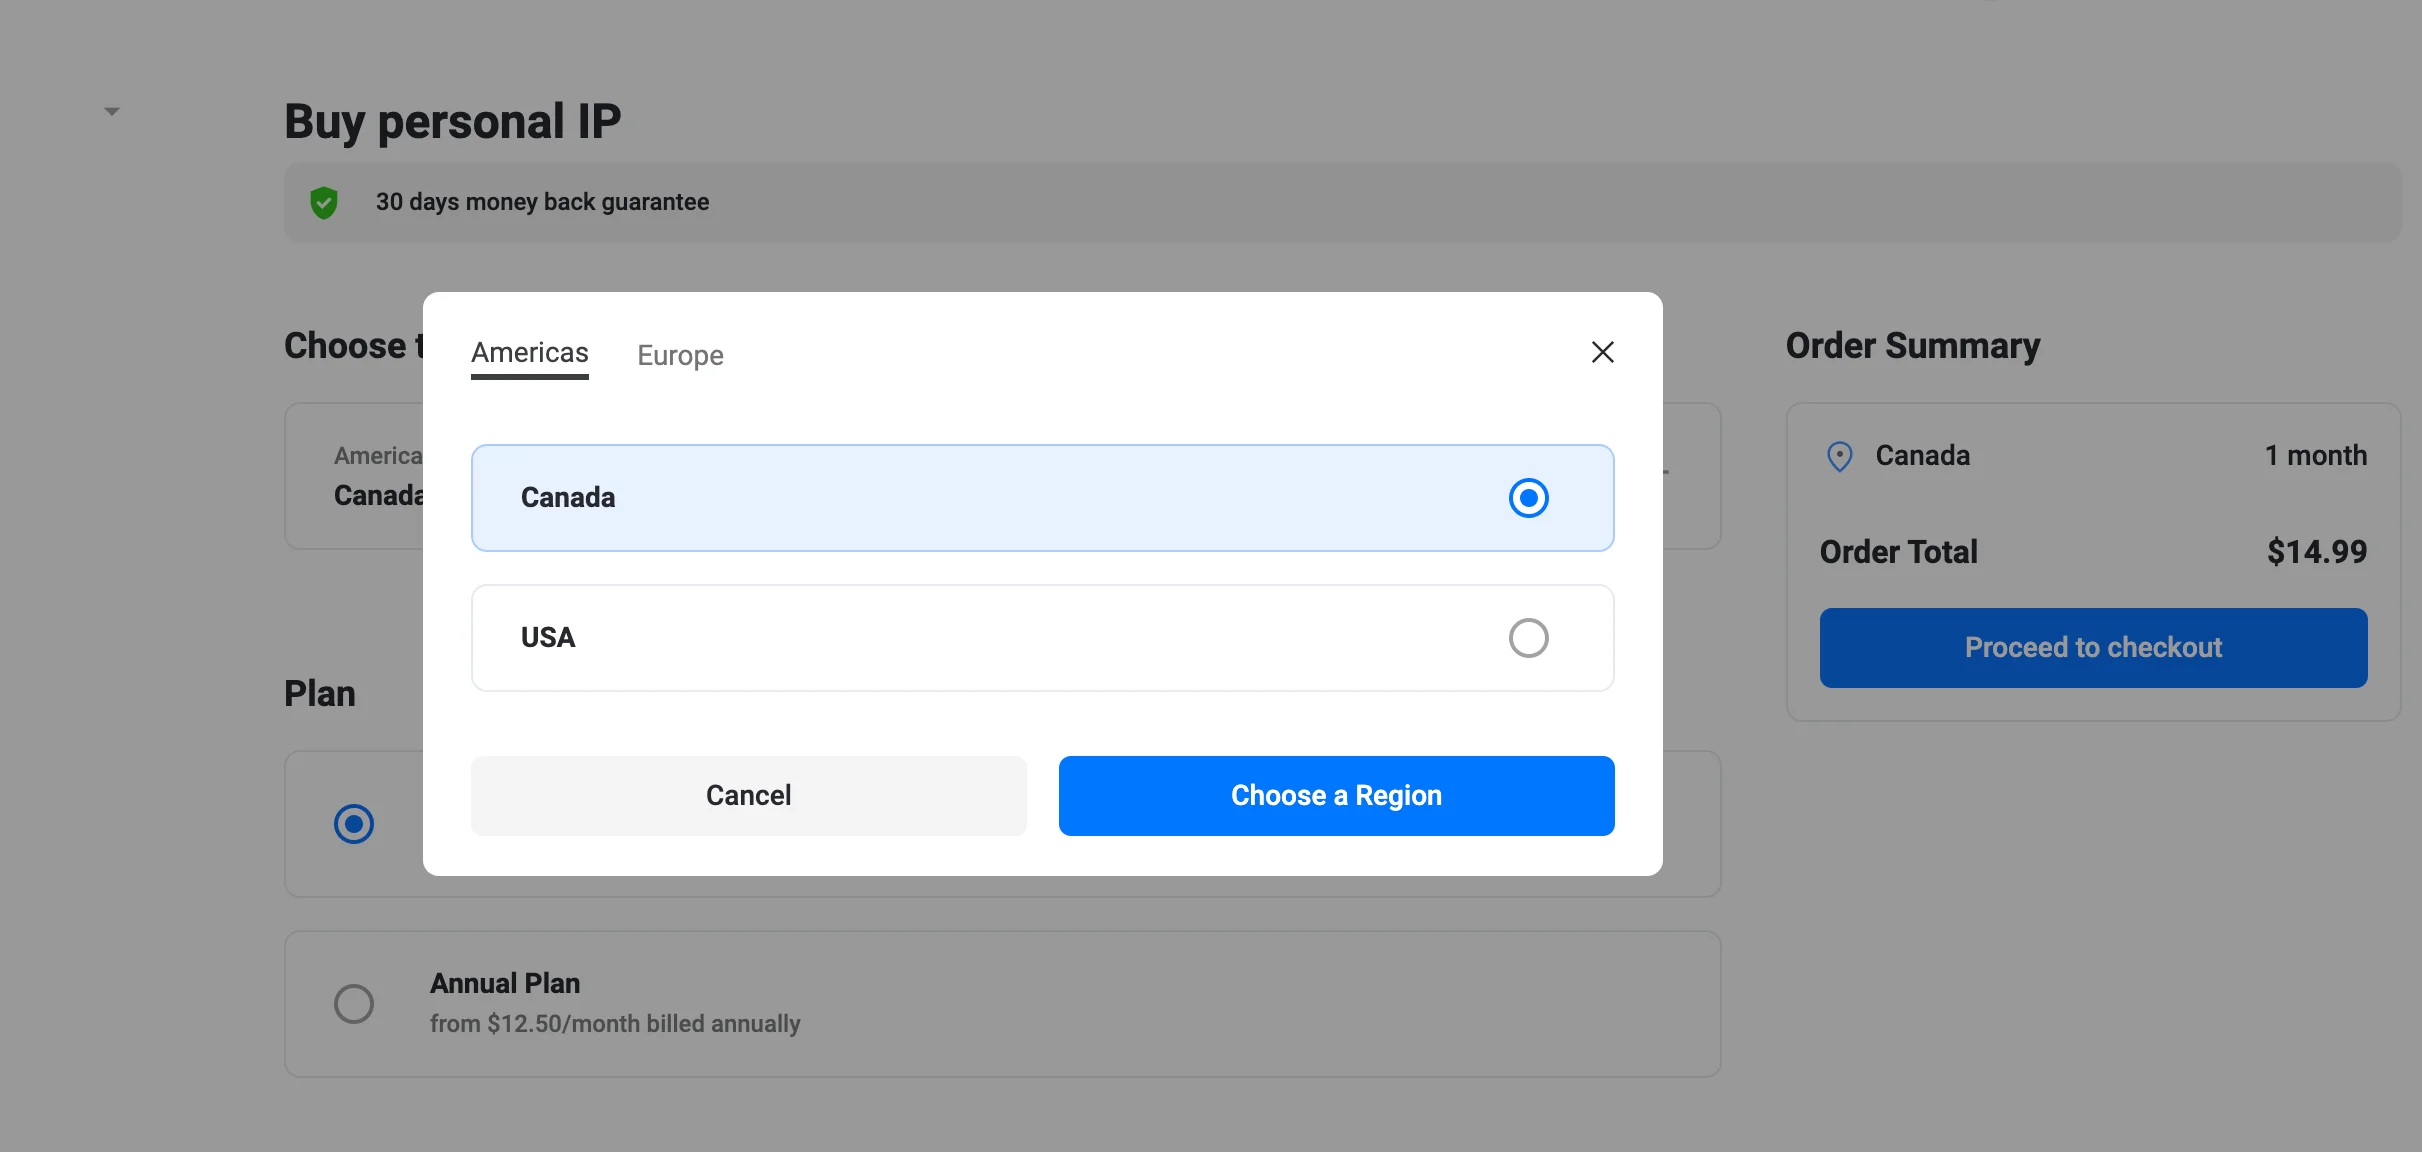
3. Buy a Personal IP
- In Extras, click Buy Personal IP.
- On the Personal IP page, choose your region and location.
- Select a plan (Monthly or Annual).
- Click Proceed to checkout and finish the purchase.
That's it! When your server is deployed, it will appear in the list of Personal Servers/ Personal IP and become available to your team members as well.
What can team members do
As a team member, you have the following possibilities:
- View all members of the team you've been invited to
- See the list of your team's Personal Servers and Personal IPs
- Create your own team
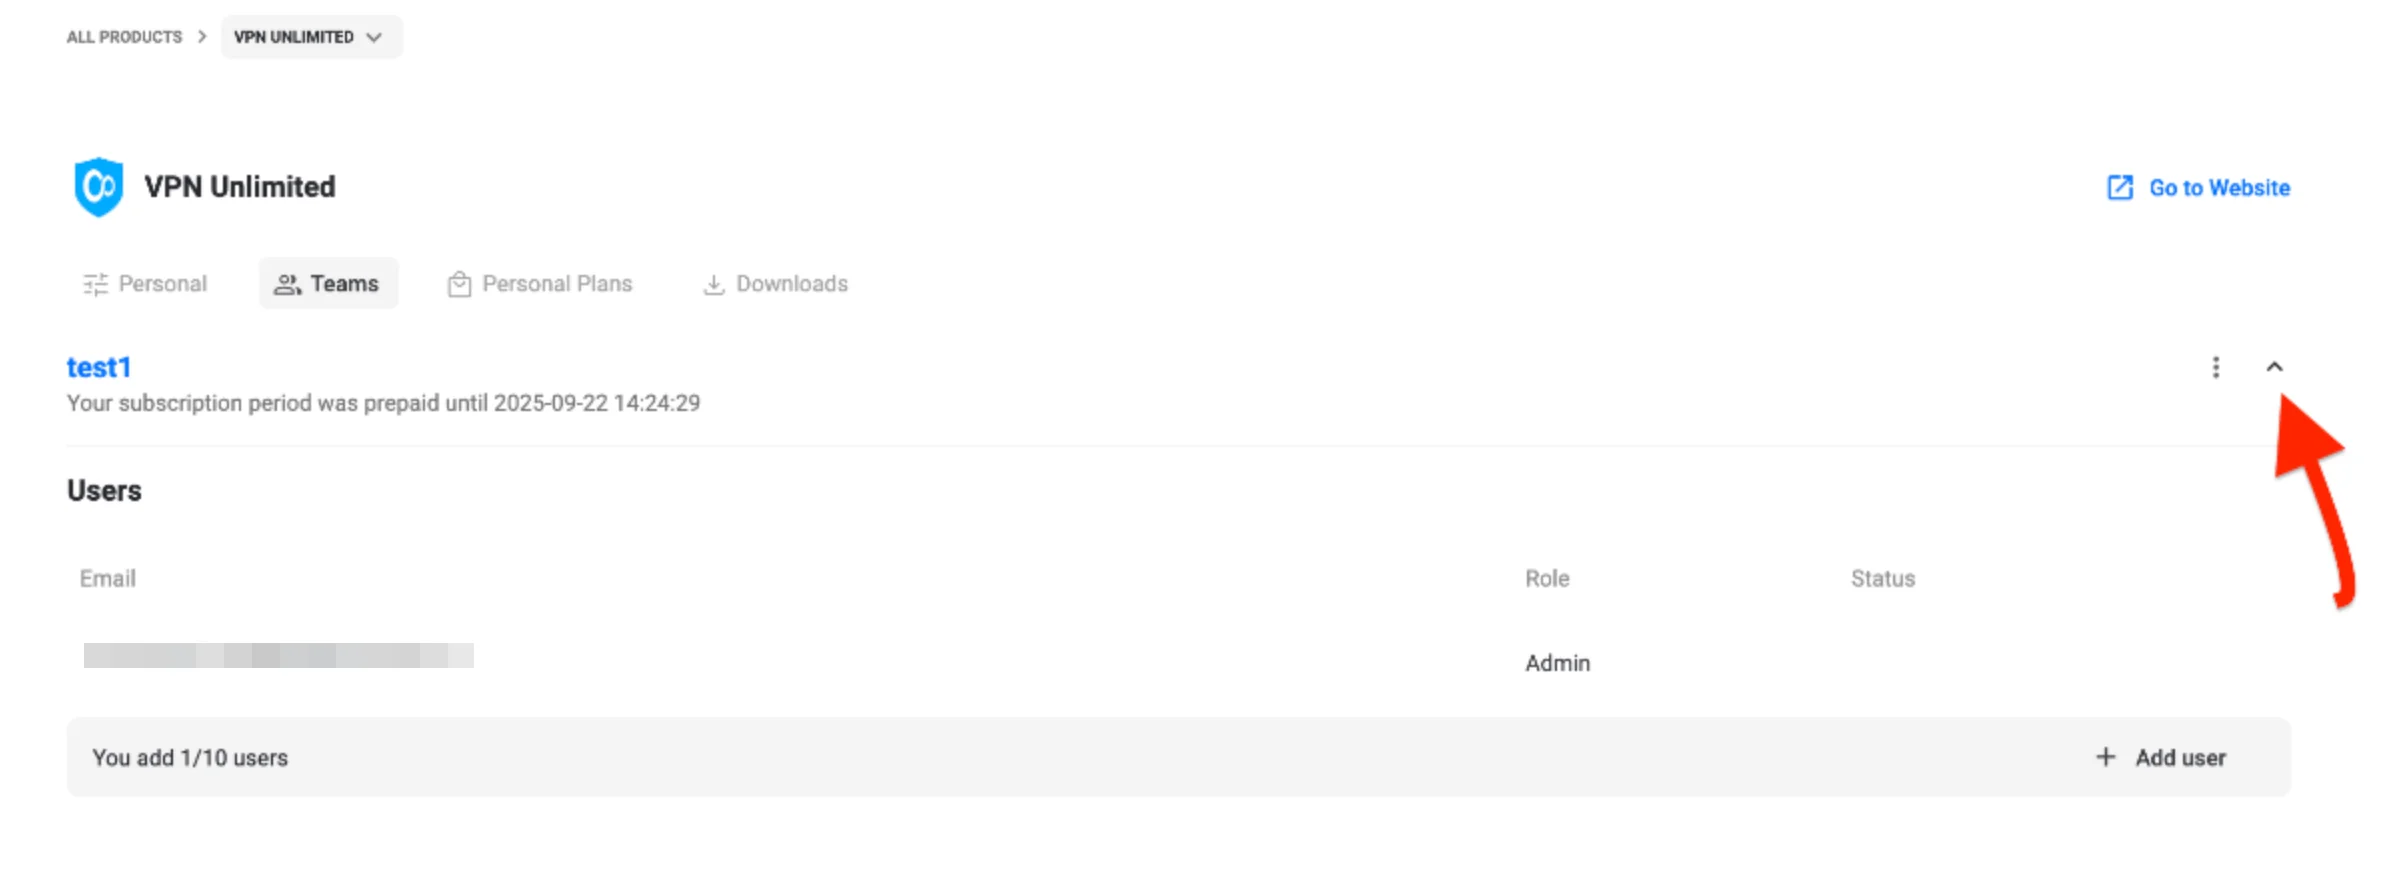
To see the list of all team members and other information, follow the below steps:
- Locate VPN Unlimited for Teams in My product list, and click View.
- Click

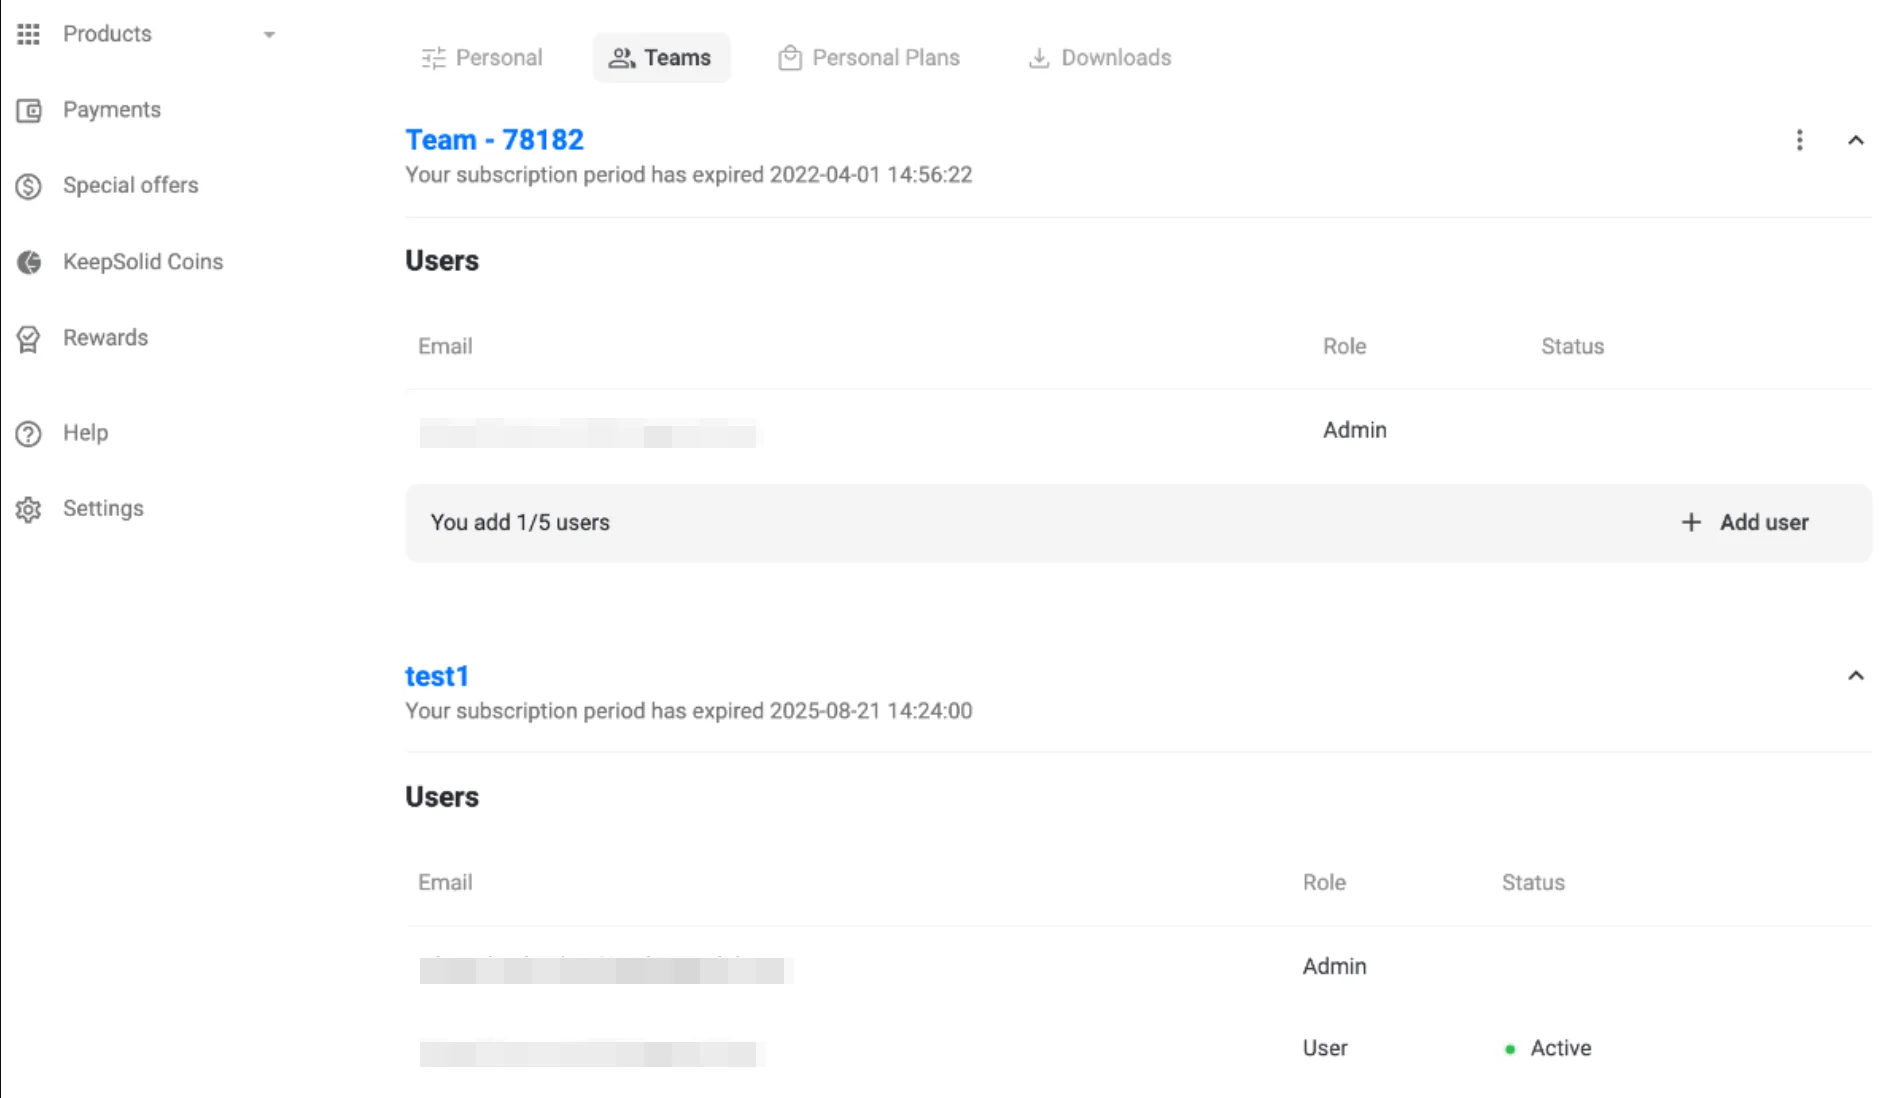
- On the tab that expands, you can find the following info:
- The date your VPN Unlimited team subscription expires
- Your Admin's email address
- The list of all your team members
- The list of shared Personal Servers and Personal IPs, if any.
Note: If you’re a team member and get a Personal Server or a Personal IP, they won’t be shared with the rest of the team and will belong to you only.
To create your own team: Simply purchase a team plan and add users to your team following the standard team management workflow.
Have any questions or comments? Just drop an email to [email protected], we’ll be glad to assist you!
Are you ready to protect your team?
Download VPN Unlimited for Teams and explore all its security features right now: protect your business data, make your online activities anonymous, and gain unrestricted access to the internet.