راهنمای پیکربندی ®WireGuard برای روتر TP-Link Archer
برای کاربران VPN Unlimited
این راهنمای گامبهگام نحوه راهاندازی VPN Unlimited ®WireGuard را در روتر TP-Link Archer AX3000 (AX55) توضیح میدهد.
پس از اتمام تنظیمات، تمام دستگاههای متصل به روتر محافظت خواهند شد. این فرآیند شامل دو بخش اصلی است:
- بخش ۱. دریافت فایل پیکربندی WireGuard از دفتر کاربری KeepSolid.
- بخش ۲. تنظیم کلاینت VPN در روتر تیپیلینک شما.
بخش ۱. دریافت فایل پیکربندی ®WireGuard
برای راهاندازی VPN روی روتر تیپیلینک، ابتدا باید یک فایل پیکربندی وایرگارد (با پسوند conf.) در دفتر کاربری KeepSolid خود ایجاد کنید.
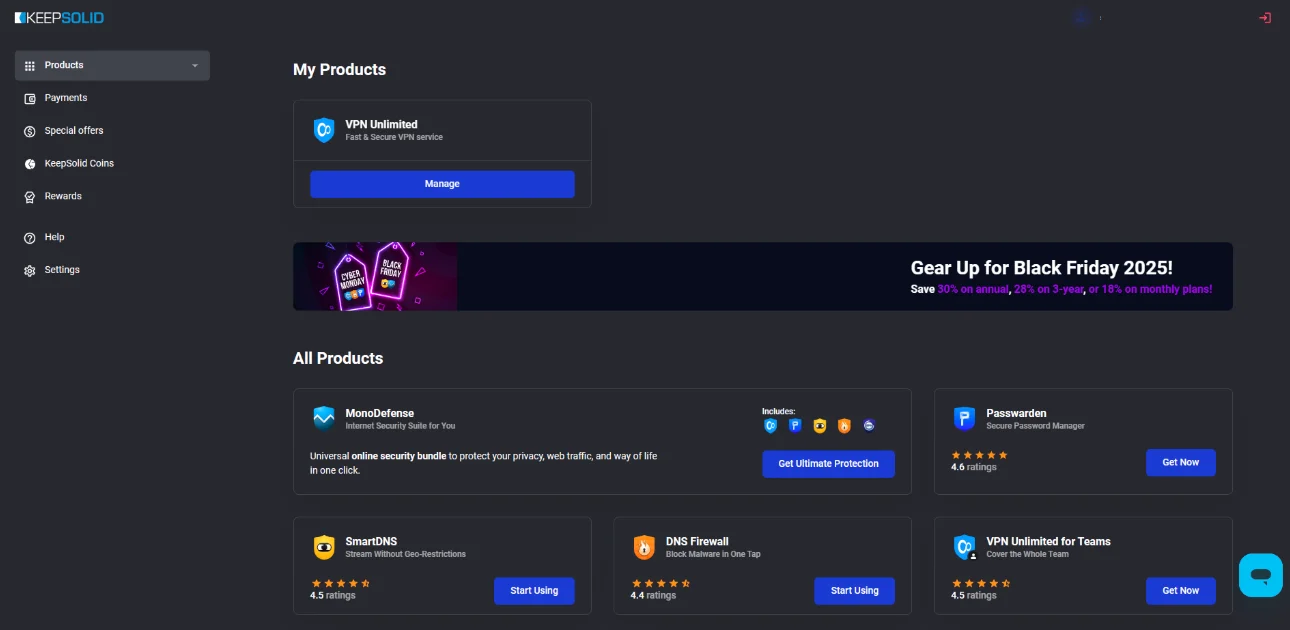
۱. وارد دفتر کاربری KeepSolid شوید. به وبسایت رسمی بروید و با استفاده از KeepSolid ID خود وارد شوید.
۲. به بخش Manual Configuration (پیکربندی دستی) بروید. در صفحه My Products (محصولات من)، روی گزینه Manage (مدیریت) در کادر VPN Unlimited کلیک کنید. به پایین صفحه و بخش Manual Configurations (تنظیمات دستی) بروید و روی Add Manual Configuration+ (افزودن پیکربندی دستی) کلیک کنید.
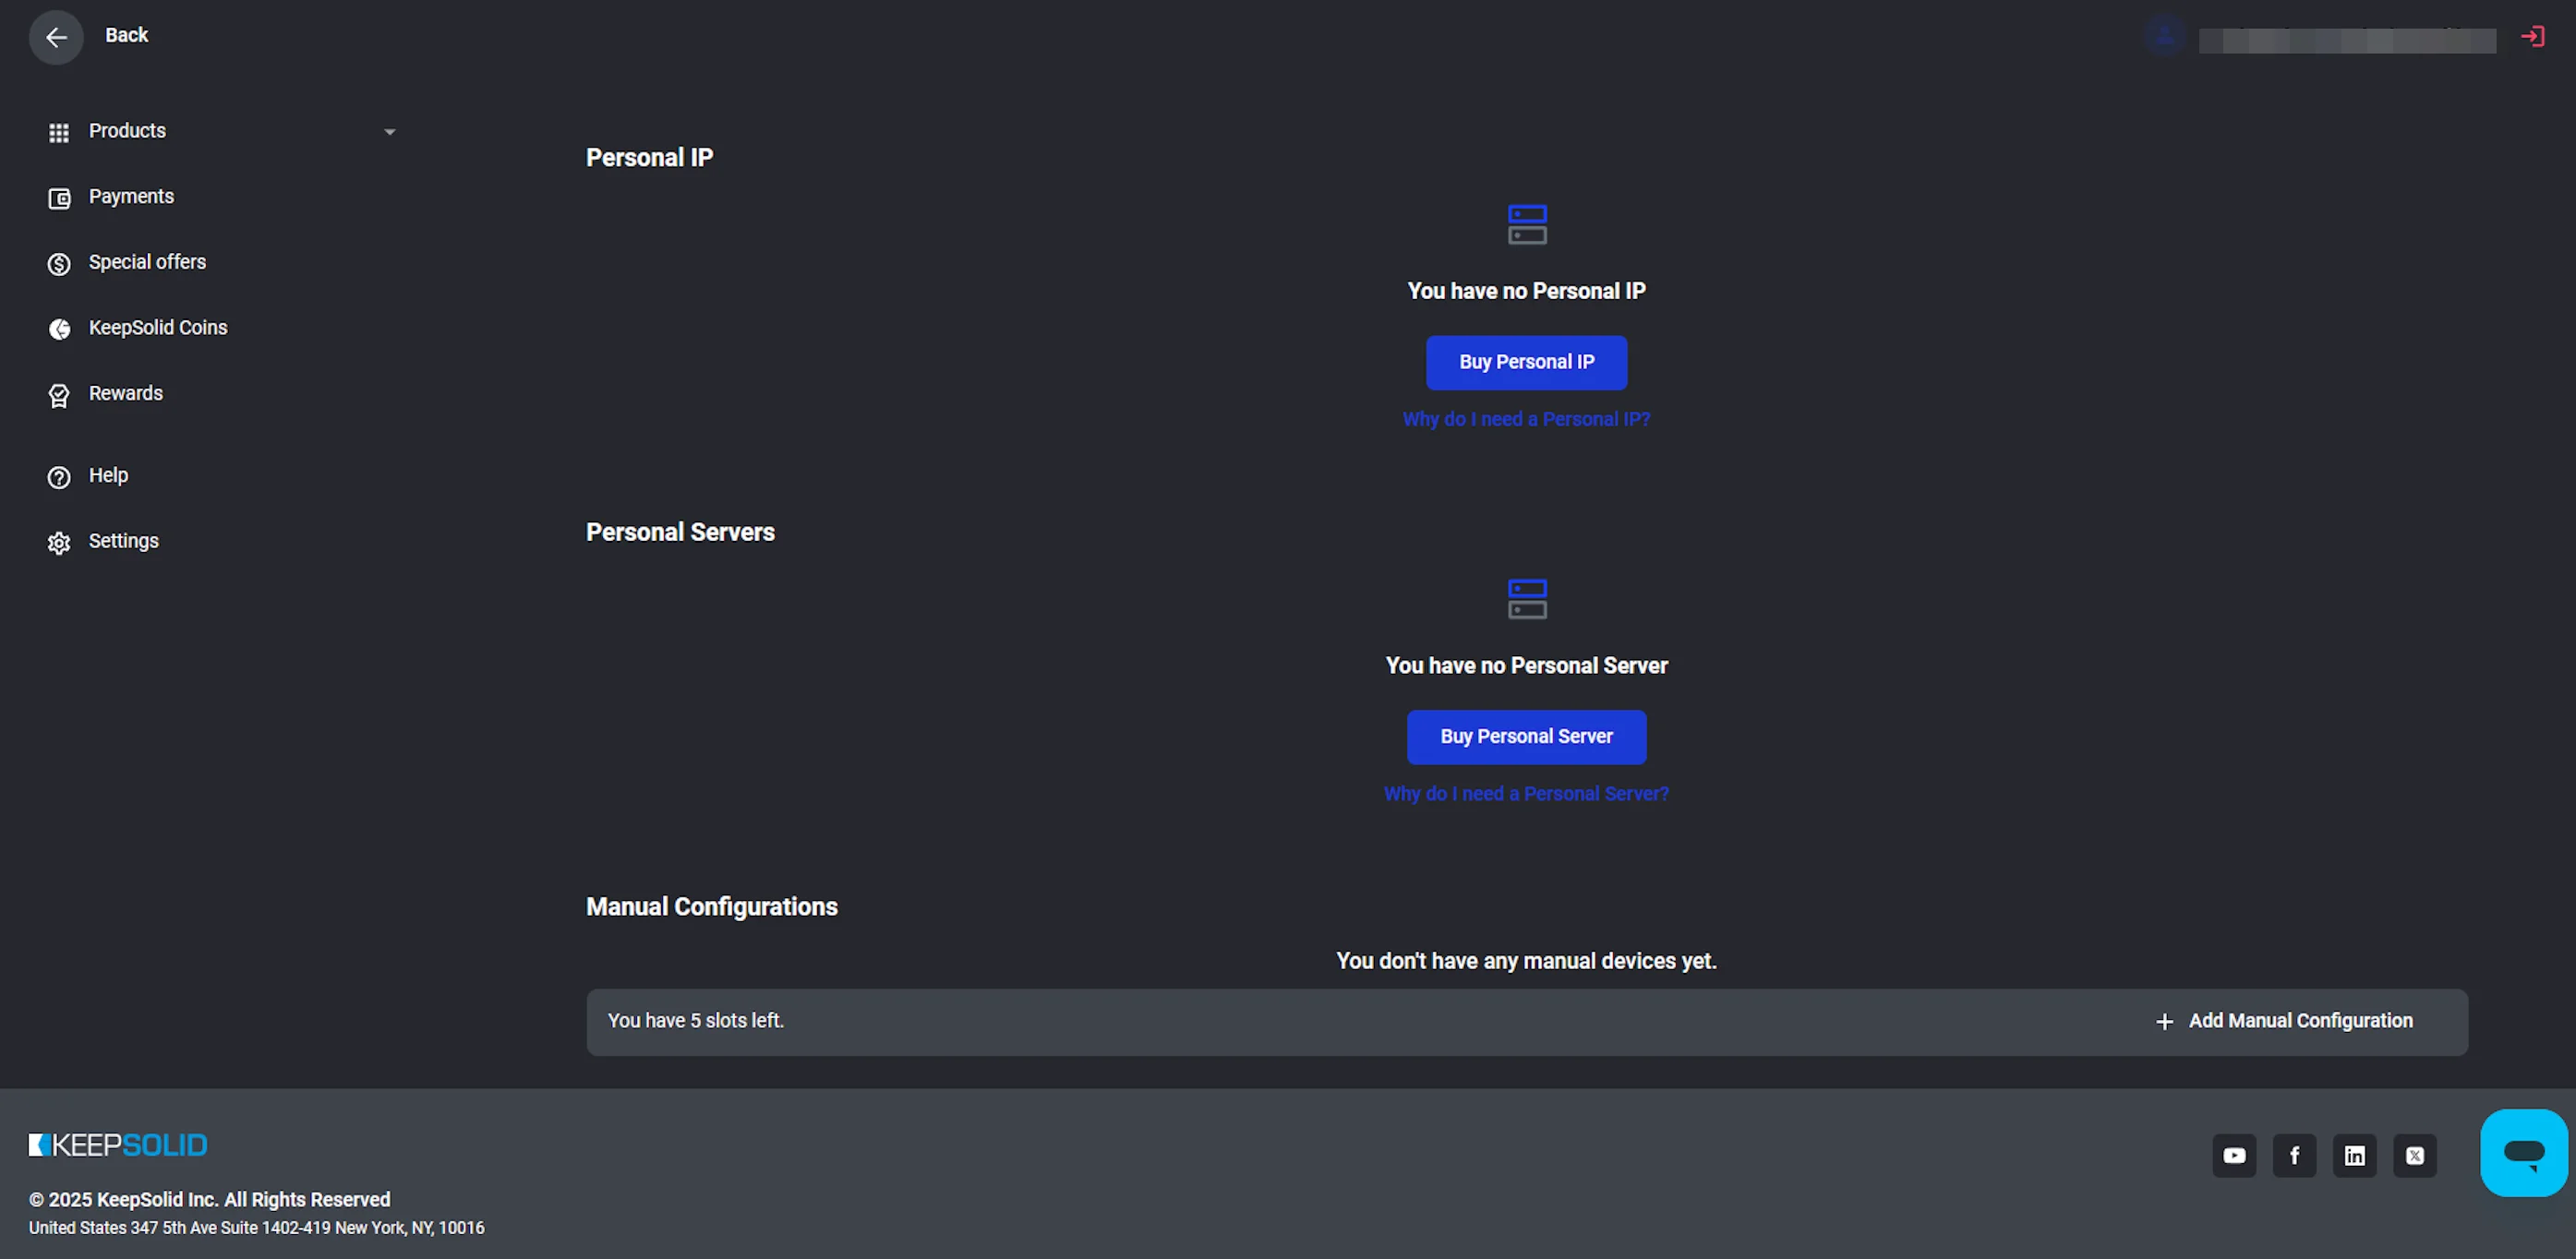
۳. ایجاد فایل. در پنجره باز شده:
- Server location (موقعیت سرور) مورد نظر خود را برای اتصال انتخاب کنید.
- WireGuard را به عنوان Protocol (پروتکل) انتخاب کنید.
- Router (روتر) را به عنوان Platform (پلتفرم) انتخاب کنید.
۳. روی Generate (ایجاد) کلیک کرده و فایل پیکربندی حاصل را ذخیره کنید (این فایل دارای پسوند .conf خواهد بود).

بخش ۲. تنظیم VPN روی روتر TP-Link
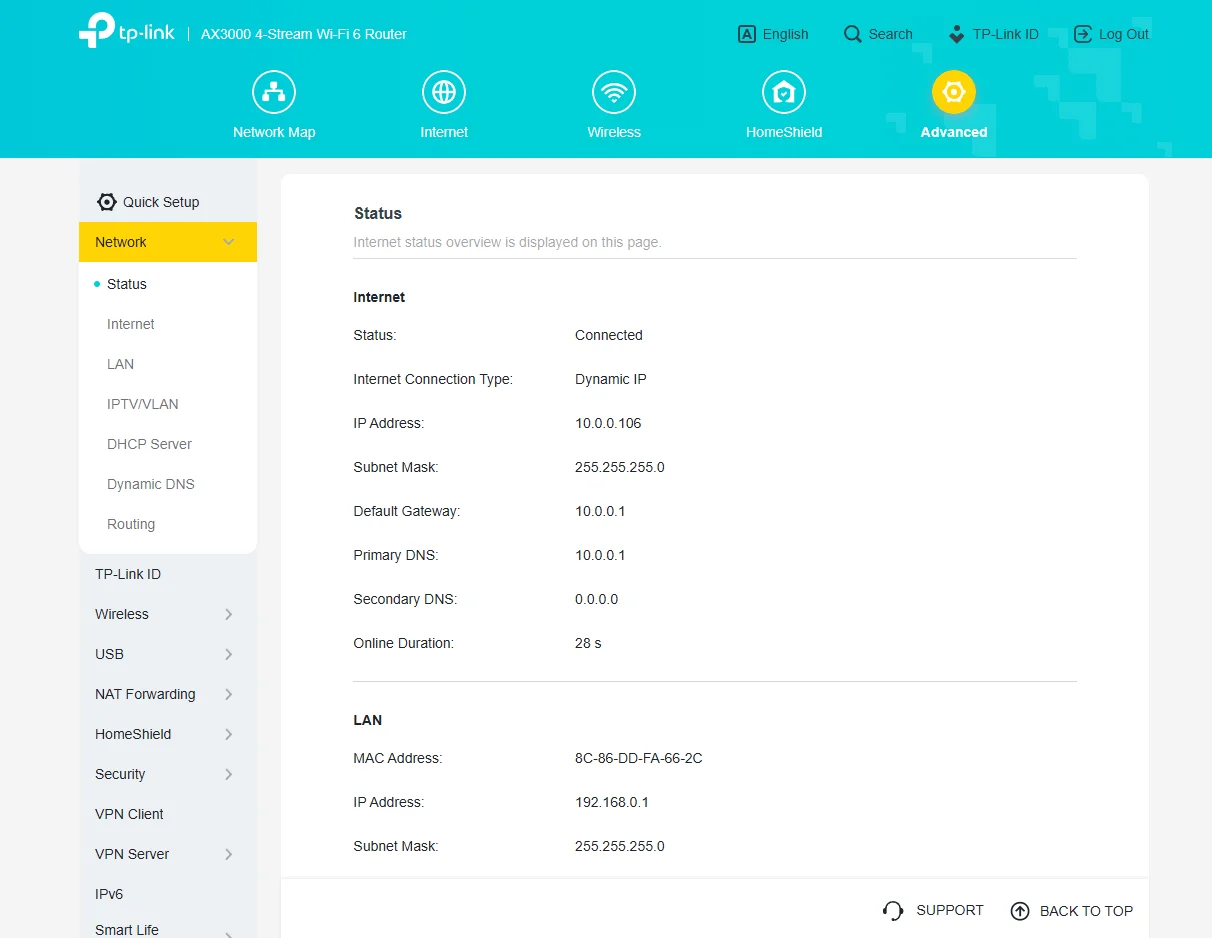
۱. وارد تنظیمات روتر شوید. مرورگر وب خود را باز کرده و آدرس 192.168.0.1 را در نوار آدرس وارد کنید. با استفاده از اطلاعات کاربری روتر خود وارد شوید.
۲. به بخش VPN Client بروید. پس از ورود، روی زبانه Advanced (پیشرفته) در منوی بالا کلیک کنید. در منوی کناری، مسیر Network > Status (شبکه > وضعیت) را انتخاب کنید تا از اتصال اینترنت خود مطمئن شوید.
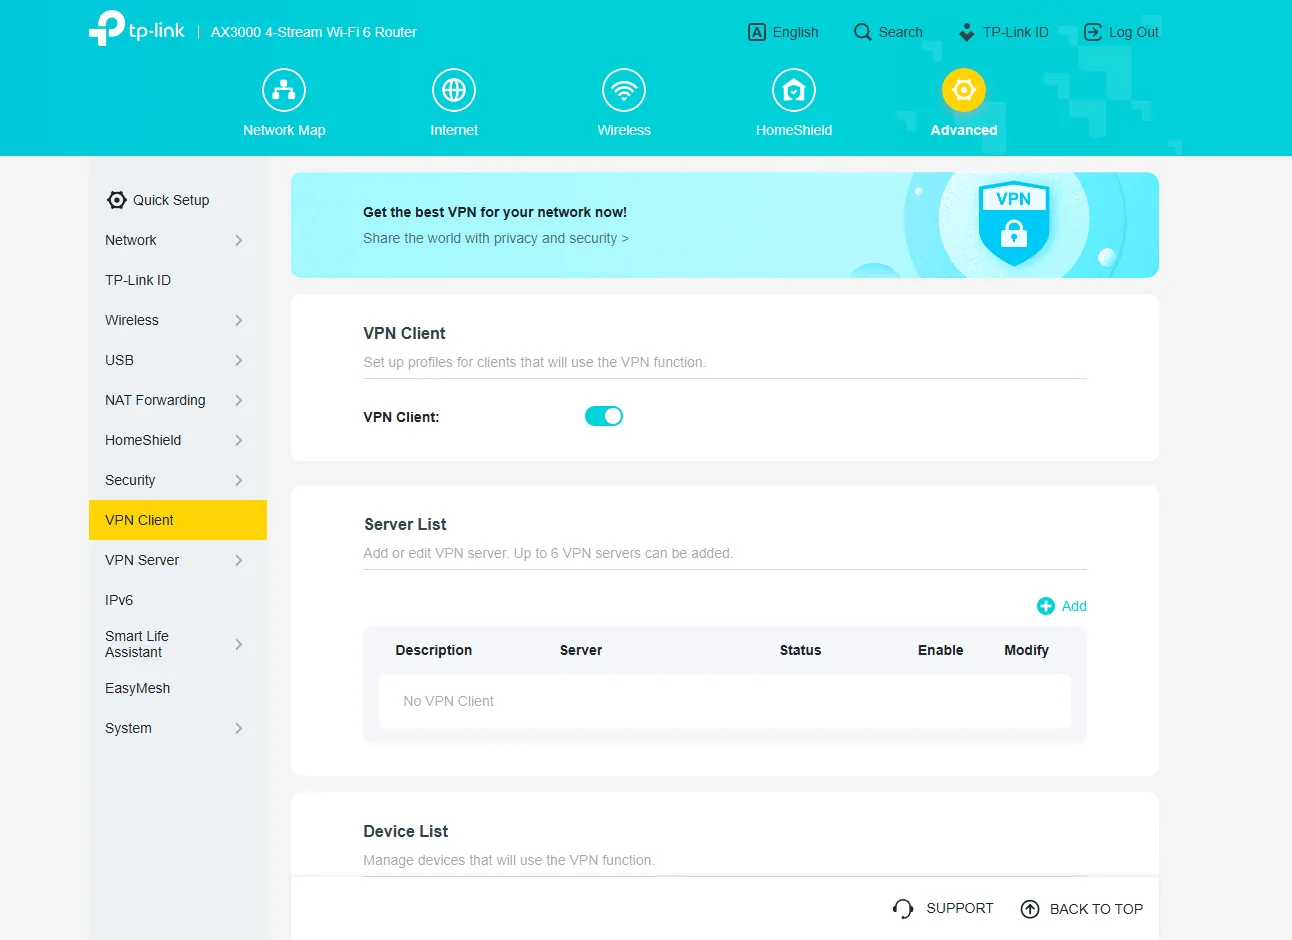
۳. تنظیمات VPN Client. در منوی کناری زیر بخش Advanced (پیشرفته)، به مسیر VPN Client (کلاینت ویپیان) بروید. اطمینان حاصل کنید که دکمه VPN Client روی حالت ON (روشن) باشد.
۴. روی دکمه Add+ (افزودن) در بخش Server List (لیست سرور) کلیک کنید.
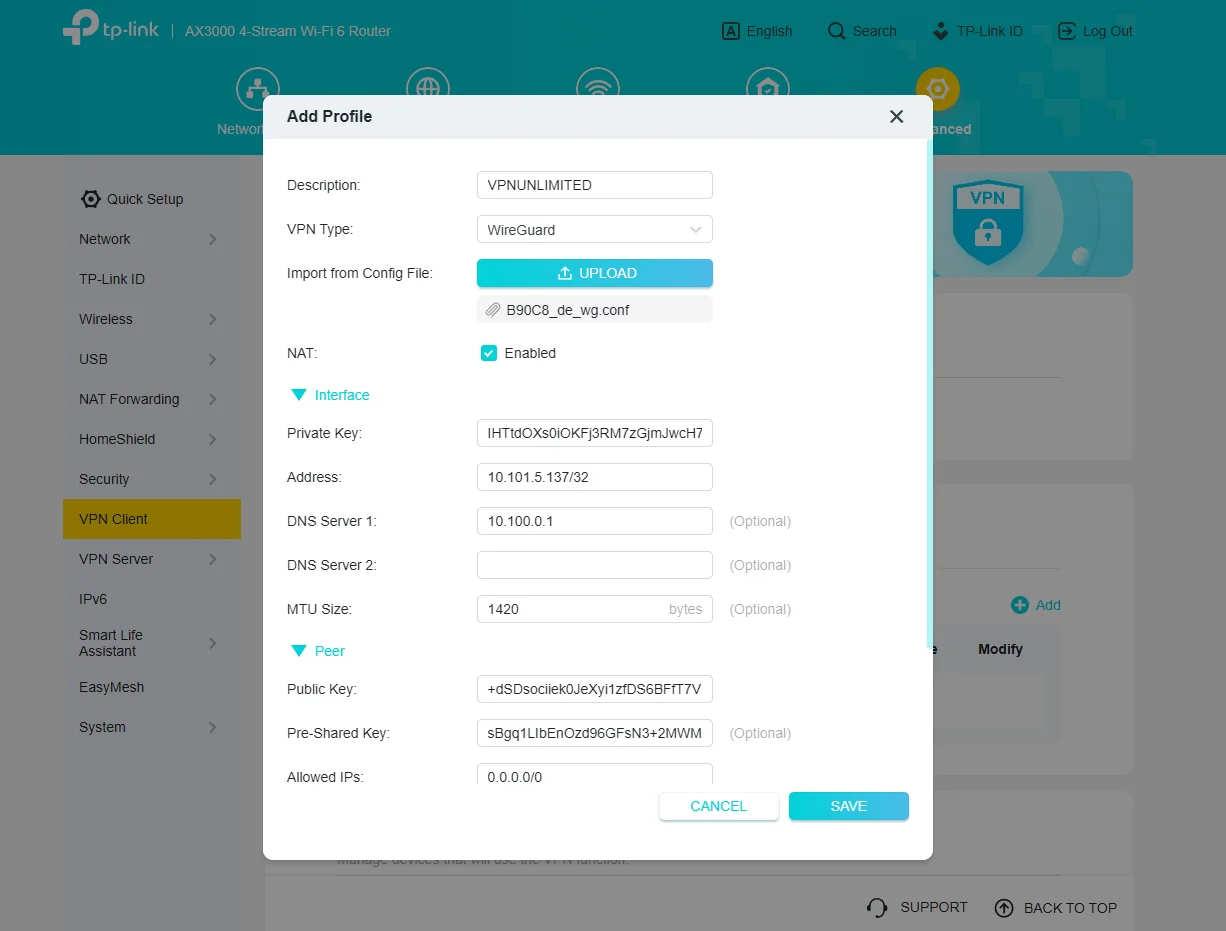
۵. افزودن پروفایل جدید. در پنجره Add Profile (افزودن پروفایل) که ظاهر میشود:
- اطمینان حاصل کنید که VPN Type (نوع ویپیان) روی WireGuard تنظیم شده باشد.
- روی Upload (بارگذاری) کلیک کرده و فایل
.confرا که در بخش اول ذخیره کرده بودید، انتخاب کنید.

۶. ذخیره پروفایل. روتر بهطور خودکار فیلدهای باقیمانده (Private Key، Address، DNS، Public Key و غیره) را از فایل استخراج و پر میکند. میتوانید در صورت تمایل Description (توضیحات) را تغییر دهید (مثلاً به VPNUNLIMITED). روی Save (ذخیره) کلیک کنید.
۷. فعالسازی VPN. پروفایل جدید ساخته شده (مثلاً VPNUNLIMITED) در Server List (لیست سرور) ظاهر میشود. از دکمه Enable (فعالسازی) در کنار پروفایل استفاده کنید تا اتصال VPN را ON (روشن) کنید. Status (وضعیت) باید به Connected (متصل شد) تغییر کند.
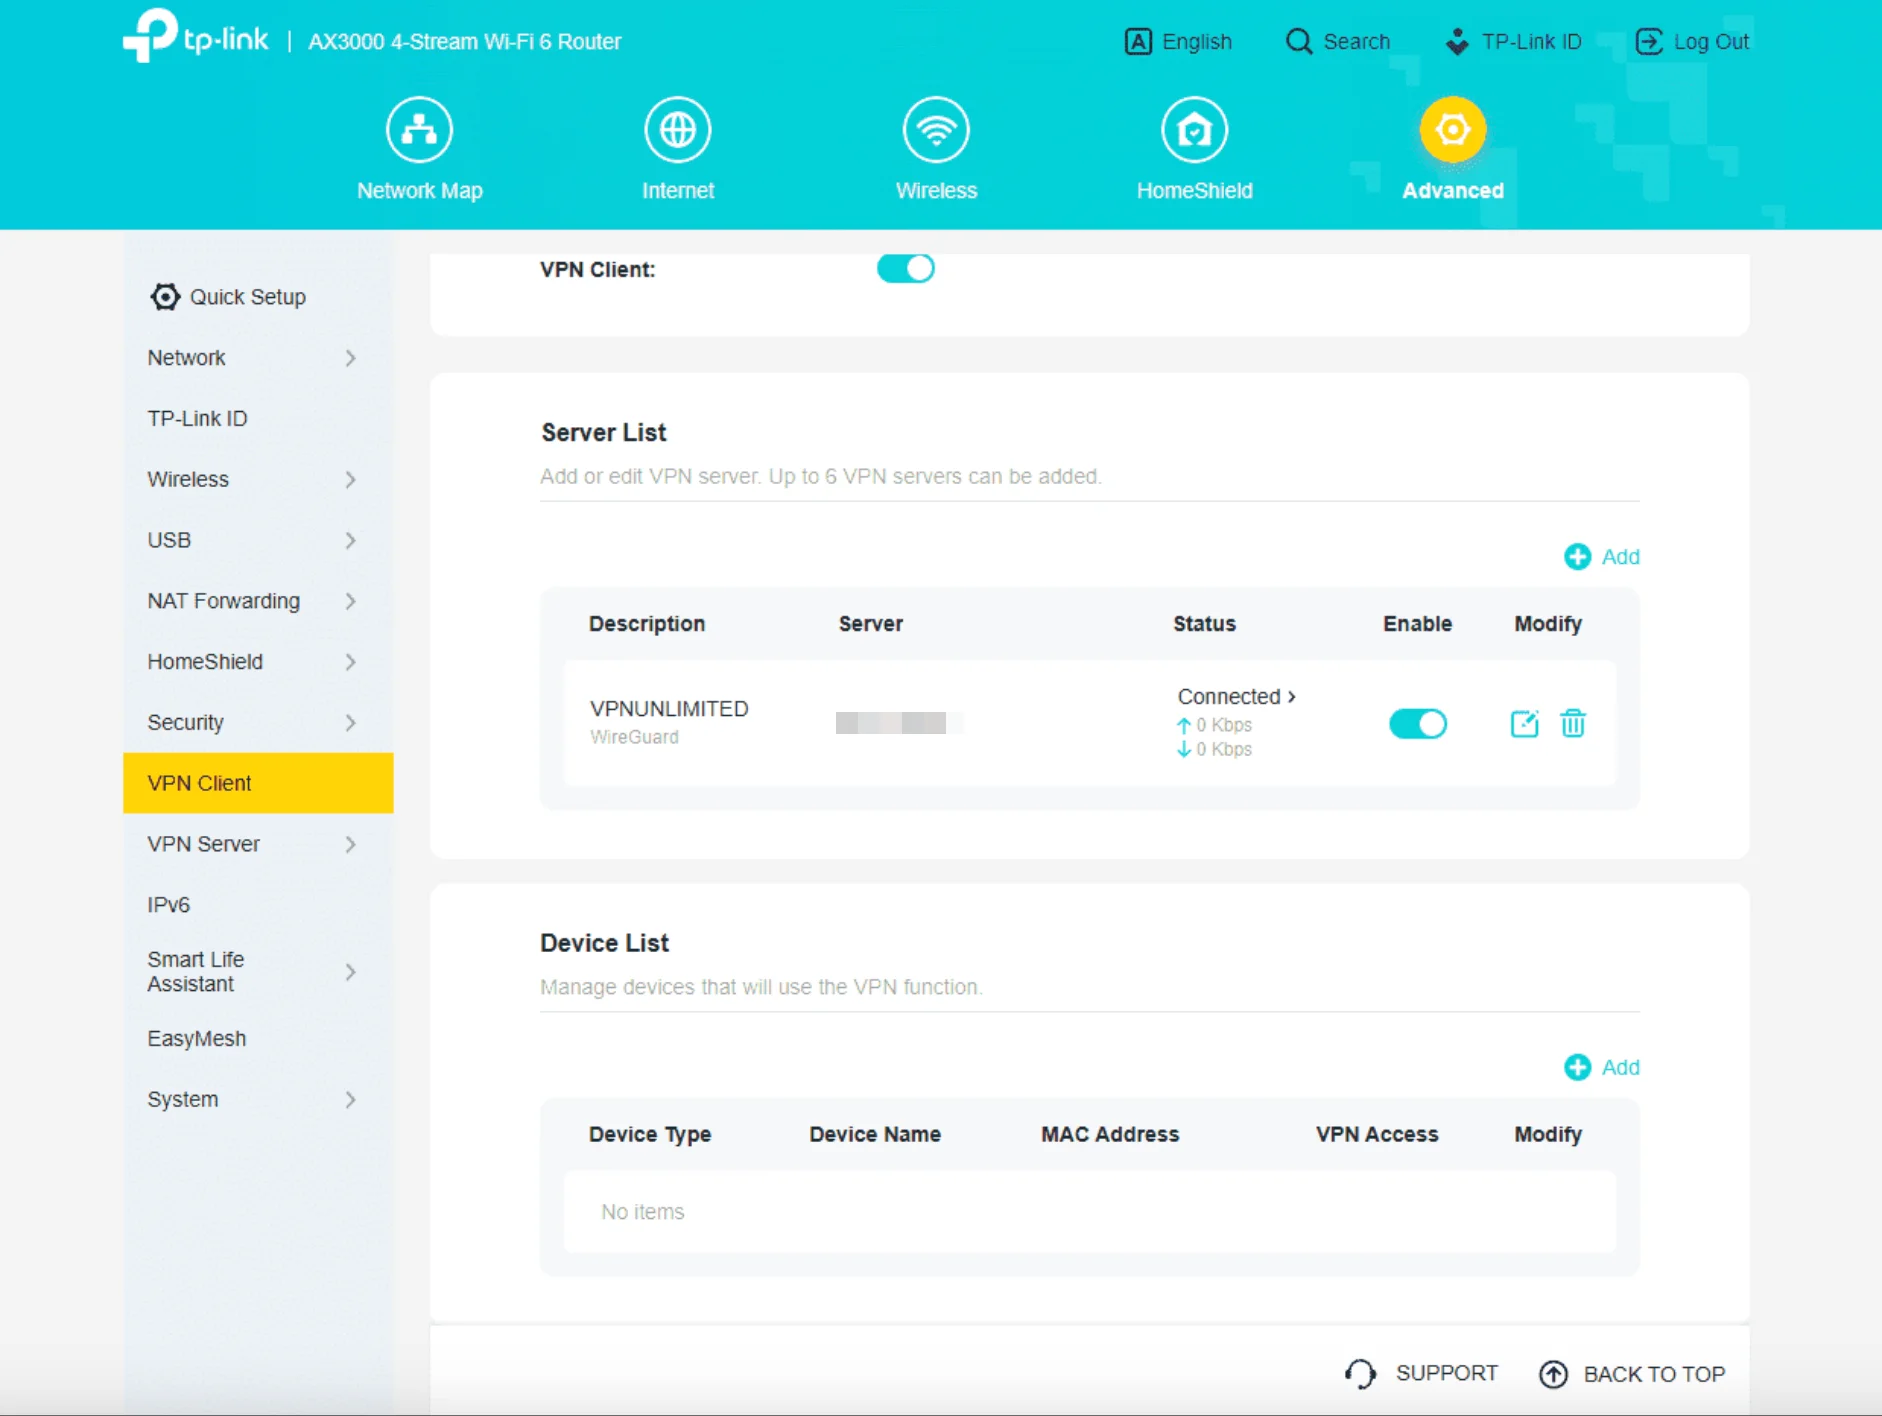
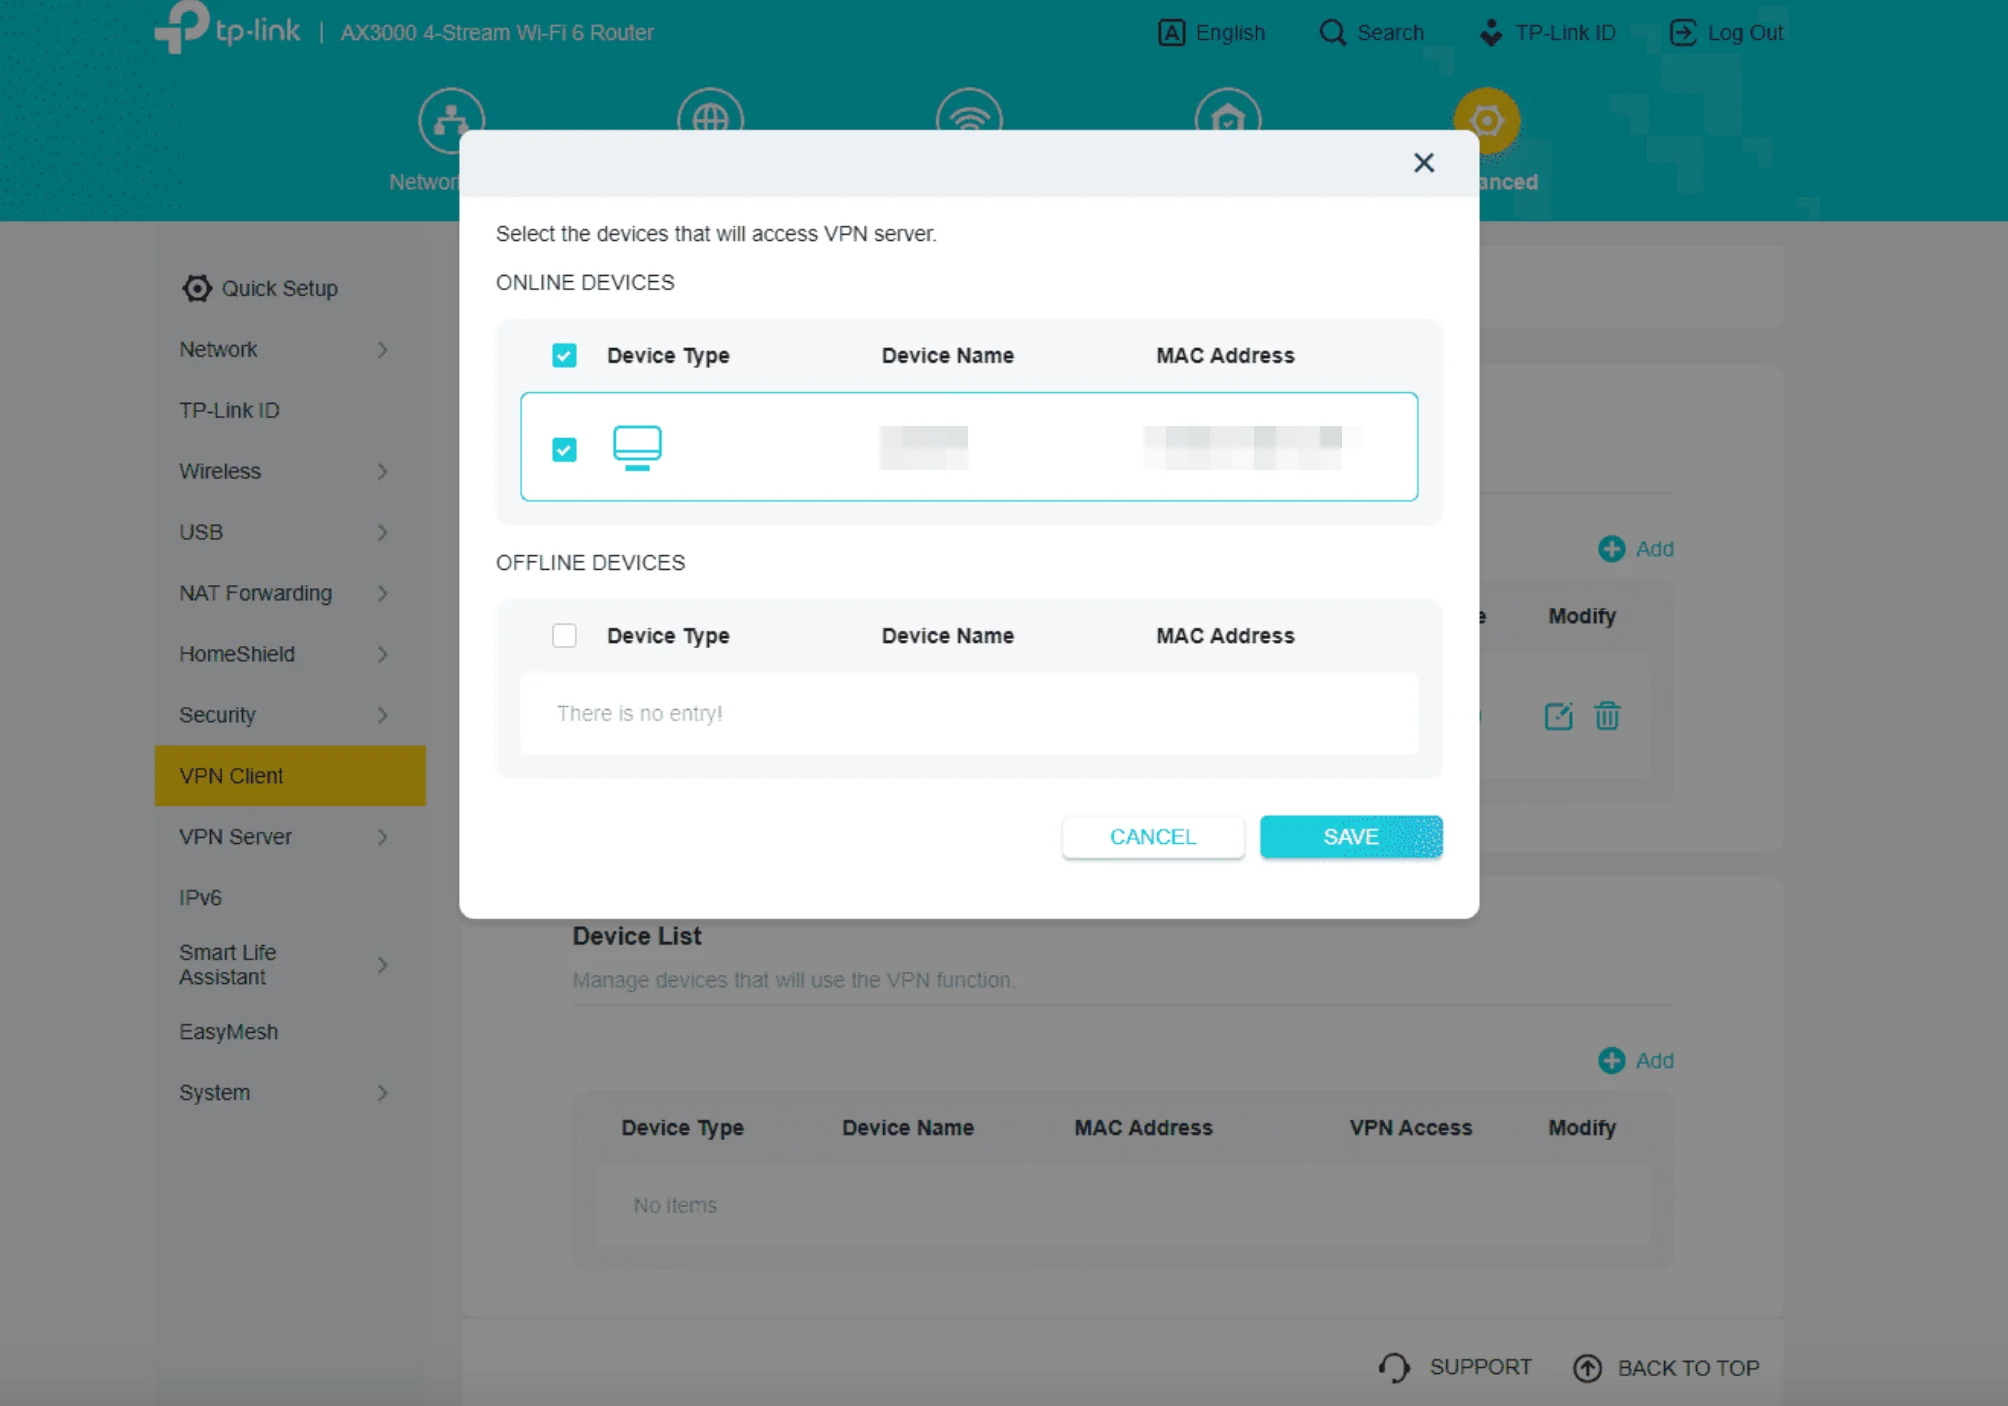
۸. انتخاب دستگاهها. در بخش Device List (لیست دستگاهها)، روی Add+ (افزودن) کلیک کنید. دستگاههایی را که میخواهید توسط VPN محافظت شوند انتخاب کرده و روی Save (ذخیره) کلیک کنید. فقط دستگاههای انتخاب شده از اتصال VPN استفاده خواهند کرد.
تمام شد! اتصال WireGuard VPN شما اکنون فعال است و از دستگاههایی که در روتر TP-Link خود انتخاب کردهاید محافظت میکند.
اگر به سایر آموزشهای پیکربندی VPN نیاز دارید، صفحه راهنما را بررسی کنید یا از طریق [email protected] با پشتیبانی مشتری ما تماس بگیرید.

VPN Unlimited را روی روتر TP-Link خود راهاندازی کرده و همه دستگاههای متصل را ایمن سازید!


