How to Set Up IKEv2 Connection on Mikrotik (RouterOS v.6.45 and higher)
Guide for VPN Unlimited Users
How to Install VPN Unlimited on Different Platforms & Create KeepSolid ID
Detailed installation guides on different platforms:
- How to install VPN Unlimited on macOS 10.14 and higher (Standalone Version)
- How to install VPN Unlimited on macOS 10.14 and higher (App Store version)
- How to install and get started with VPN Unlimited on iOS
- How to install VPN Unlimited Application on Android
- How to install VPN Unlimited application on Windows XP SP3
- How to install VPN Unlimited Application on Windows 7
- How to set up VPN Unlimited Application on Windows 8/8.1
- How to Install and Get Started with VPN Unlimited App on Windows 10
- How to install VPN Unlimited on Linux
How to create a new KeepSolid ID
- After installing the VPN Unlimited app, you will see the line "Create KeepSolid ID", сlick on it to start the process.
- Enter your email address in the designated field.
- Create a password and enter it in the password field.
- Repeat your password in the provided field to confirm it.
- Check the box next to the statement "By continuing, you agree to our…".
- Tap the "Sign up" button to complete the registration.
Connecting to a VPN server for the first time, you will be requested to allow adding VPN configurations and downloading a VPN profile. For more details, please refer to the manuals provided above on how to install VPN Unlimited on different platforms.
Mikrotik IKEv2 setup lets you go anonymous, secure internet traffic of devices connected to your router, as well as unblock geo-restricted content. To get more information about the IKEv2 protocol, check out our detailed article What is IKEv2 protocol.
This guide provides a detailed walkthrough on how to configure IKEv2 connection on Mikrotik (with RouterOS v.6.45 and higher) using VPN Unlimited settings. Complete your Mikrotik VPN client setup with our guide and make your online experience private, secure, and unrestricted with us VPN Unlimited.
I. Generate manual VPN configurations
Before setting up VPN on Mikrotik router, you need to generate IKEv2 configurations in your KeepSolid User Office.
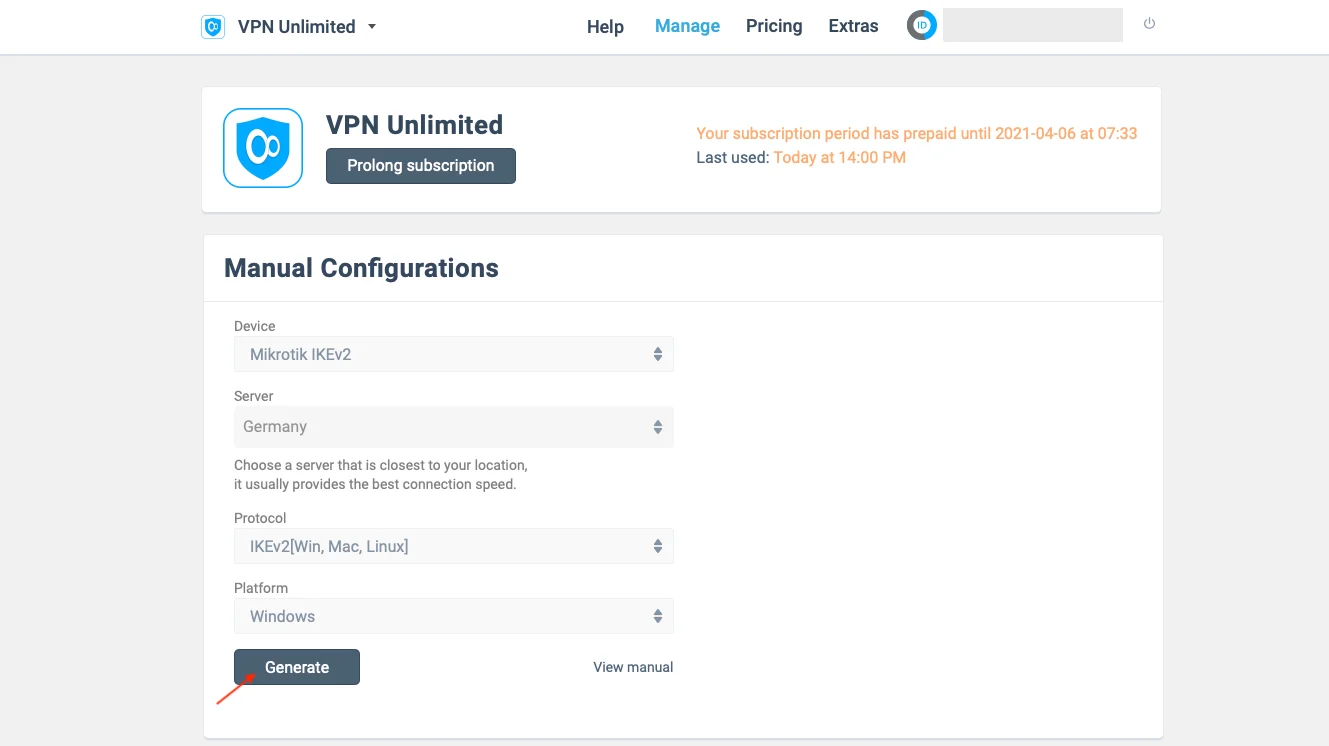
To do this, follow just a few simple steps of our guide on how to manually create VPN configurations.
There you’ll get information required for the further setup of IKEv2 on your Mikrotik: the chosen VPN server IP address, login, password, and a certificate, which you need to save to your computer.
II. Configure IKEv2 connection on Mikrotik
- Proceed to your Mikrotik WebFig.
- Open Files and add the certificate you’ve previously generated in your User Office.
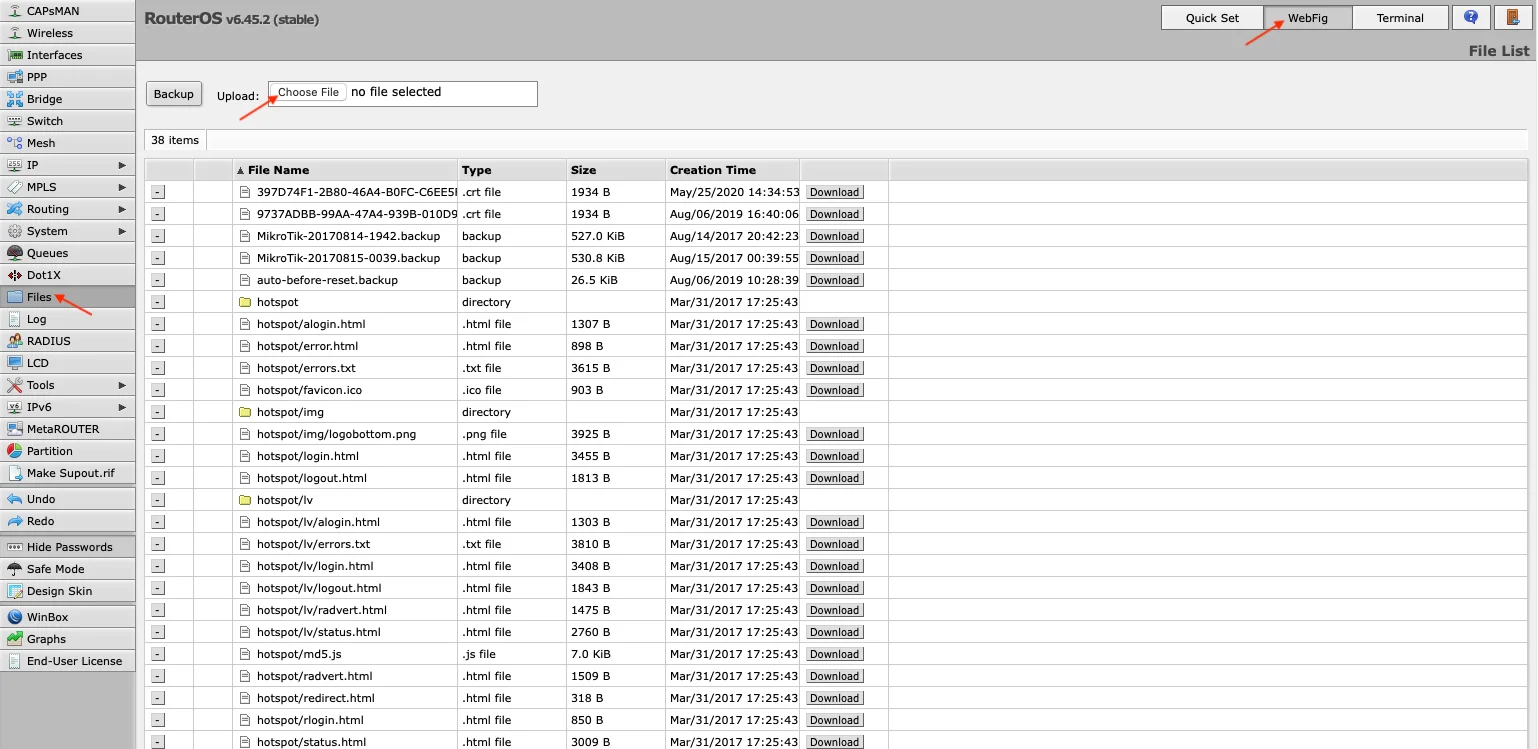
- Import your certificate via System > Certificates > Import. In the drop down menu opposite the Only File field choose the certificate you’ve just added, and click Import.

- Add a new profile on your Mikrotik router by navigating to IP > IPsec > Profiles > Add New. Fill out the fields of your new profile in the following way:
- Name: Enter a custom name of your new VPN profile
- Hash Algorithms: sha512
- Encryption Algorithm: aes-256
- DH Group: modp3072
- Proposal Check: obey
- Lifetime: Leave the default 1d 00:00:00
- DPD Interval: 120
- DPD Maximum Failures: 5
Click Apply > OK.

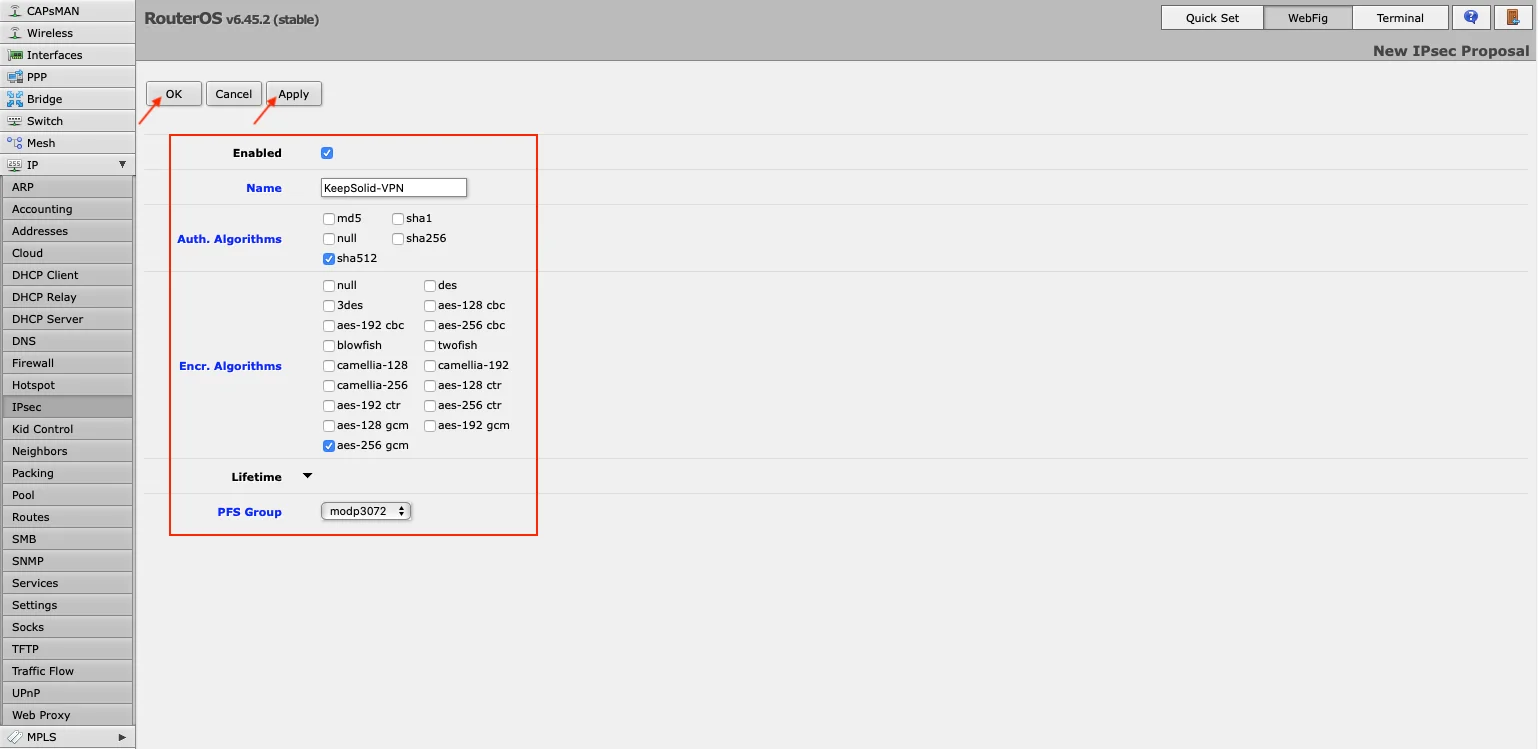
- On the same IPsec screen, go to the Proposals tab and click Add New. Complete the fields as shown below:
- Enabled: The box should be checked
- Name: Enter a custom name, for example KeepSolid-VPN
- Auth. Algorithms: sha512
- Enc. Algorithms: aes-256 gcm
- PFS Group: modp3072
Click Apply > OK.
- Navigate to the Groups tab, press Add New, and enter name of the new group, for example KeepSolid, and click OK.
- Now you need to create an IPsec policy on your Mikrotik router. Go to the Policies tab and click Add New. Fill out the fields as shown below and click OK:
- Enabled: The box should be checked
- Src. Address: Leave the default 0.0.0.0/0
- Dst. Address: Leave the default 0.0.0.0/0
- Protocol: 255 (all)
- Template: Check the box
- Group: default (make sure it's the one you created in Step 6, in our case it is KeepSolid)
- Action: encrypt
- IPsec Protocols: esp
- Proposal: select the proposal you’ve created before, in our case it is KeepSolid-VPN.

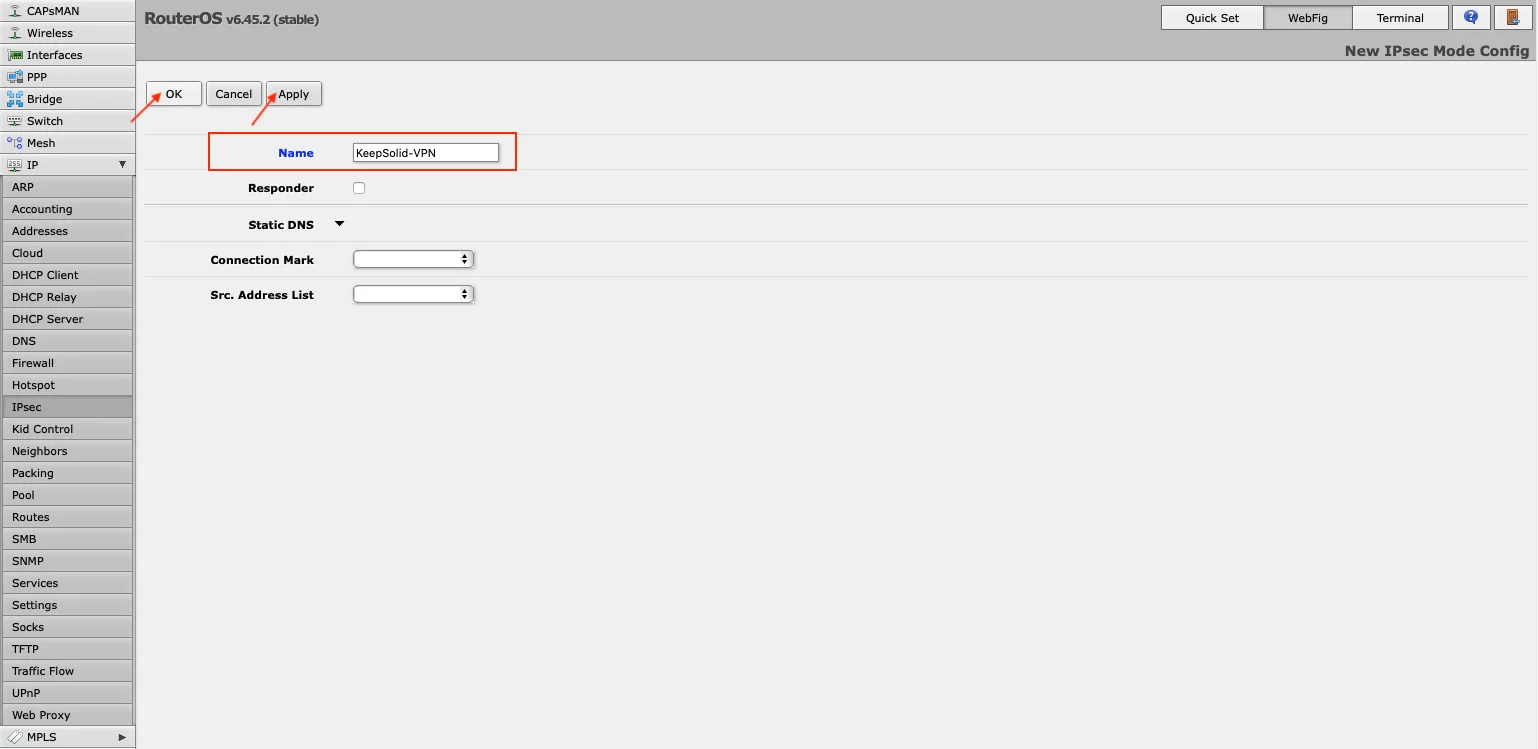
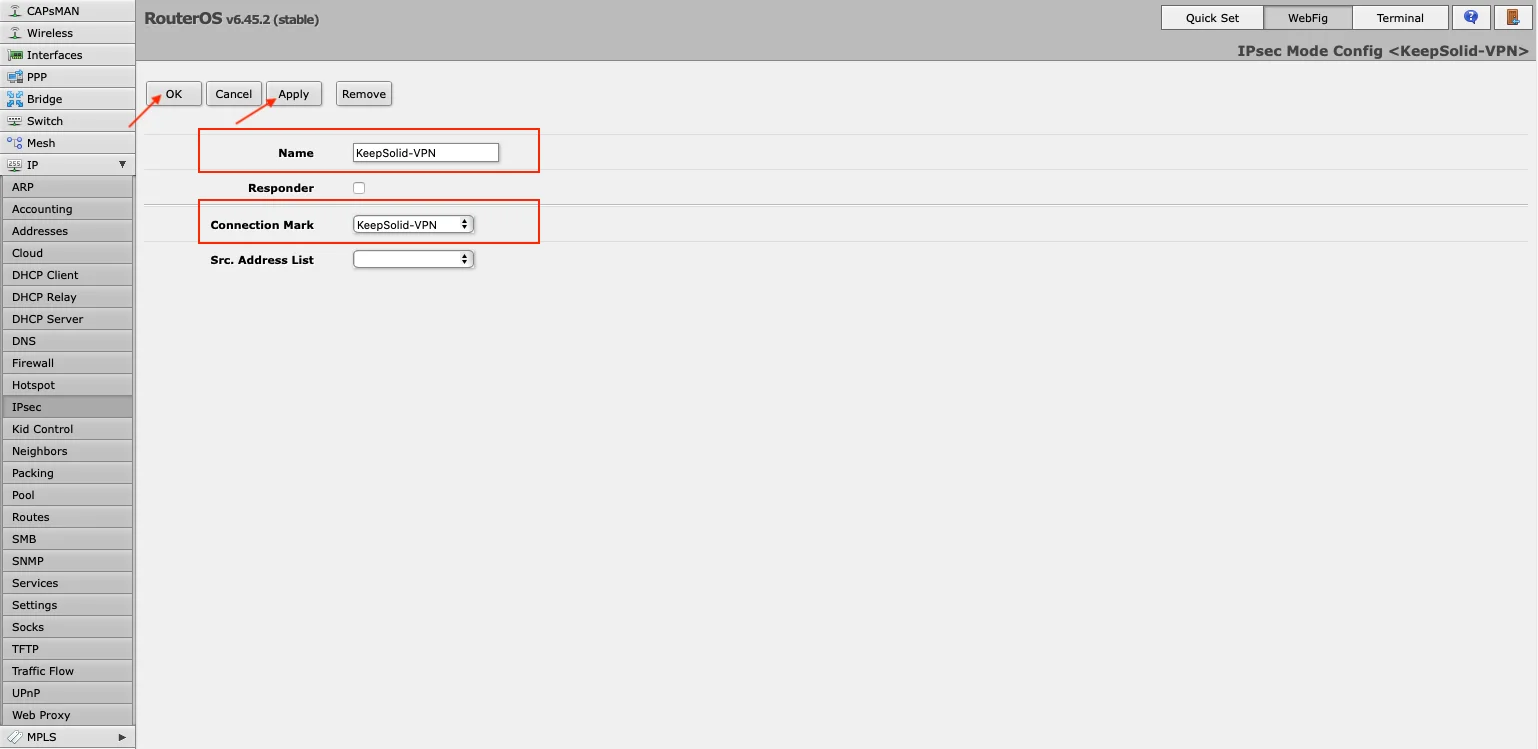
- Proceed to the Mode Configs tab in the same IPsec section and press Add New. Enter the name of the configuration and click Apply > OK.
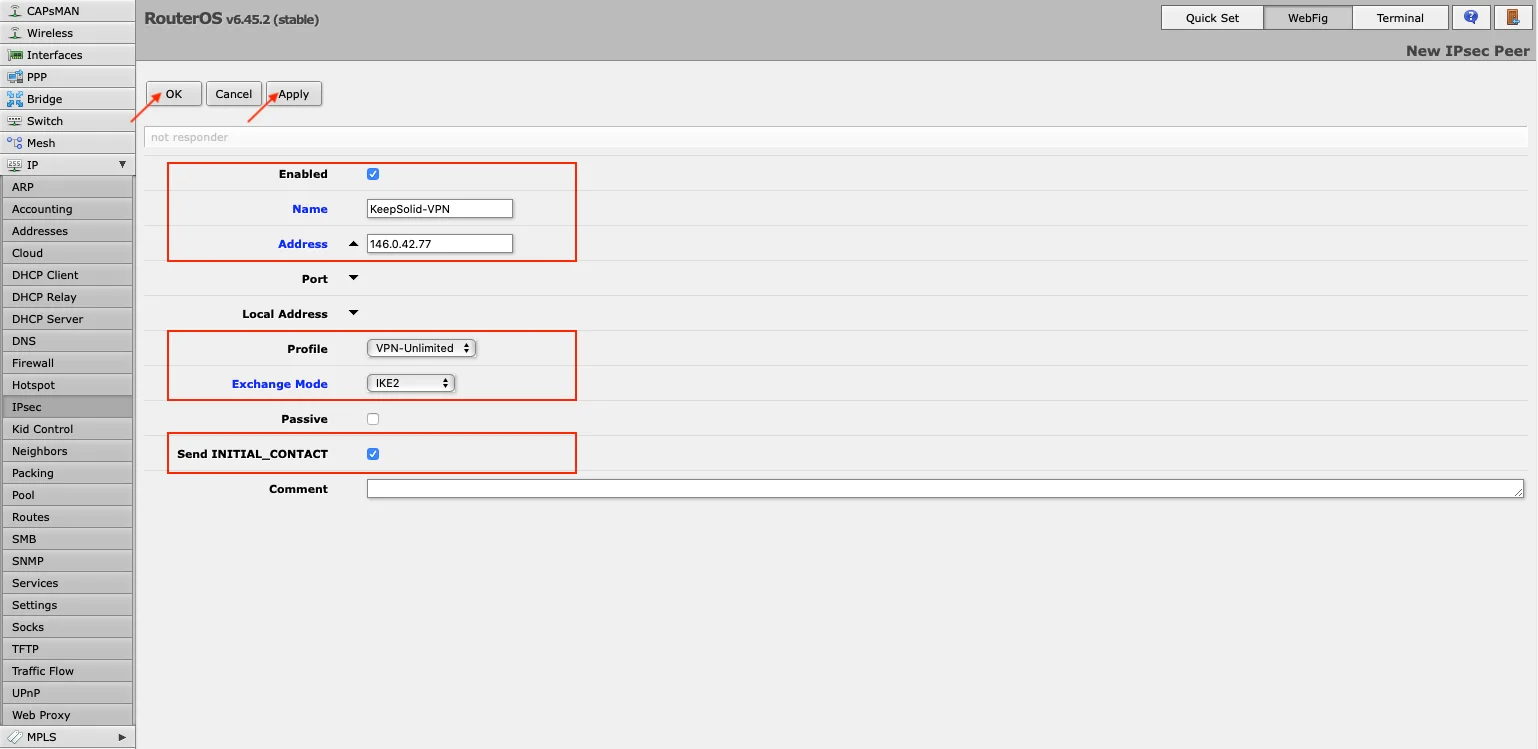
- Create an IPsec peer on the IPsec > Peers tab. Click Add New and provide the following details and click Apply > OK:
- Enabled: The box should be checked
- Address: Enter the IP address of the chosen VPN server (you can find it in the IPS field of the settings you’ve generated)
- Profile: Select the created profile, in our case it is VPN-Unlimited
- Exchange Mode: Choose IKE2
- Send INITIAL_CONTACT: The box should be checked.
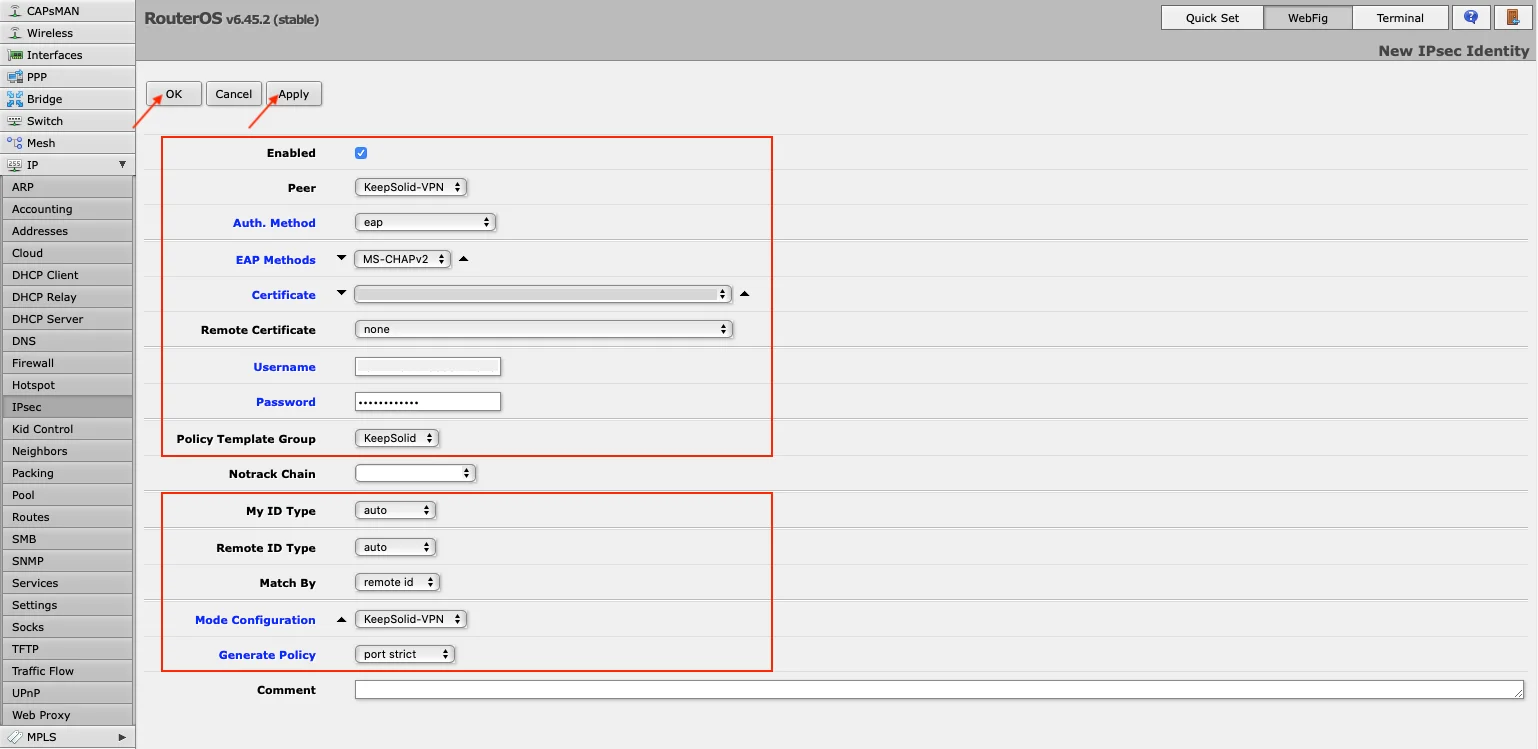
- On the IPsec > Identities tab, click Add New and fill out the fields as shown below:
- Enabled: The box should be checked
- Peer: Select the peer you’ve added, e.g. KeepSolid-VPN
- Auth. Method: eap
- EAP Methods: MS-CHAPv2
- Certificate: Choose the IKEv2 certificate you’ve loaded before
- Remote certificate: none
- Username: Enter the information from the Login field of the generated manual VPN configurations
- Password: Enter the password from the manual configurations
- Policy Template Group: Select the policy you’ve created, in our example it is KeepSolid
- My ID Type: auto
- Remote ID Type: auto
- Match By: remote id
- Mode Configuration: Choose the name of the configuration you’ve added in step 8
- Generate Policy: port strict
Click Apply > OK.
- You can check the established connections on Active Peers and Installed SAs tabs of IPsec section.
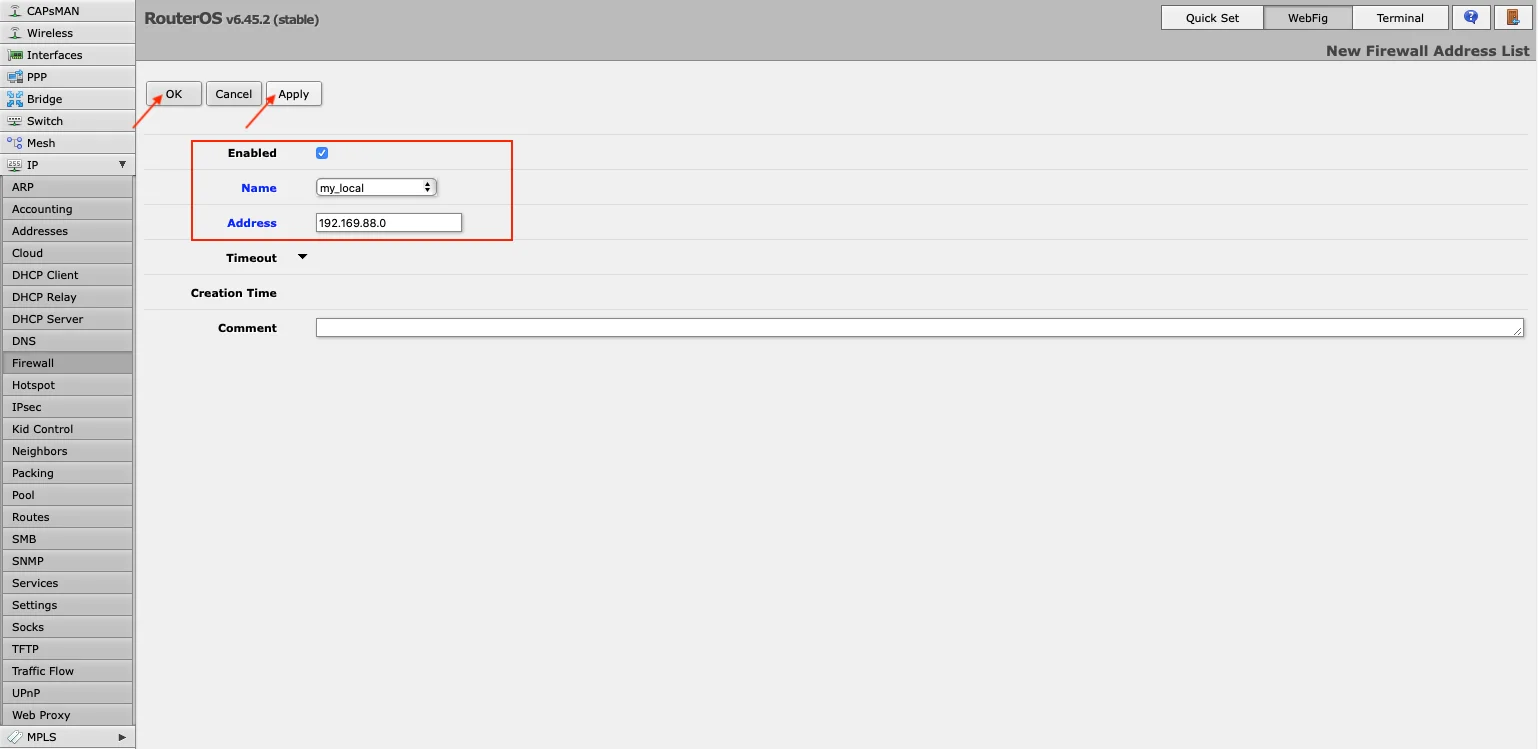
To send all traffic to the tunnel, you need to create address list with your local network. For this, navigate to Firewall > Address Lists and click Add New. In the Name field, choose your local network and type in its IP address and network prefix length in the Address field.
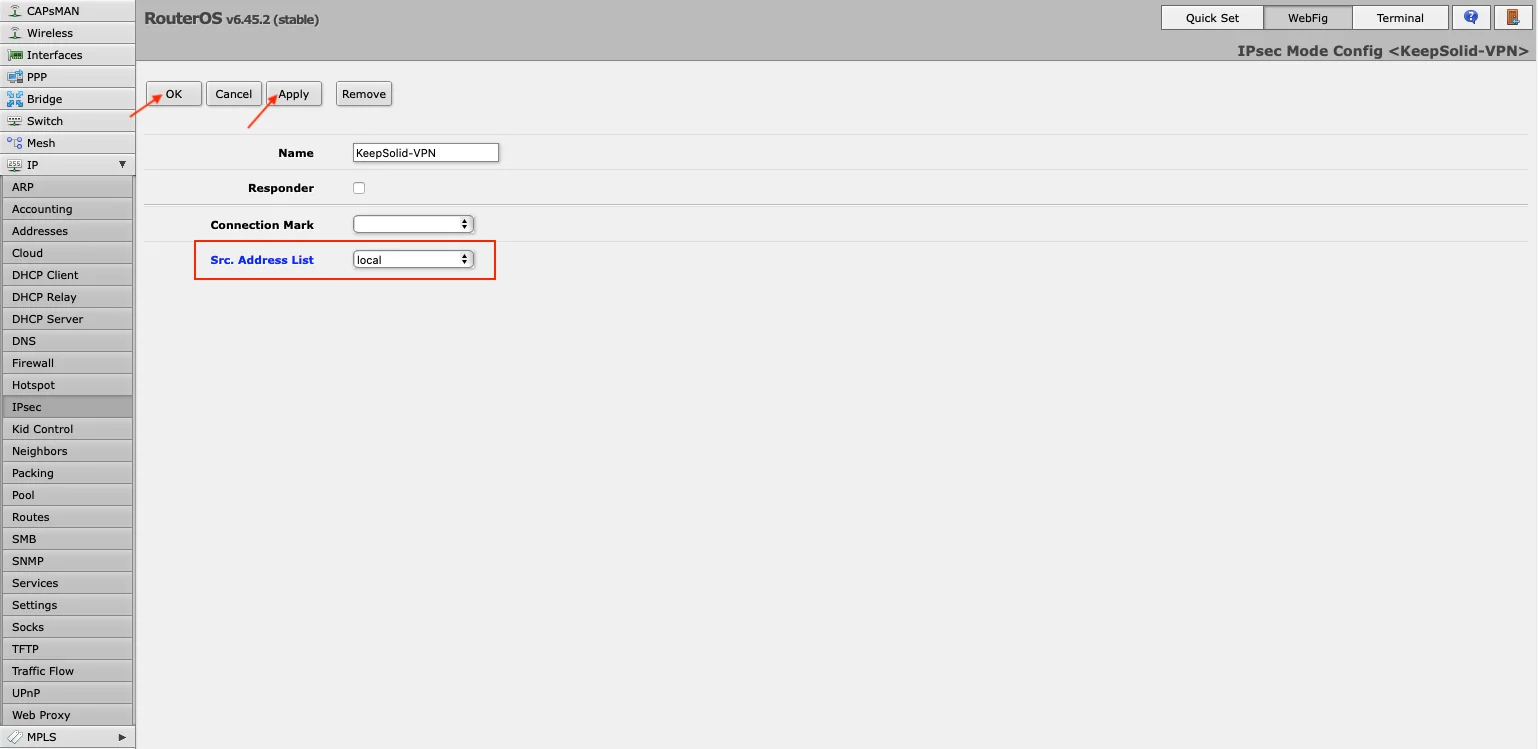
- Now you need to assign this list to your mode configuration. For this, go to IPsec > Mode Configs > KeepSolid-VPN, and select the list you’ve just created in the drop down menu in front of Src. Address List field.
Note: Don't forget to disable the FastTrack rule in Firewall > Filter Rules list.
III. How to send only needed traffic via the VPN tunnel
- Create connection-mark via IPsec > Mode Configs > Add/Edit.
- In Firewall > Address Lists, click Add New to include the required IP address in the address list.
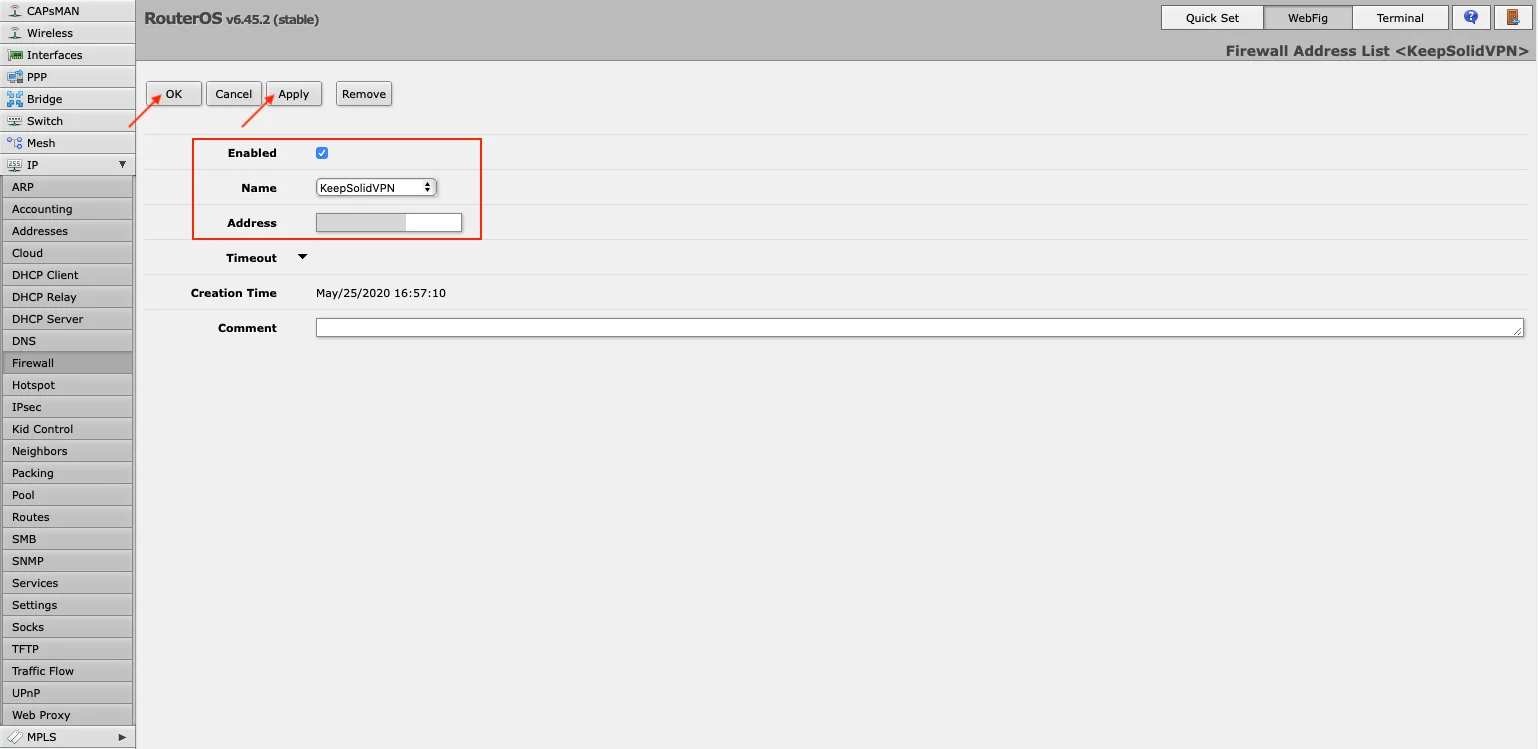
You can add a different IP address with the same Address List name.
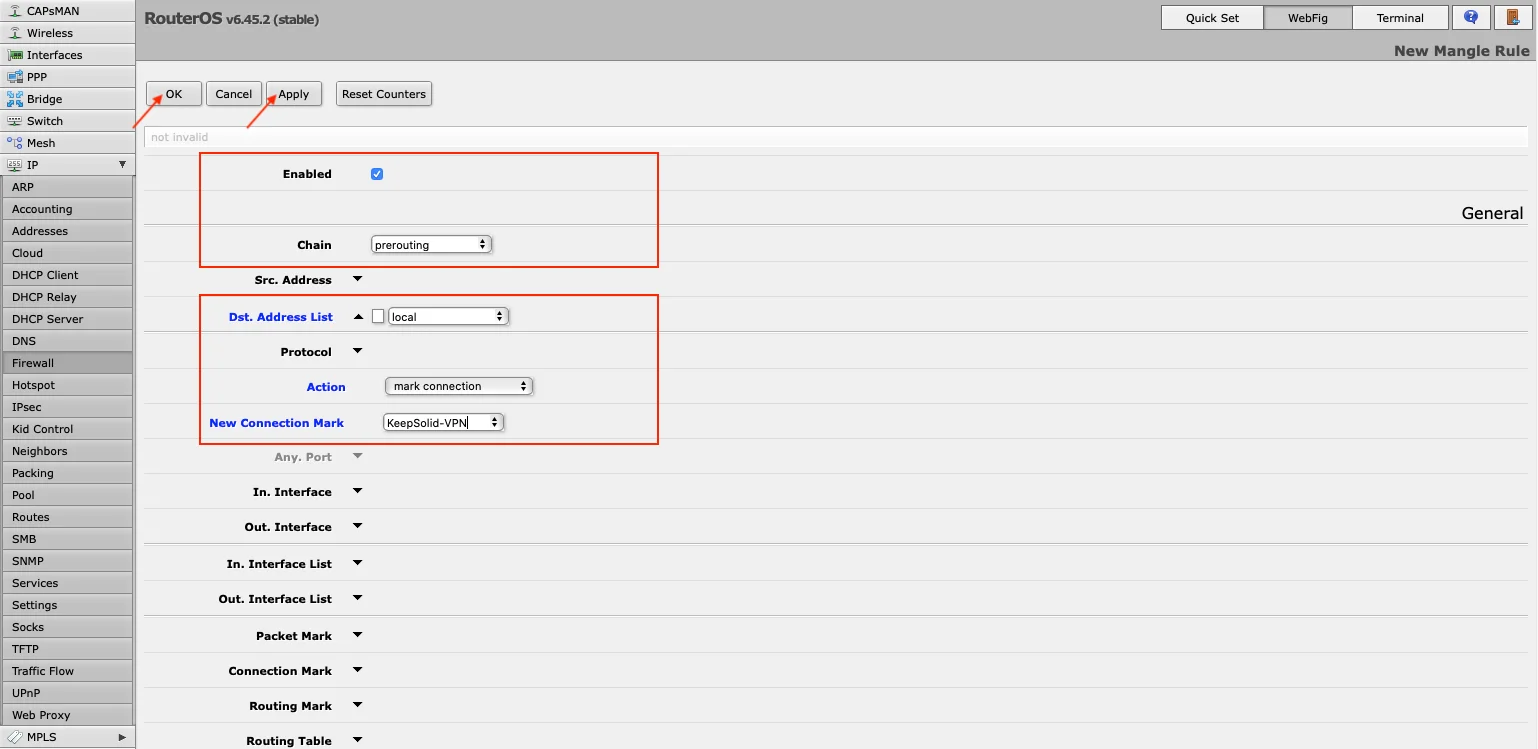
- Go to Firewall > Mangle to create mangle rule. Press Add New and make the following changes:
- Enabled: The box should be checked
- Chain: prerouting
- Dst. Address List: Choose the address list you’ve created
- Action: mark connection
- New Connection Mark: Select the connection-mark added in step 1
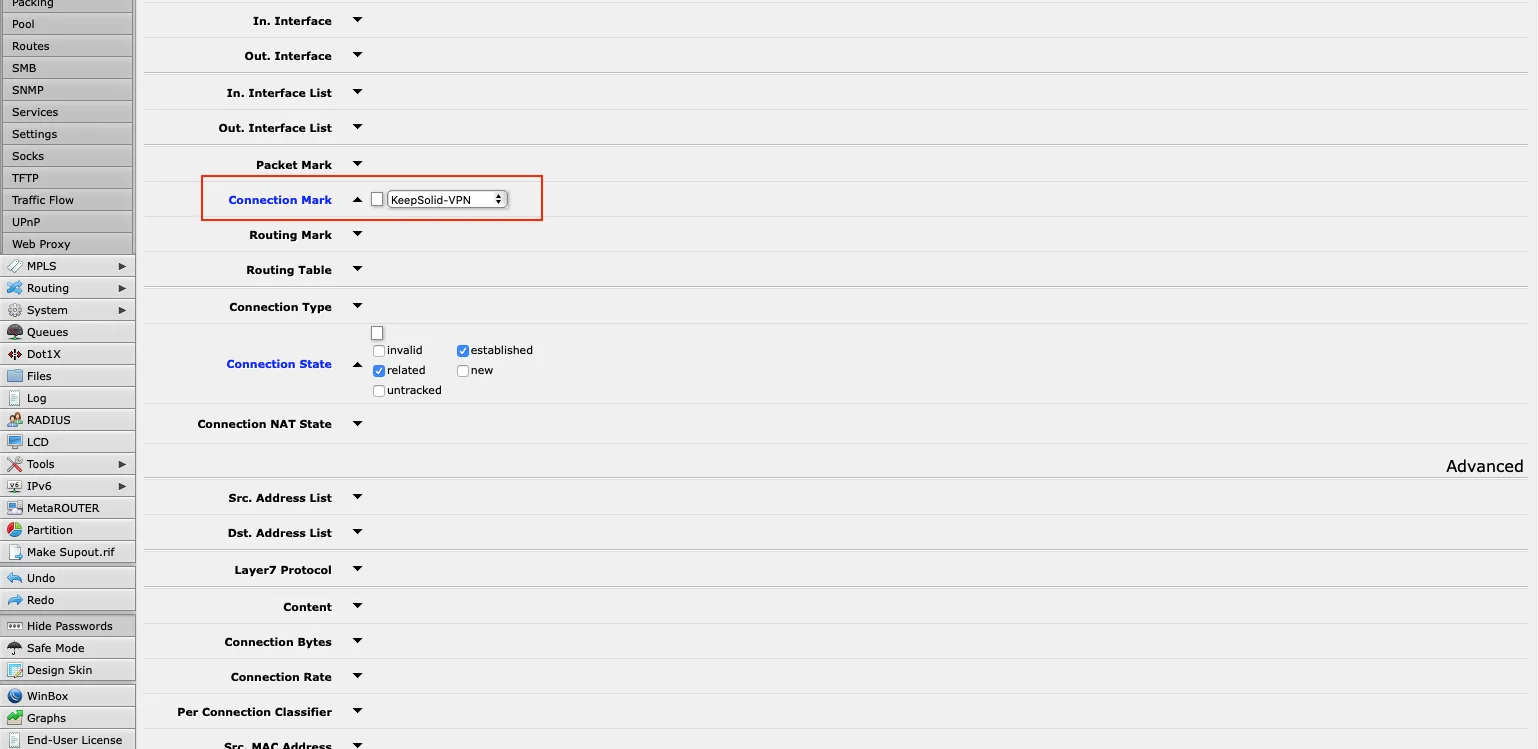
Note: If you have enabled FastTrack, you need to edit the rule. Choose your connection-mark in the relevant Connection Mark field and click OK.
That's it! You've successfully configured IKEv2 on Mikrotik router and can enjoy all the benefits of VPN Unlimited service and the fast and secure IKEv2 protocol.
We have tried to cover this topic as fully as possible. But if you have additional questions, feel free to contact us at [email protected].

Become invulnerable to cybercriminals, protect your sensitive data, and hide your real-life identity from any third parties with no hassle!


