OpenVPN & L2TP clients setup for routers with Padavan firmware
for VPN Unlimited users
How to Install VPN Unlimited on Different Platforms & Create KeepSolid ID
Detailed installation guides on different platforms:
- How to install VPN Unlimited on macOS 10.14 and higher (Standalone Version)
- How to install VPN Unlimited on macOS 10.14 and higher (App Store version)
- How to install and get started with VPN Unlimited on iOS
- How to install VPN Unlimited Application on Android
- How to install VPN Unlimited application on Windows XP SP3
- How to install VPN Unlimited Application on Windows 7
- How to set up VPN Unlimited Application on Windows 8/8.1
- How to Install and Get Started with VPN Unlimited App on Windows 10
- How to install VPN Unlimited on Linux
How to create a new KeepSolid ID
- After installing the VPN Unlimited app, you will see the line "Create KeepSolid ID", сlick on it to start the process.
- Enter your email address in the designated field.
- Create a password and enter it in the password field.
- Repeat your password in the provided field to confirm it.
- Check the box next to the statement "By continuing, you agree to our…".
- Tap the "Sign up" button to complete the registration.
Connecting to a VPN server for the first time, you will be requested to allow adding VPN configurations and downloading a VPN profile. For more details, please refer to the manuals provided above on how to install VPN Unlimited on different platforms.
This tutorial provides a detailed walkthrough on how to configure OpenVPN® and L2TP clients on your router flashed with Padavan firmware. To get more information about the OpenVPN protocol, check out our detailed article What is OpenVPN protocol. As well, we recommend you to check the article What is L2TP VPN protocol to learn more about its features and technical details.
Note: This guide no longer covers the configuration of L2TP without IPsec.
Xiaomi Mi-3 router with Padavan firmware 3.4.3.9-099 was taken as an example. How to setup VPN Unlimited for Padavan firmware? How to configure OpenVPN for Padavan firmware? Let’s check it out!
I. How to configure OpenVPN client for Padavan firmware
II. How to configure L2TP client on your Padavan router
III. Optional Kill Switch of our VPN for Padavan Firmware setup (for advanced users only)
I. How to configure OpenVPN client for Padavan firmware
- Before setting up VPN on your Padavan firmware router, you need to generate manual configuration files. This guide outlines a few simple steps on how to do it.
- Then, login to your Padavan router control panel. If you don’t know how to access your router control panel, check out our instruction on how to find your router IP.
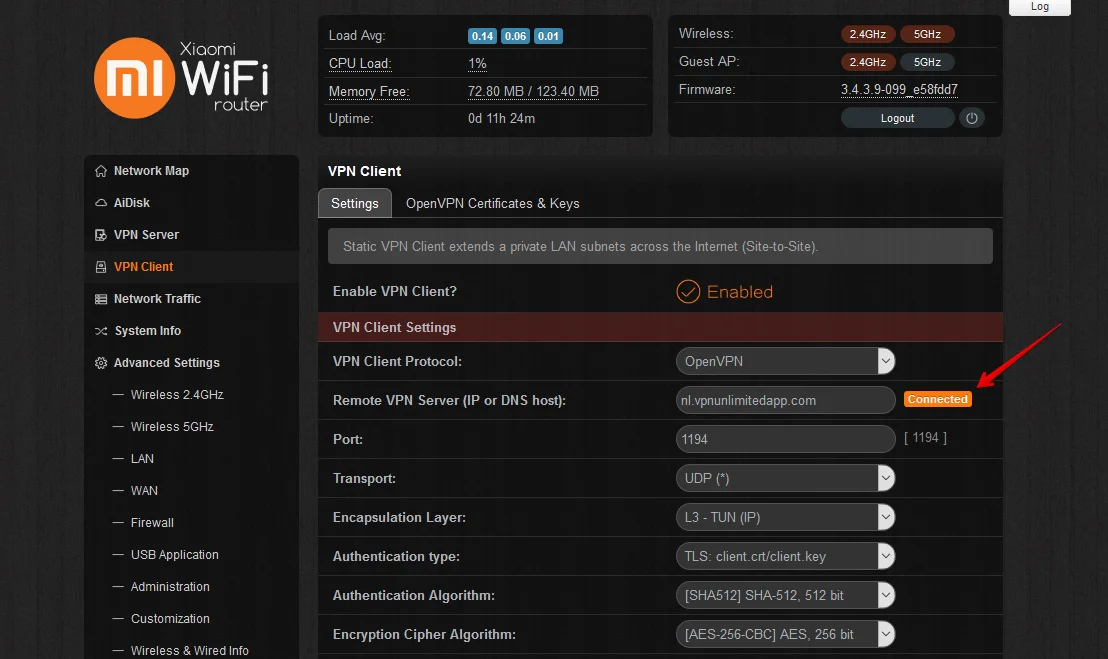
- Navigate to the VPN Client > Settings tab.
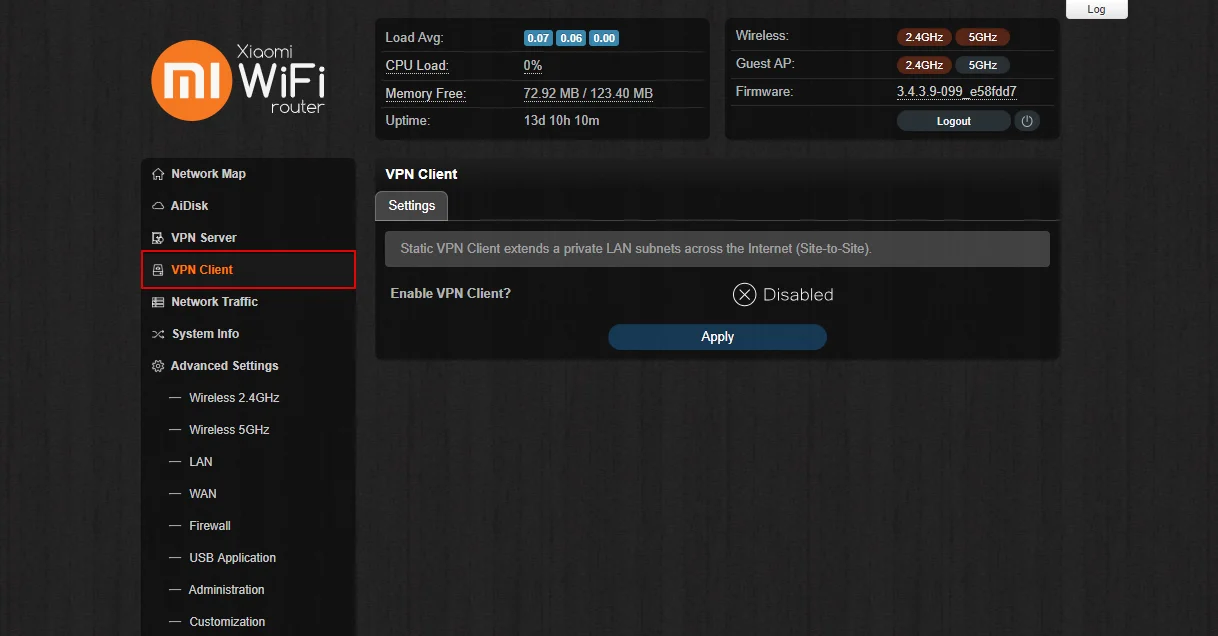
- Enable the VPN Client for Padavan firmware.
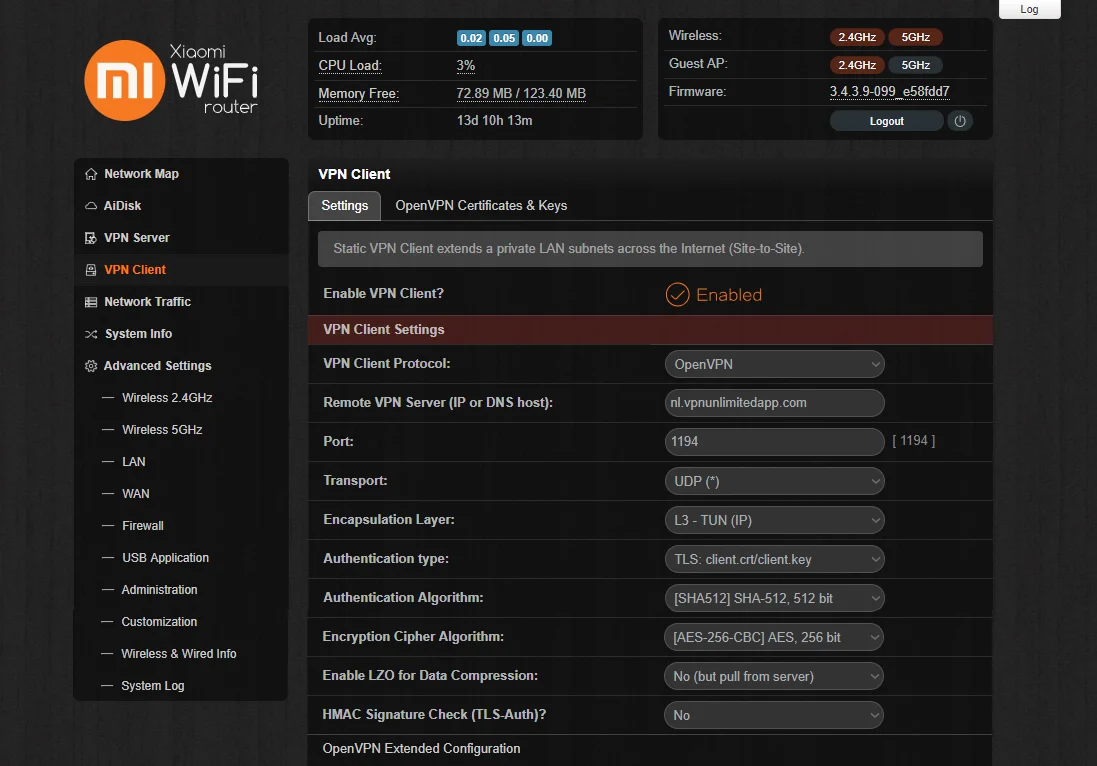
- Fill out the fields in the following way:
- VPN Client Protocol: OpenVPN
- Remote VPN Server (IP or DNS host): Specify a server domain name from the configuration settings you’ve generated
- Port: 1197
- Transport: UDP
- Encapsulation Layer: L3 – TUN (IP)
- Authentication type: TLS: client.crt/client.key
- Authentication Algorithm: [SHA512] SHA-512, 512 bit
- Encryption Cipher Algorithm: [AES-256-CBC] AES, 256 bit
- Enable LZO for Data Compression: No (but pull from server)
- HMAC Signature Check (TLS-Auth)? - No
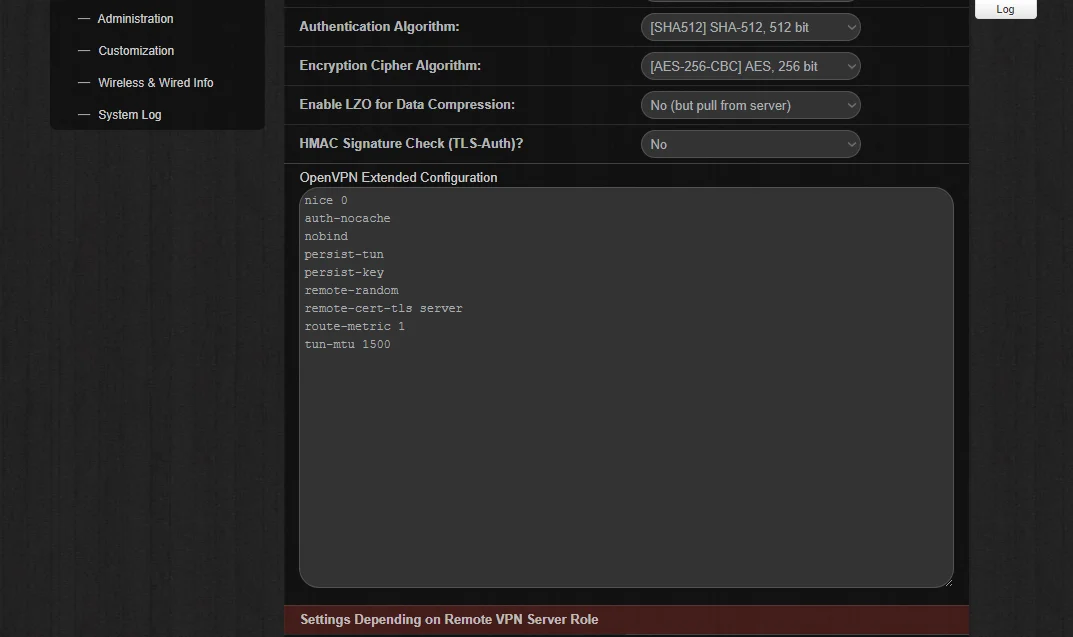
- Click OpenVPN Extended Configuration and paste the below settings:
nice 0
auth-nocache
nobind
persist-tun
persist-key
remote-random
remote-cert-tls server
route-metric 1
tun-mtu 1500
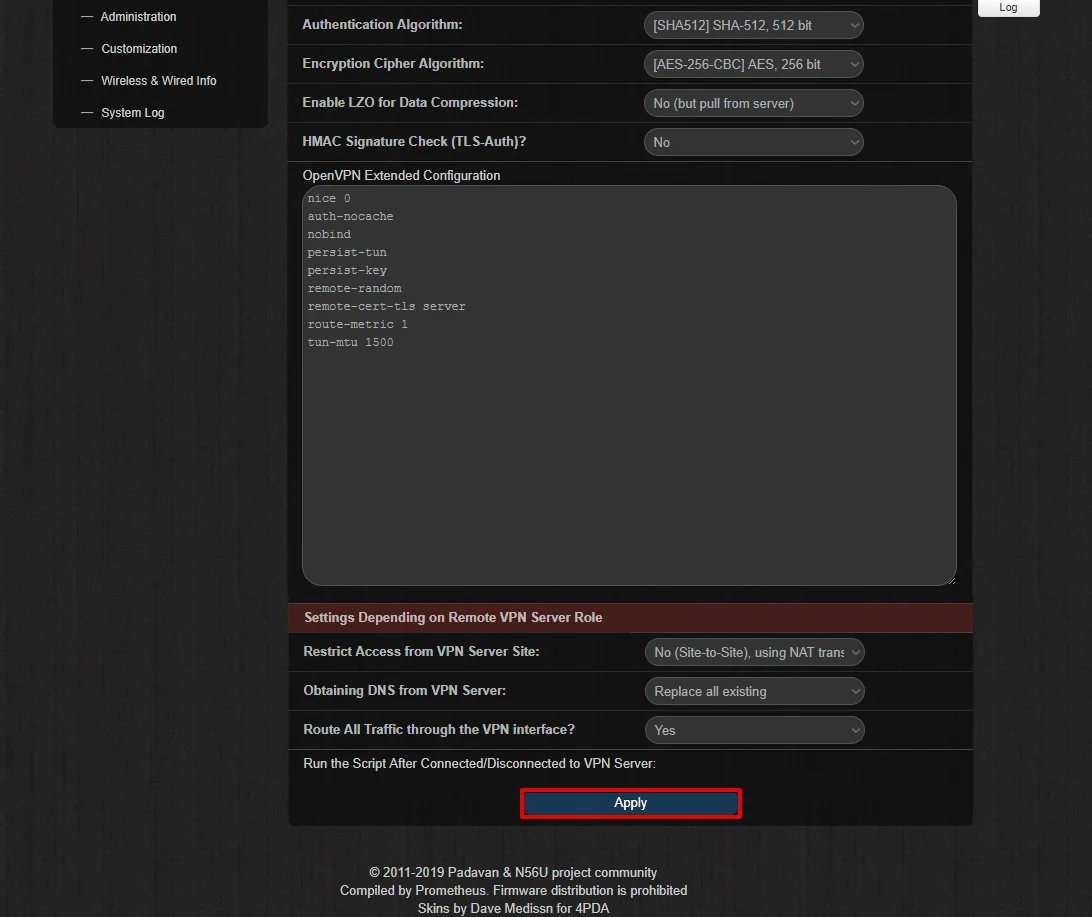
- In the section Settings Depending on Remove VPN Server Role choose the following options:
- Restrict Access from VPN Server Site: No (Site-to-Site), using NAT translation
- Obtaining DNS from VPN Server: Replace all existing
- Route All Traffic through the VPN interface? - Yes
- Click Apply.
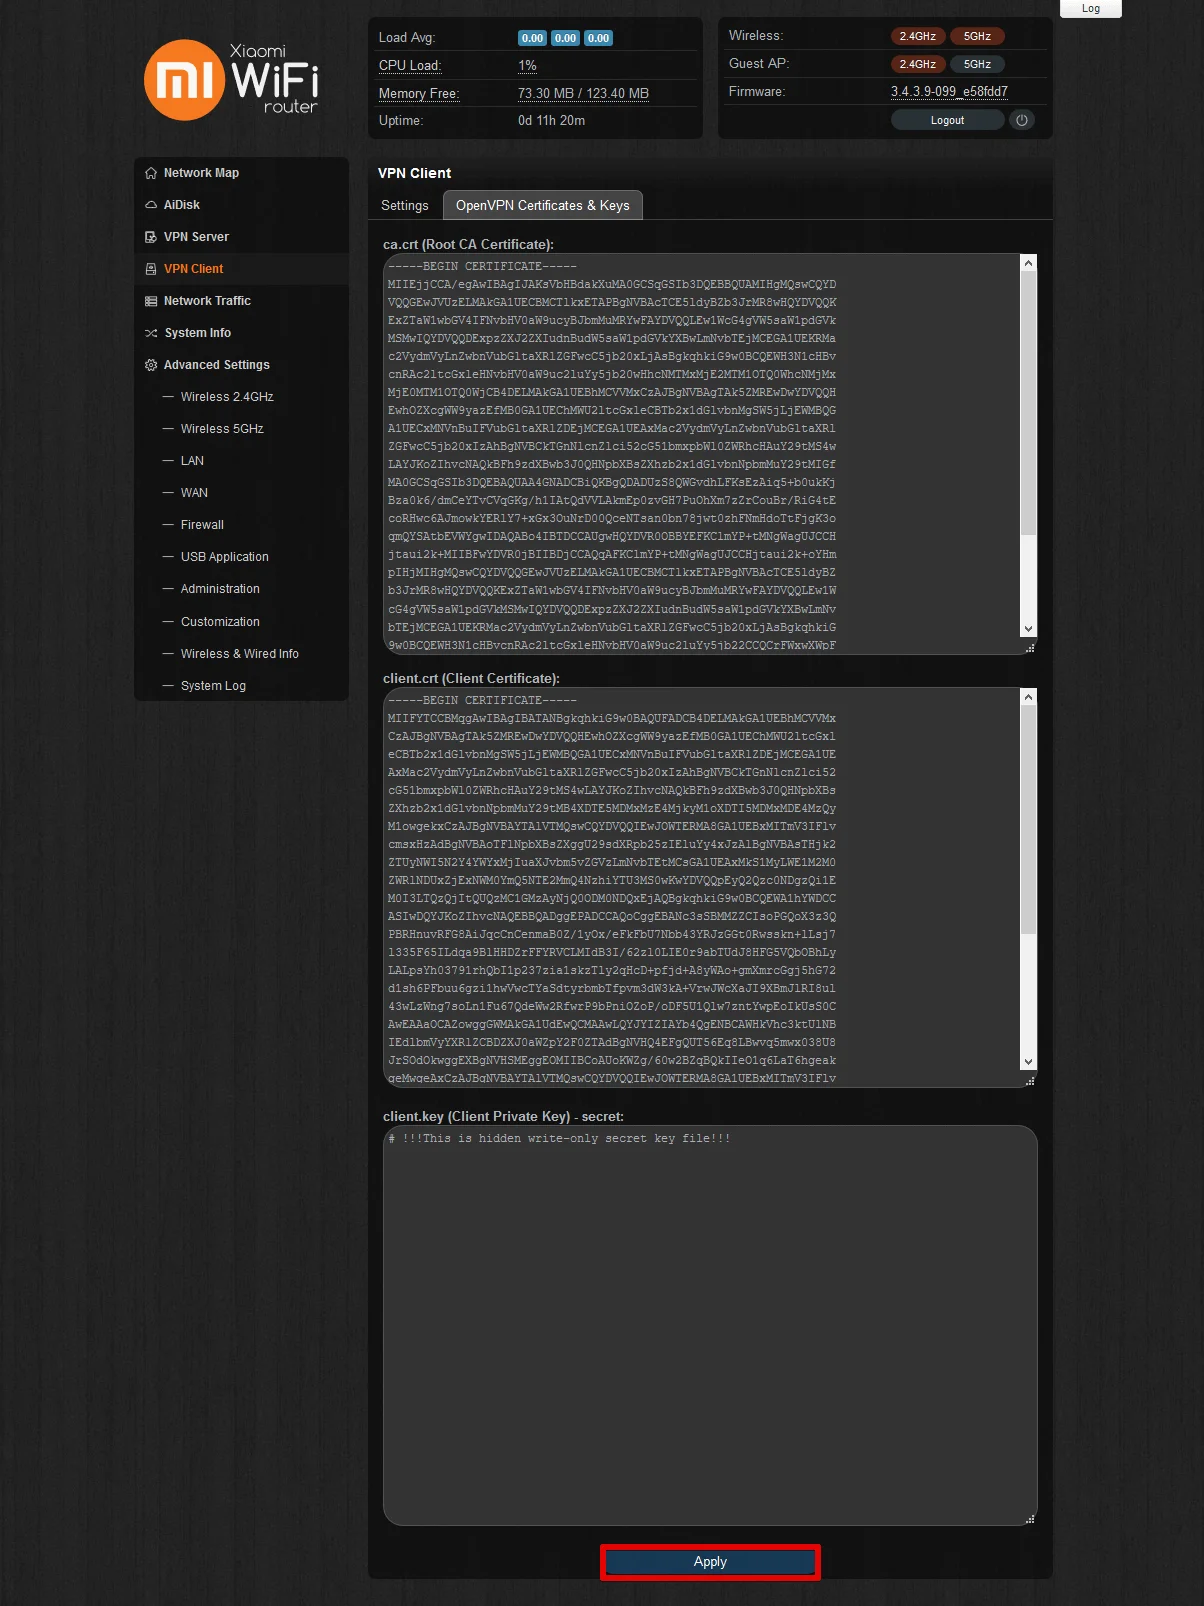
- Navigate to the OpenVPN Certificates & Keys tab for Padavan firmware. Here, you’ll need to enter the key and certificates from the generated .ovpn configuration file:
- ca.crt (Root CA Certificate): paste the strings between <ca> and </ca>, including -----BEGIN CERTIFICATE----- and -----BEGIN CERTIFICATE-----
- client.crt (Client Certificate): paste the strings between <cert> and </cert>, including -----BEGIN CERTIFICATE----- and -----BEGIN CERTIFICATE-----
- client.key (Client Private Key) - secret: paste the strings between <key> and </key>, including -----BEGIN CERTIFICATE----- and -----BEGIN CERTIFICATE-----
- Click Apply.
When the VPN connection for Padavan firmware is successfully established, you’ll see the Connected status on the Settings tab as shown below.
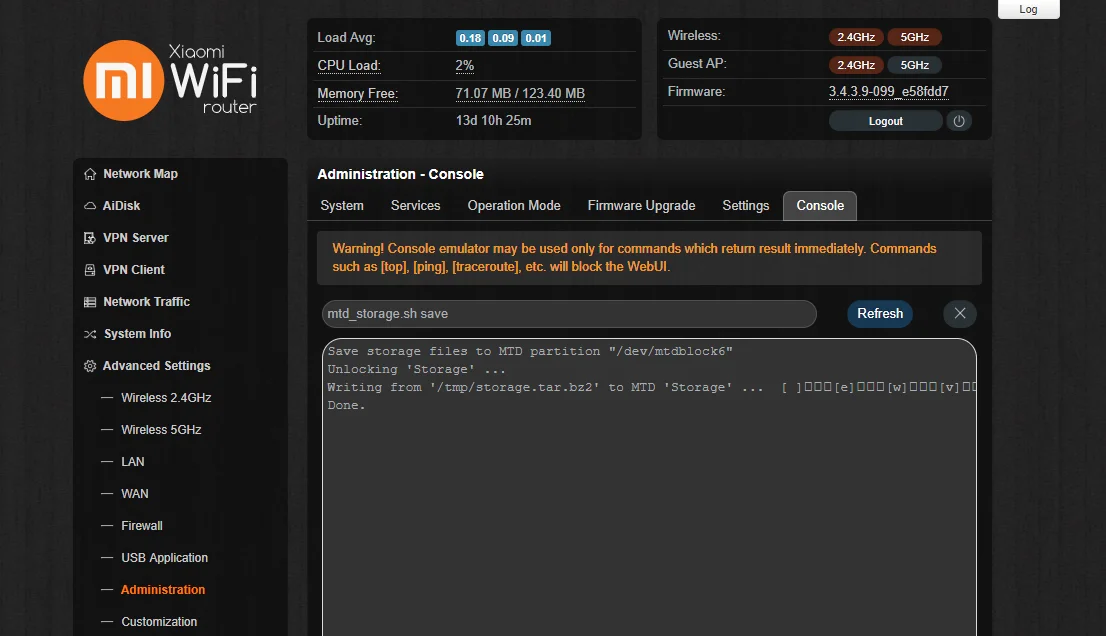
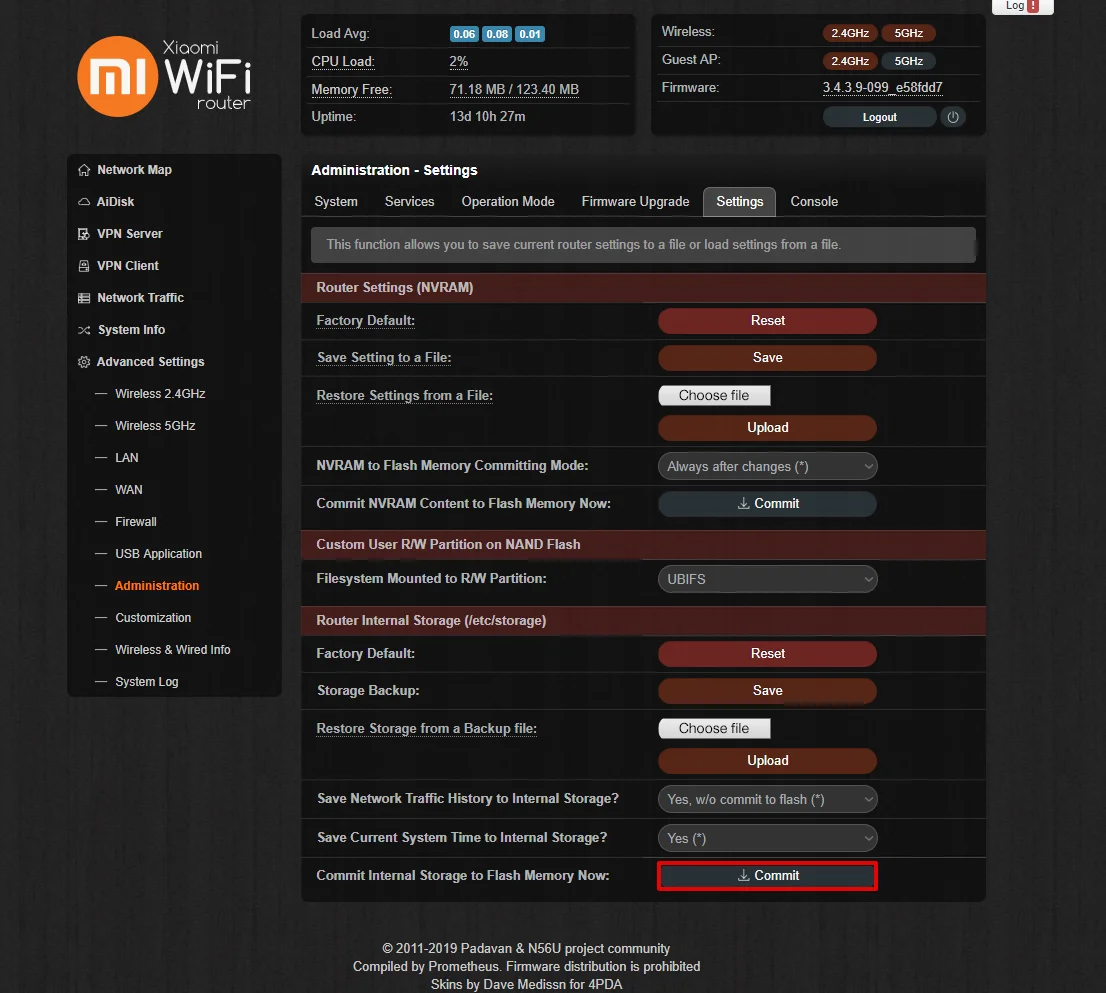
- After connecting to our service for Padavan firmware, you need to make your changes permanent. You can do this in three ways:
- In Administration > Console run the command mtd_storage.sh save.
- Go to Advanced Settings > Administration > Settings, navigate to Commit Internal Storage to Flash Memory Now at the bottom of the page and press Commit.
- Reboot your router by pressing Reboot to the right of Logout button.
II. How to configure L2TP client on your Padavan router
- Generate L2TP configurations in your KeepSolid User Office following this guide.
- Open the web interface of your router in a browser and login to the router control panel.
- In the side menu, go to VPN Client > Settings.
- Enable the VPN client for Padavan firmware and set up the L2TP connection filling out the fields in the following way:
- VPN Client Protocol: L2TP (w/o IPSec)
- Remote VPN Server (IP or DNS host): Paste the chosen server name from the manual configuration set you’ve generated in step 1
- Login: Enter the login from the configuration settings
- Password: Paste the password from the configuration settings
- Restrict Access from VPN Server Site: No (Site-to-Site), using NAT translation
- Obtaining DNS from VPN Server: Replace all existing
- Route All Traffic through the VPN interface? - Yes
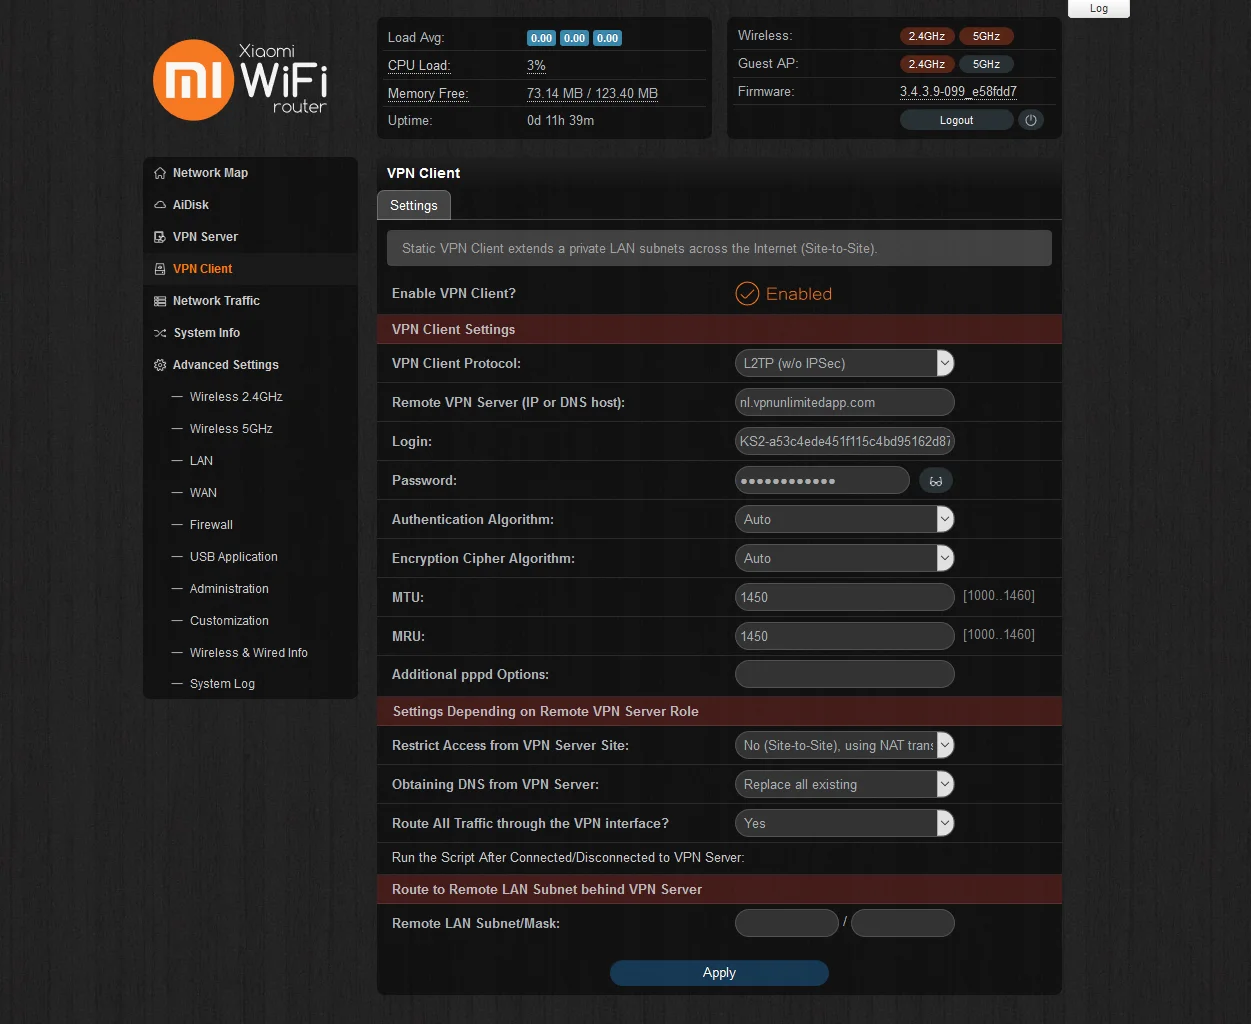
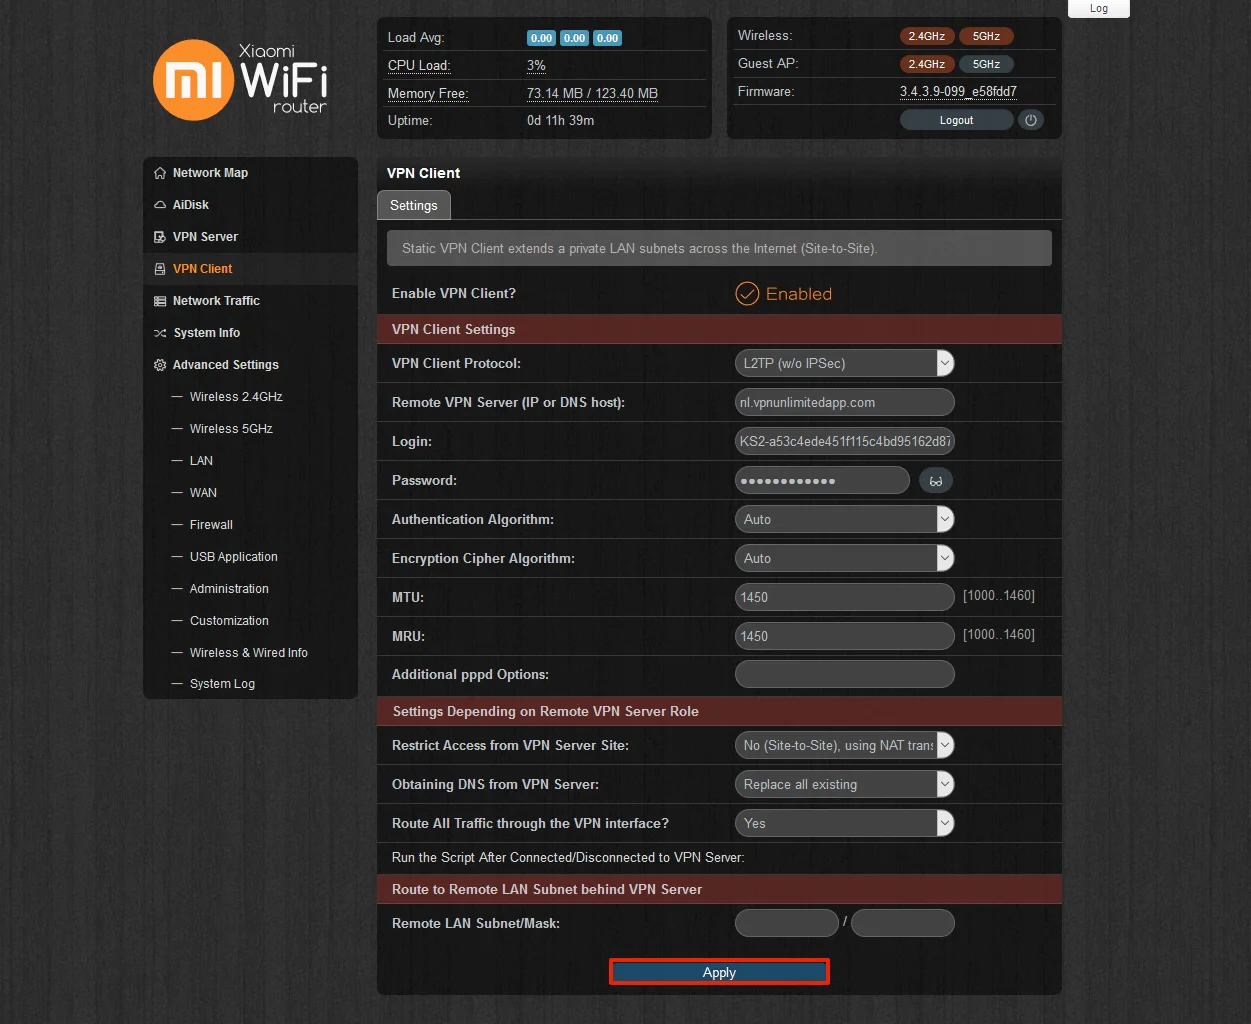
- Click Apply.
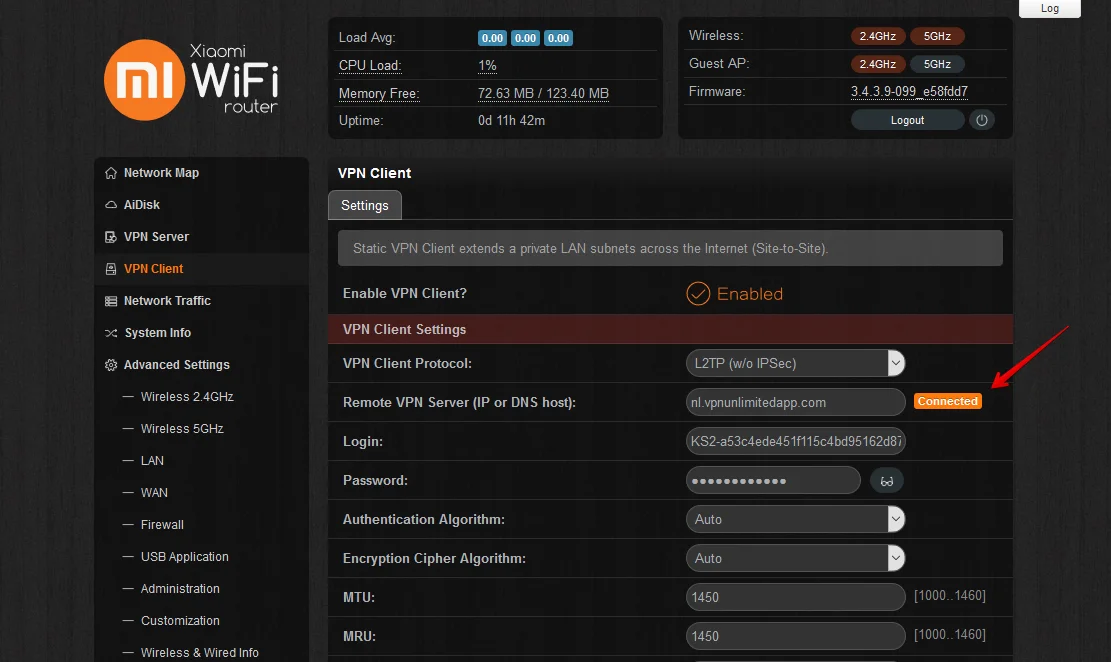
The VPN connection will be established and you’ll see the status Connected on the same Settings tab.
That’s it! You’ve successfully completed your Padavan firmware VPN client setup and have a running VPN connection on your router.
III. Optional Kill Switch of our VPN for Padavan Firmware setup (for advanced users only)
NOTE: Please make sure to configure Kill Switch correctly, otherwise you will lose internet connection on your router.
To set up Kill Switch and prevent traffic leakage in case of a sudden drop of a VPN connection, navigate to Run the Script After Connected/Disconnected to VPN Server on the VPN Client interface and paste the following:
#!/bin/sh


### Custom user script

### Called after internal VPN client connected/disconnected to remote VPN server

### $1        - action (up/down)

### $IFNAME   - tunnel interface name (e.g. ppp5 or tun0)

### $IPLOCAL  - tunnel local IP address

### $IPREMOTE - tunnel remote IP address

### $DNS1     - peer DNS1

### $DNS2     - peer DNS2


# private LAN subnet behind a remote server (example)

peer_lan="192.168.10.0"

peer_msk="255.255.255.0"


### example: add static route to private LAN subnet behind a remote server


func_ipup()

{

#  route add -net $peer_lan netmask $peer_msk gw $IPREMOTE dev $IFNAME

if iptables -C FORWARD -j REJECT; then

iptables -D FORWARD -j REJECT

fi return 0

}


func_ipdown()

{

#  route del -net $peer_lan netmask $peer_msk gw $IPREMOTE dev $IFNAME

if (! iptables -C FORWARD -j REJECT); then

iptables -I FORWARD -j REJECT

fi return 0

}


logger -t vpnc-script "$IFNAME $1"


case "$1" in

up)

  func_ipup

  ;;

down)

  func_ipdown

  ;;

esac

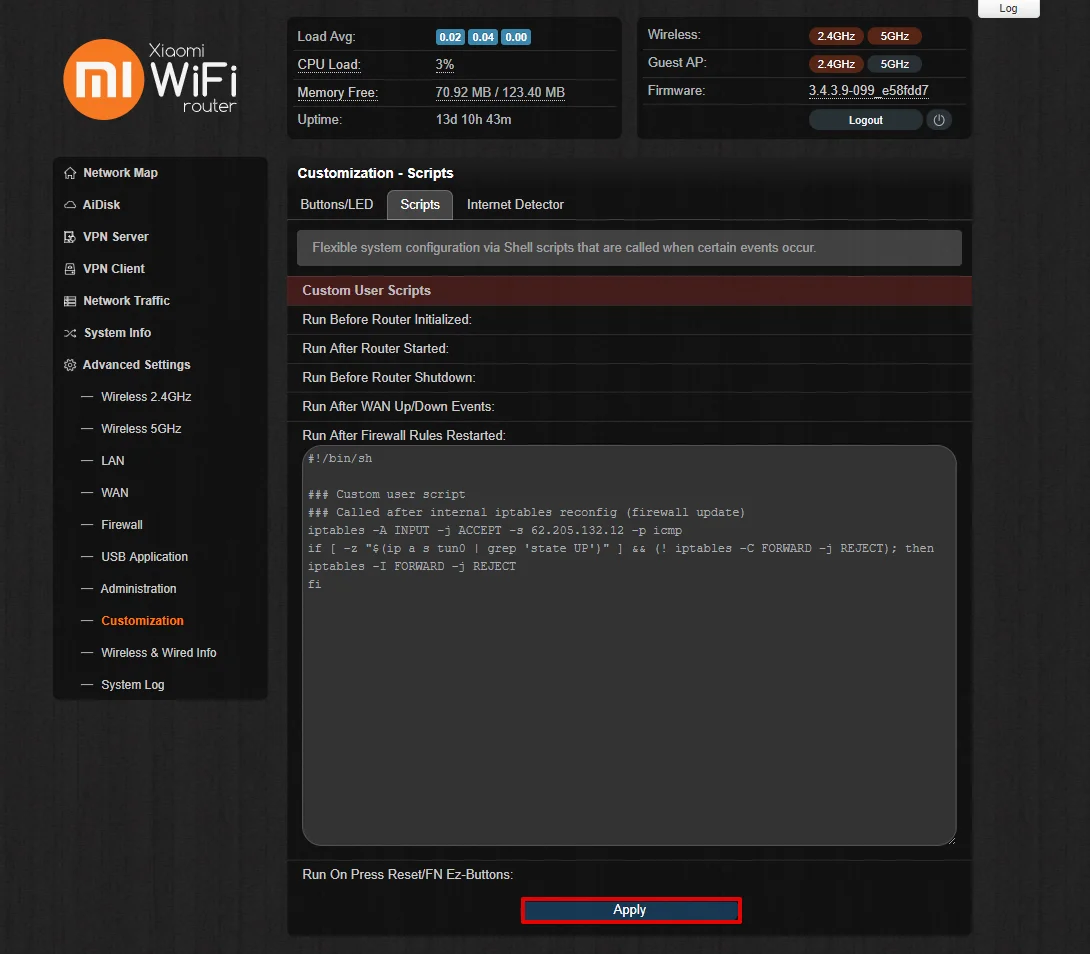
You should also block traffic until the tunnel is up. To do it, navigate to Advanced Settings > Customization > Scripts and paste the following lines in the Run After Firewall Rules Restarted field:
#!/bin/sh


### Custom user script

### Called after internal iptables reconfig (firewall update)

iptables -A INPUT -j ACCEPT -s 62.205.132.12 -p icmp

if [ -z "$(ip a s tun0 | grep 'state UP')" ] && (! iptables -C FORWARD -j REJECT); then

iptables -I FORWARD -j REJECT

fi
Once filled out, click Apply at the bottom of the page.
Need to configure other devices? Check our Manuals page where you can find the relevant guides, or don’t hesitate to contact our 24/7 customer support via [email protected].
“OpenVPN” is a registered trademark of OpenVPN Inc.

Select your perfect subscription plan and get additional 7 days of use for absolutely free!


